
Motion Studio Product Guide
Motion Studio is an online workbench for robot motion production and mocap data processing. In one interface, users can import motion assets, preview them in 3D, map human motion to robots, map motion between robots, edit poses, evaluate data, connect real-time data and export results.
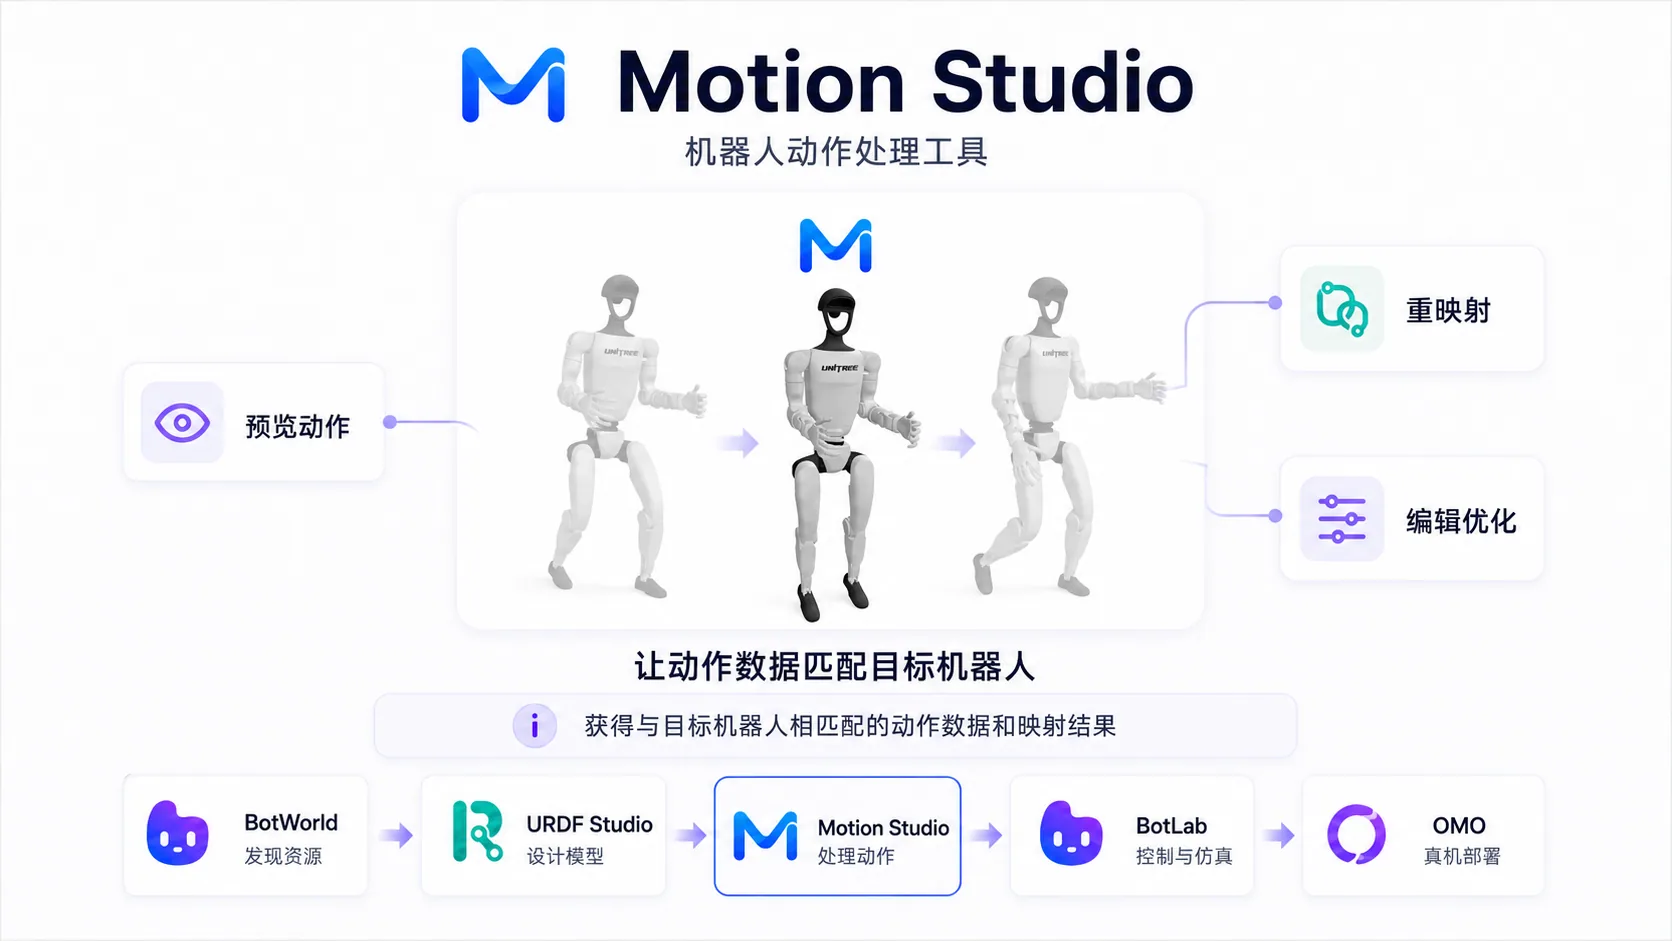
Typical users include robot algorithm engineers, mocap data operators, robot content creators and simulation testers.
| Stage | What the user needs to do |
|---|---|
| Before import | Prepare the robot model, motion file, scene asset or ZIP package. |
| After import | Confirm asset categories in the asset panel, then confirm format, data role and axes in the properties panel. |
| During processing | Preview the motion on the stage and timeline, then retarget or edit poses as needed. |
| Before delivery | Run data evaluation or interaction simulation checks, then export locally. |
Opening The Workbench
Open the workbench to confirm the product entry, default robot and basic tools. Import, preview, editing and export all happen inside this interface.
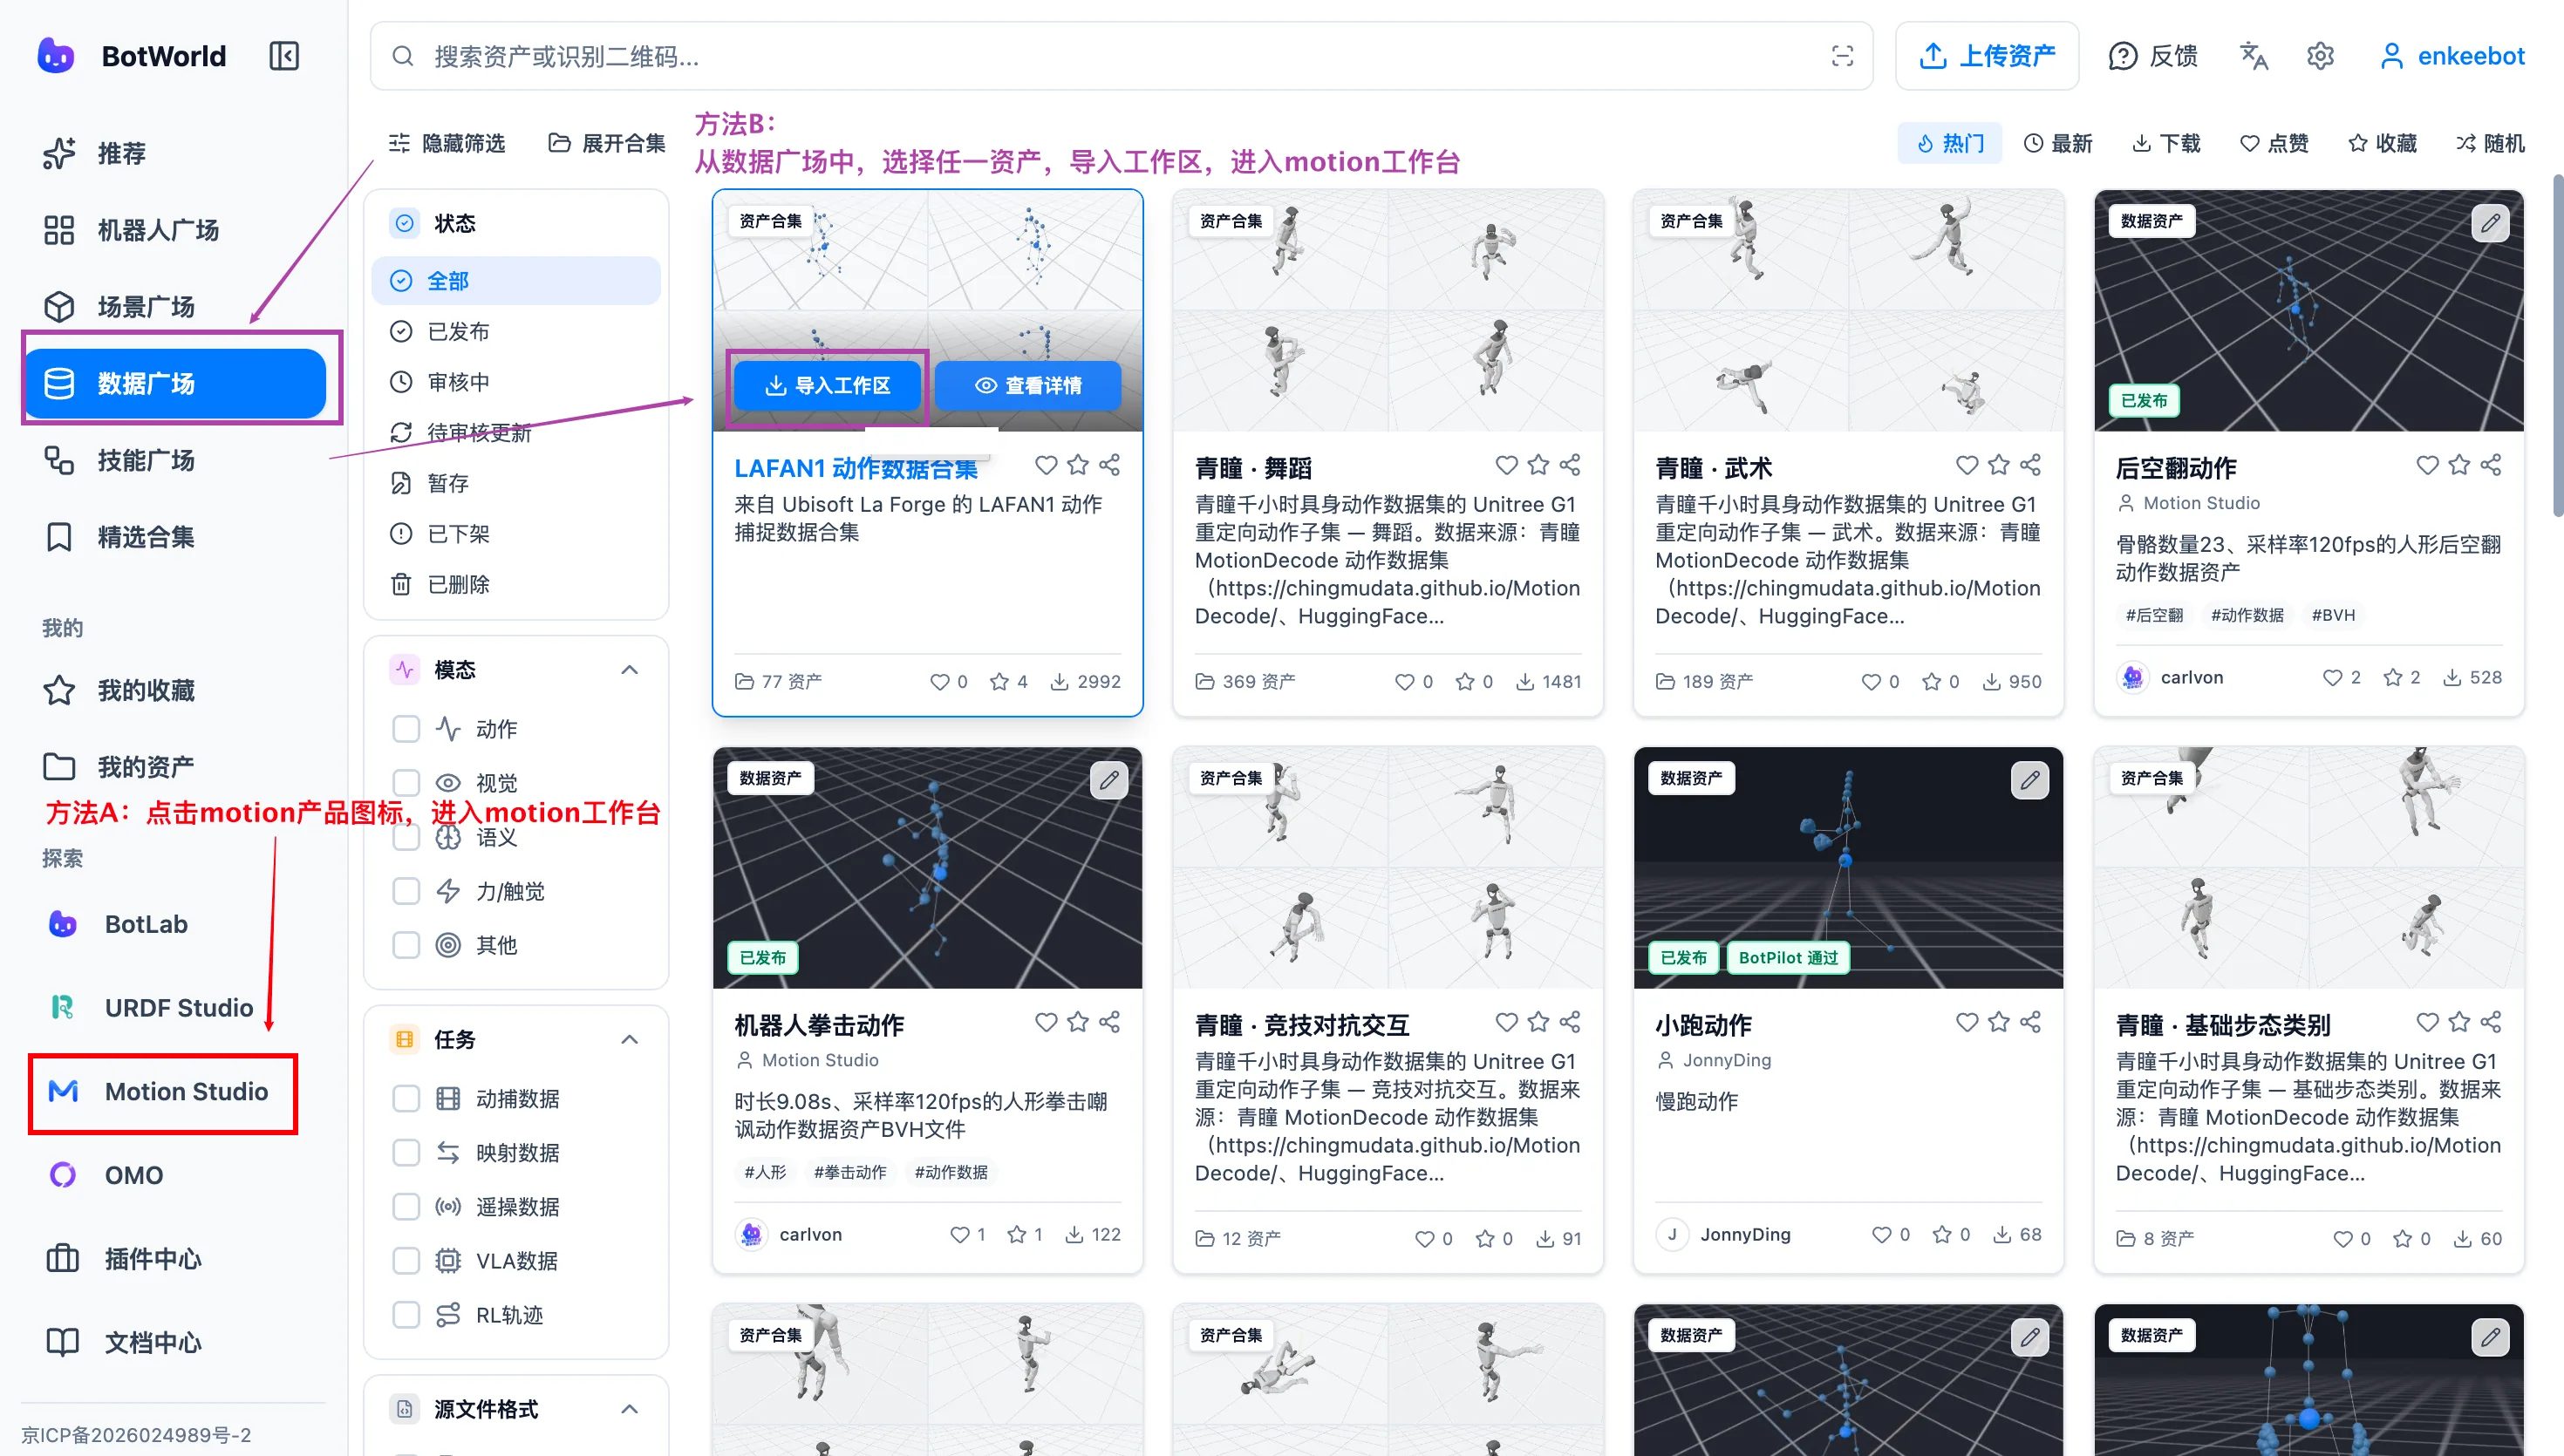
You can enter from BotWorld or visit the Motion Studio URL directly.
Enter From BotWorld
Enter Motion Studio from BotWorld.
Visit The Product URL
Visit https://motion.enkeebot.com/.
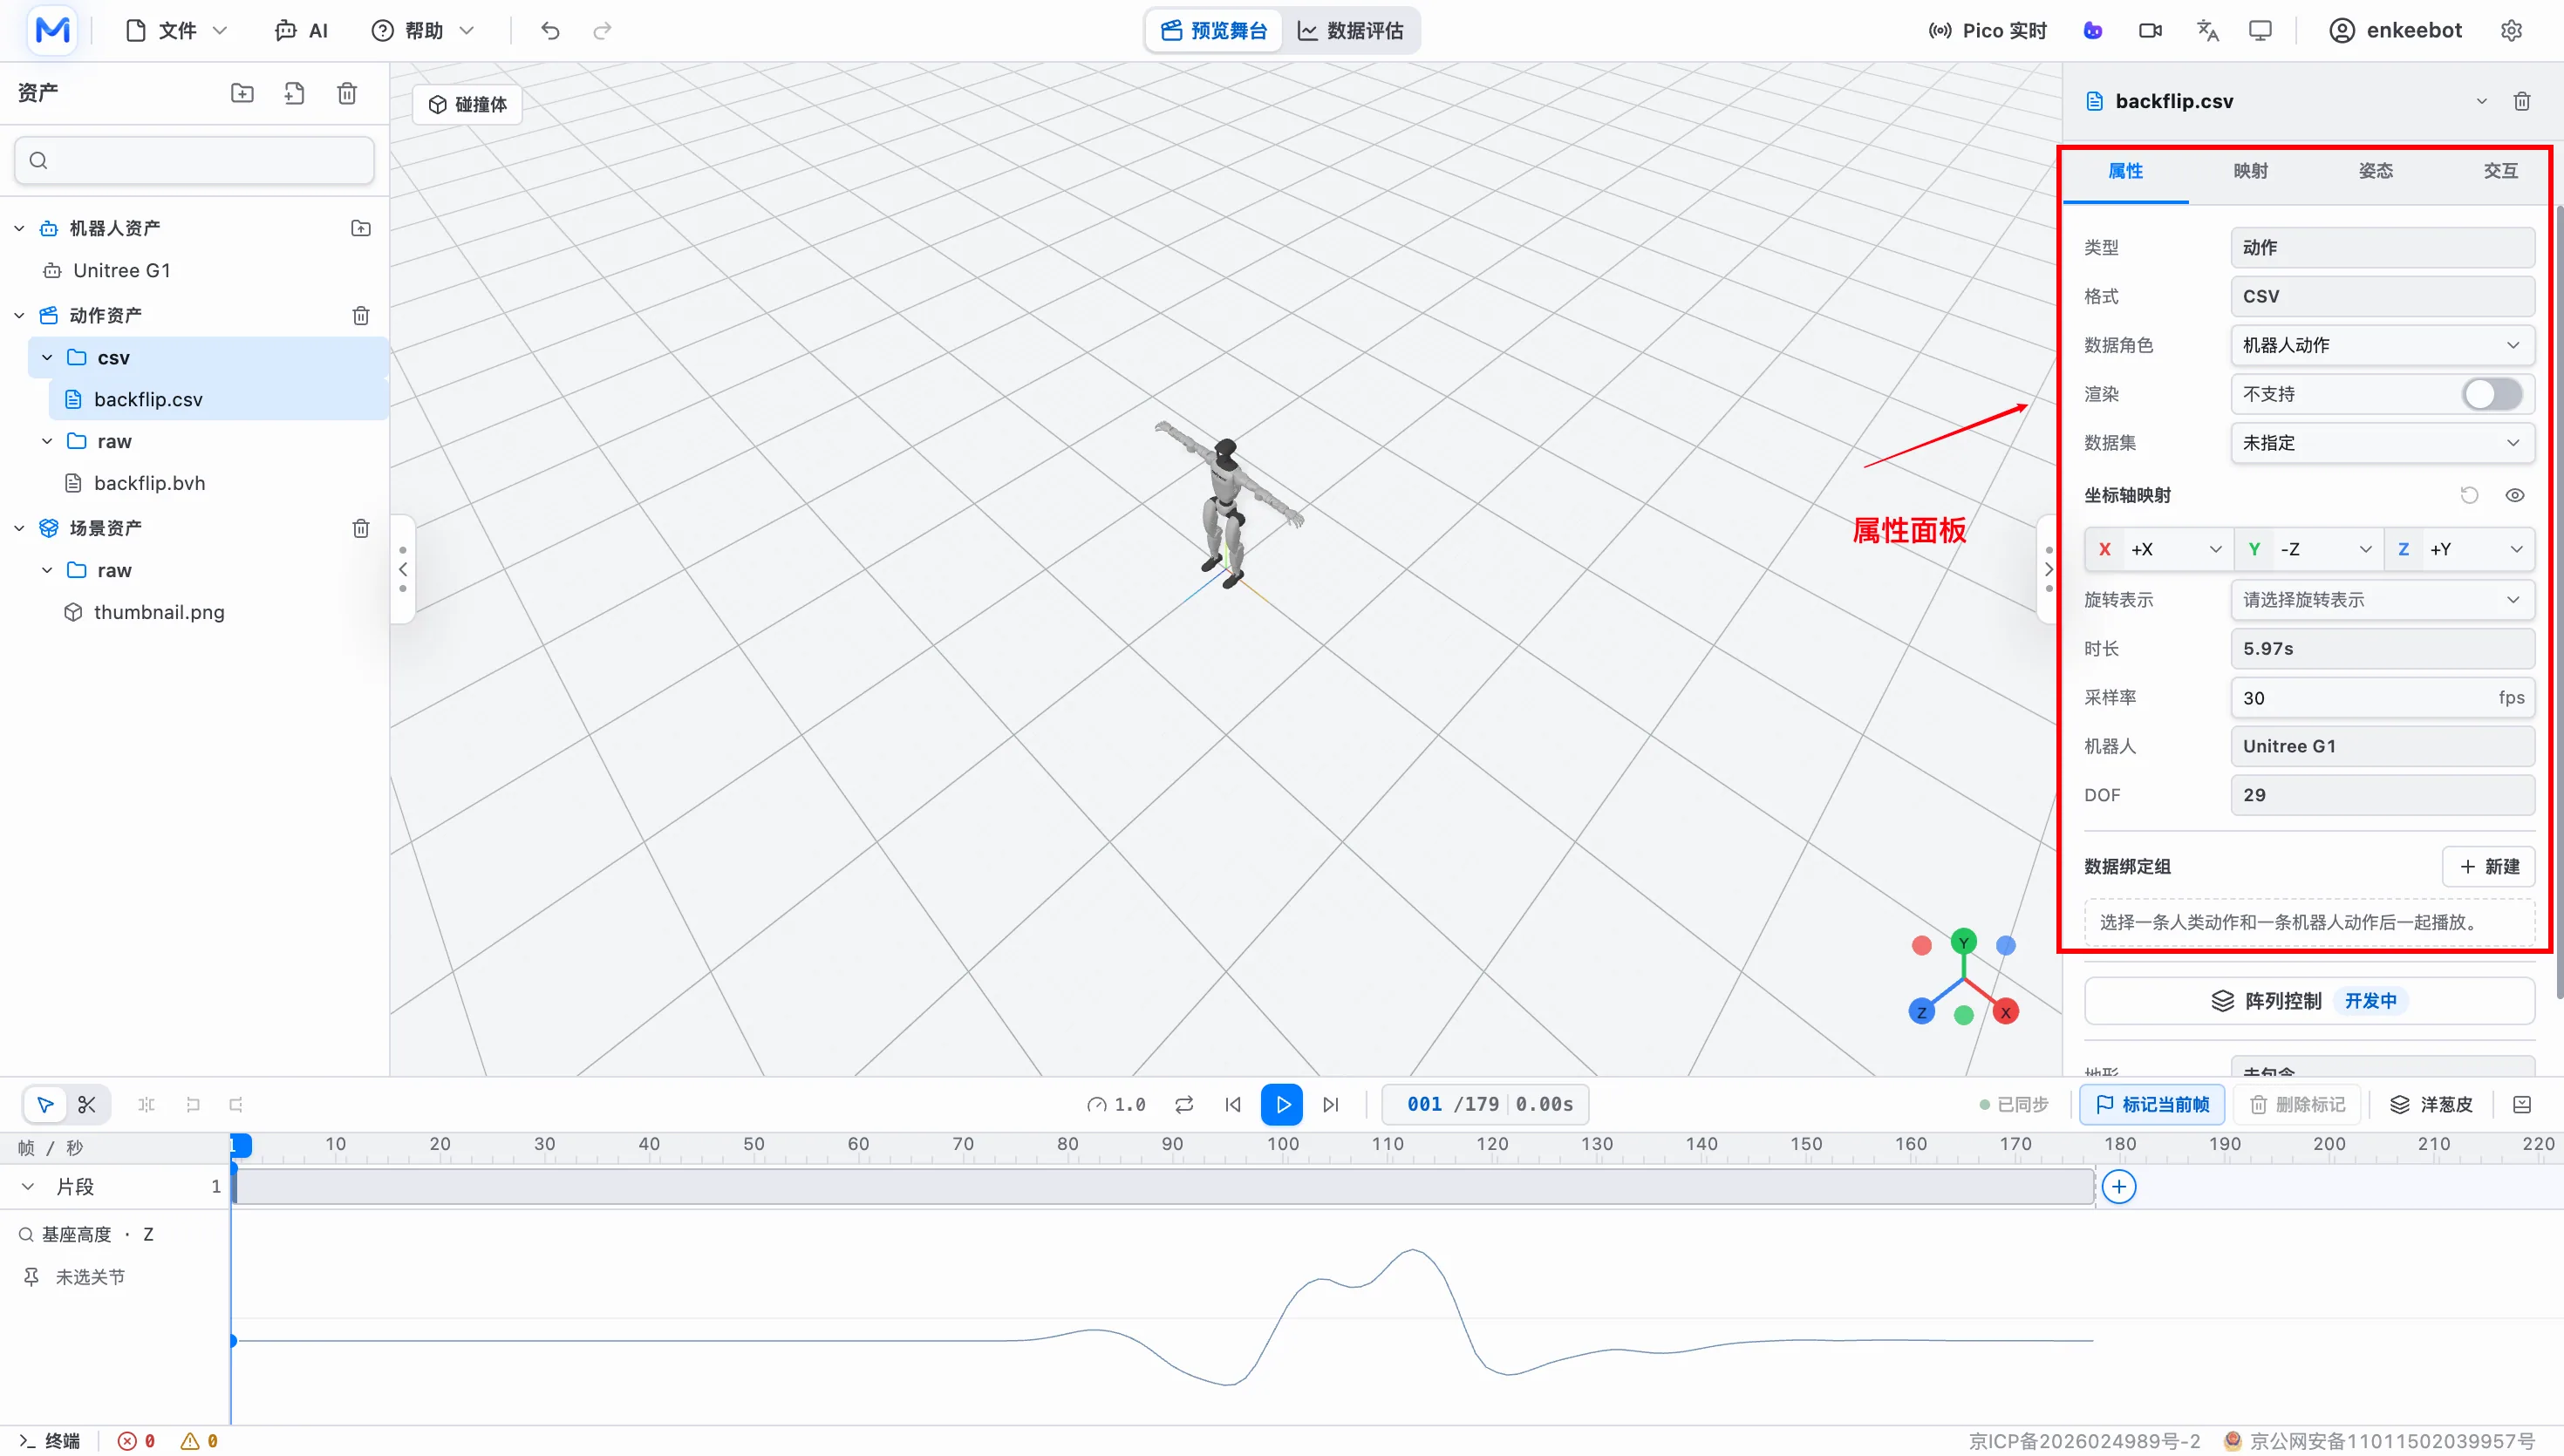
When the following interface appears, the workbench has opened successfully.
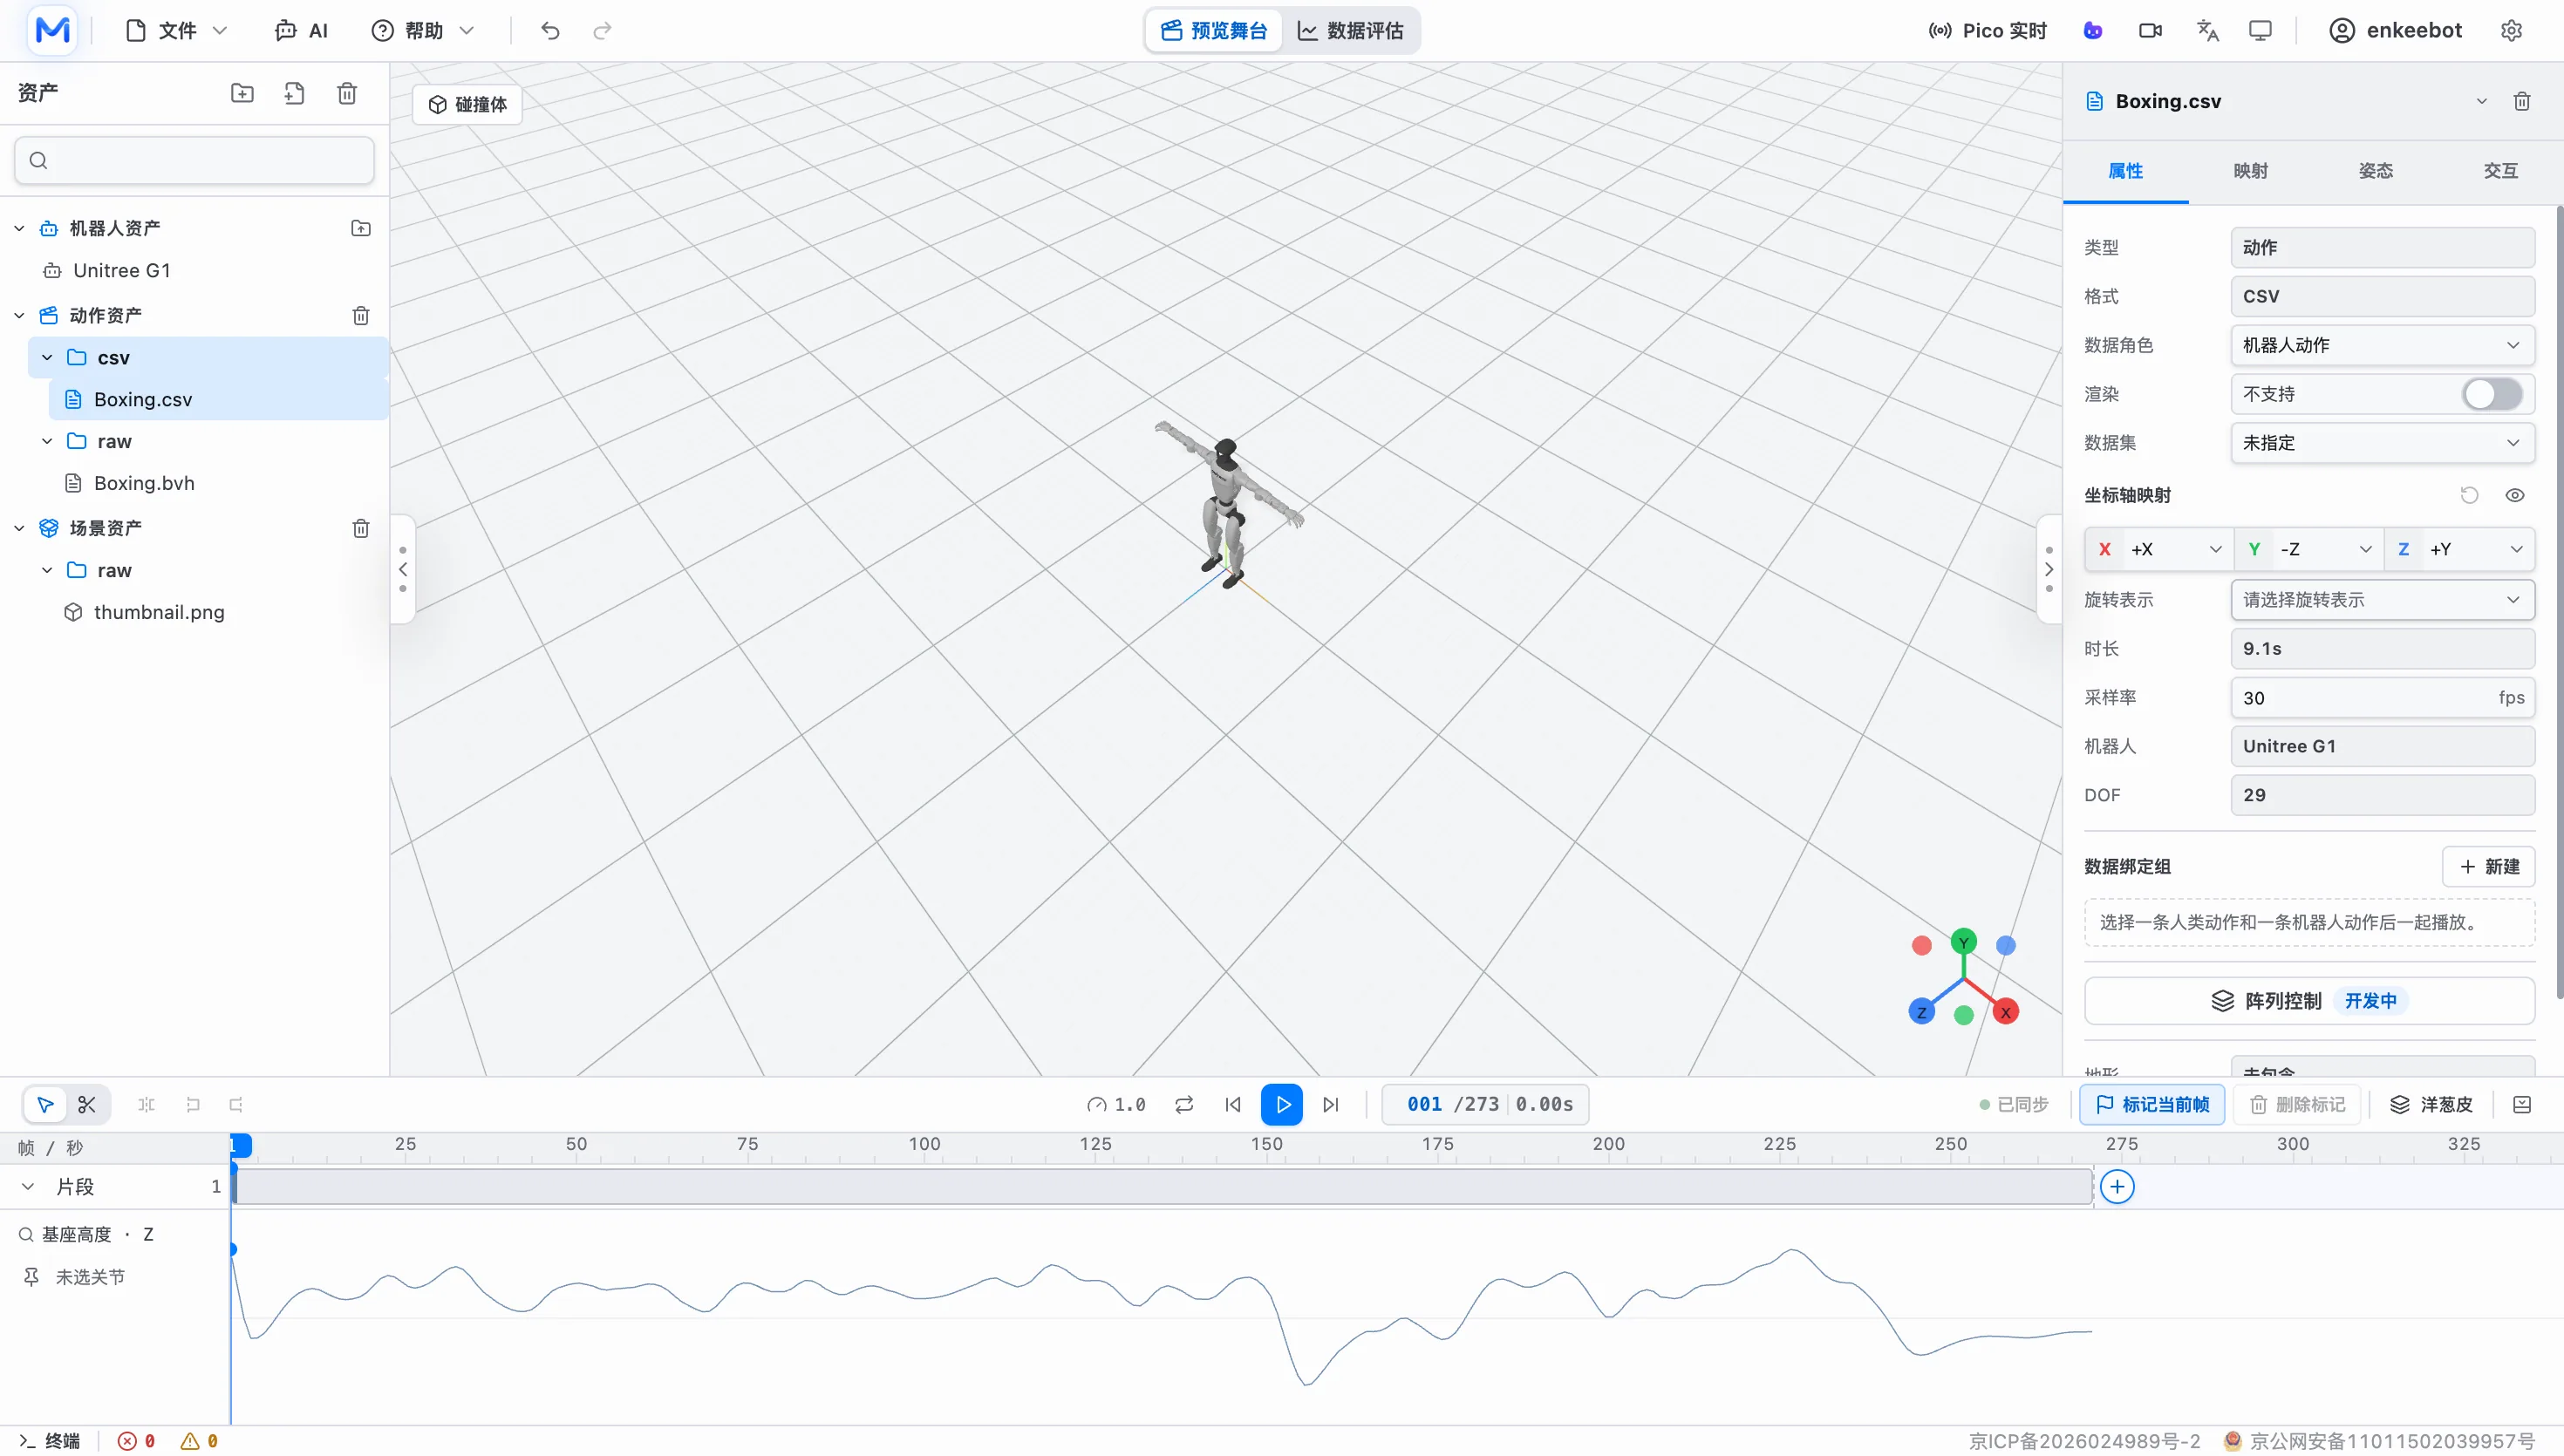
Confirm that you are in the Preview Stage workspace and that the left asset panel contains a default robot asset, such as Unitree G1. Use the basic tools in the top-right area to switch languages, change theme, open the profile page or adjust settings.
Importing And Managing Assets
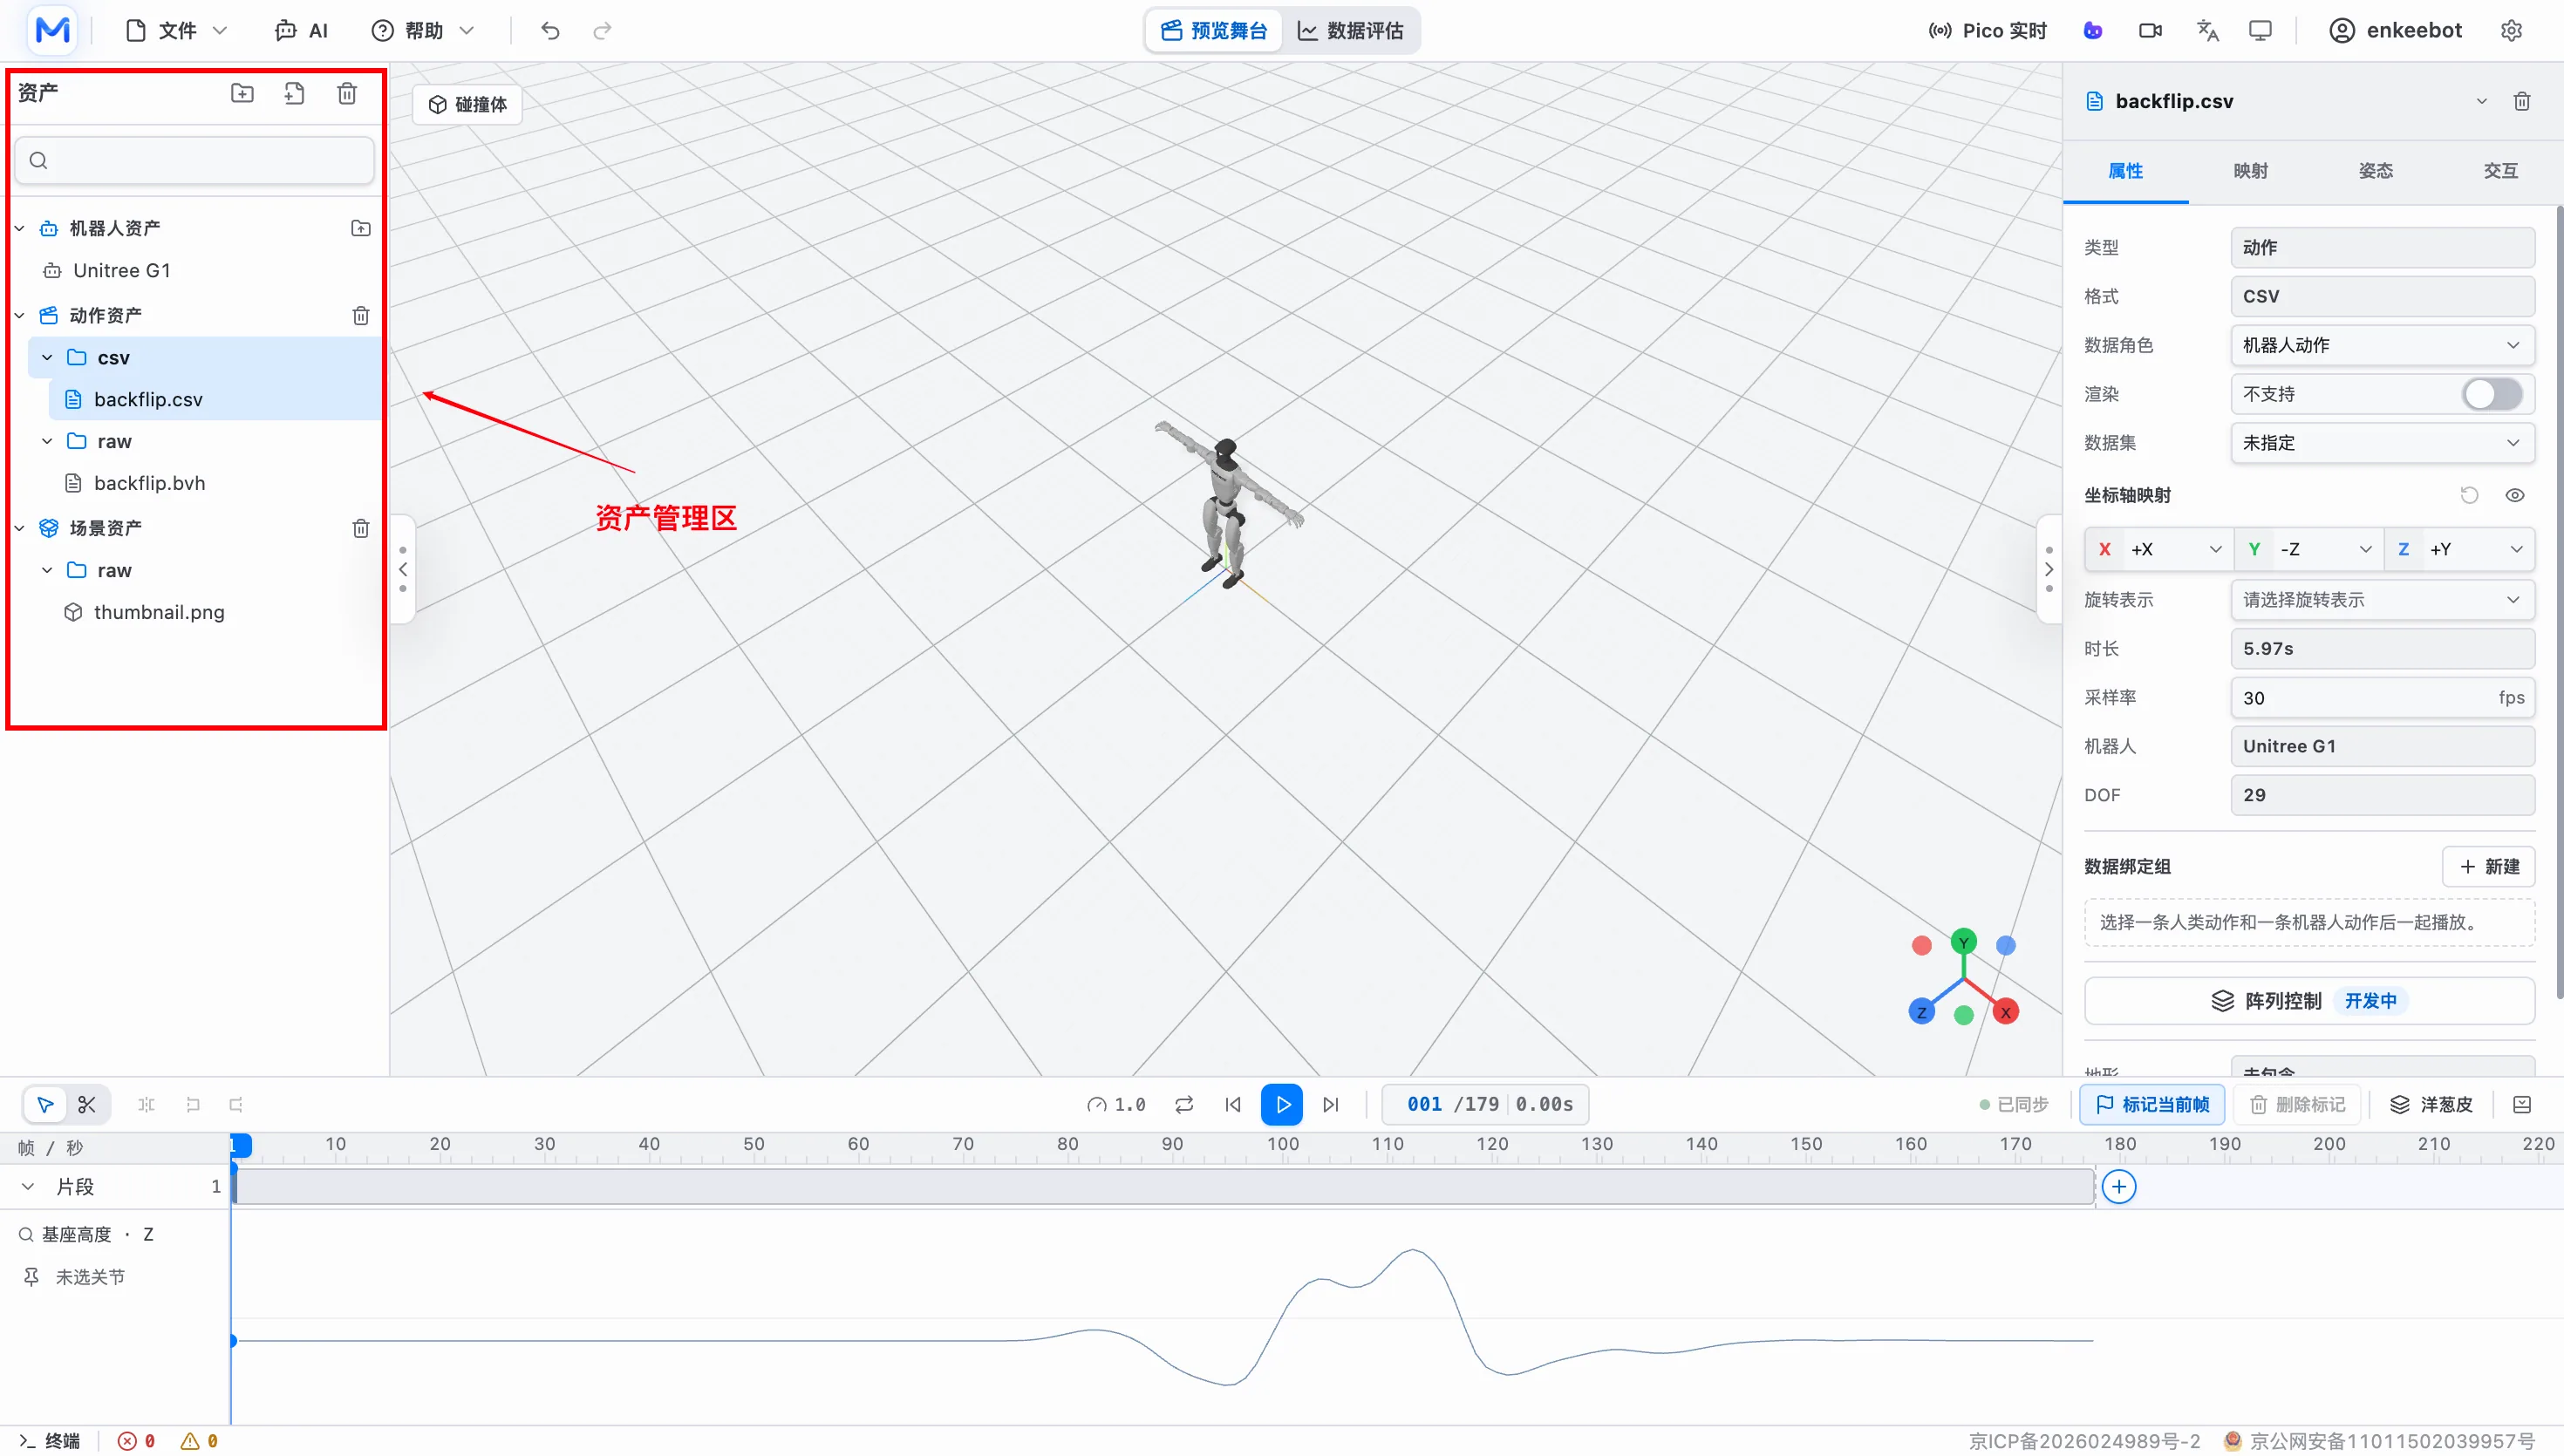
After entering the workbench, the usual first step is importing robot, motion or scene resources. The left asset panel groups resources into robot assets, motion assets and scene assets.
Import Methods
Importing places an external model, motion or scene into the current project. Once imported, resources appear in the asset panel for preview, mapping and editing.
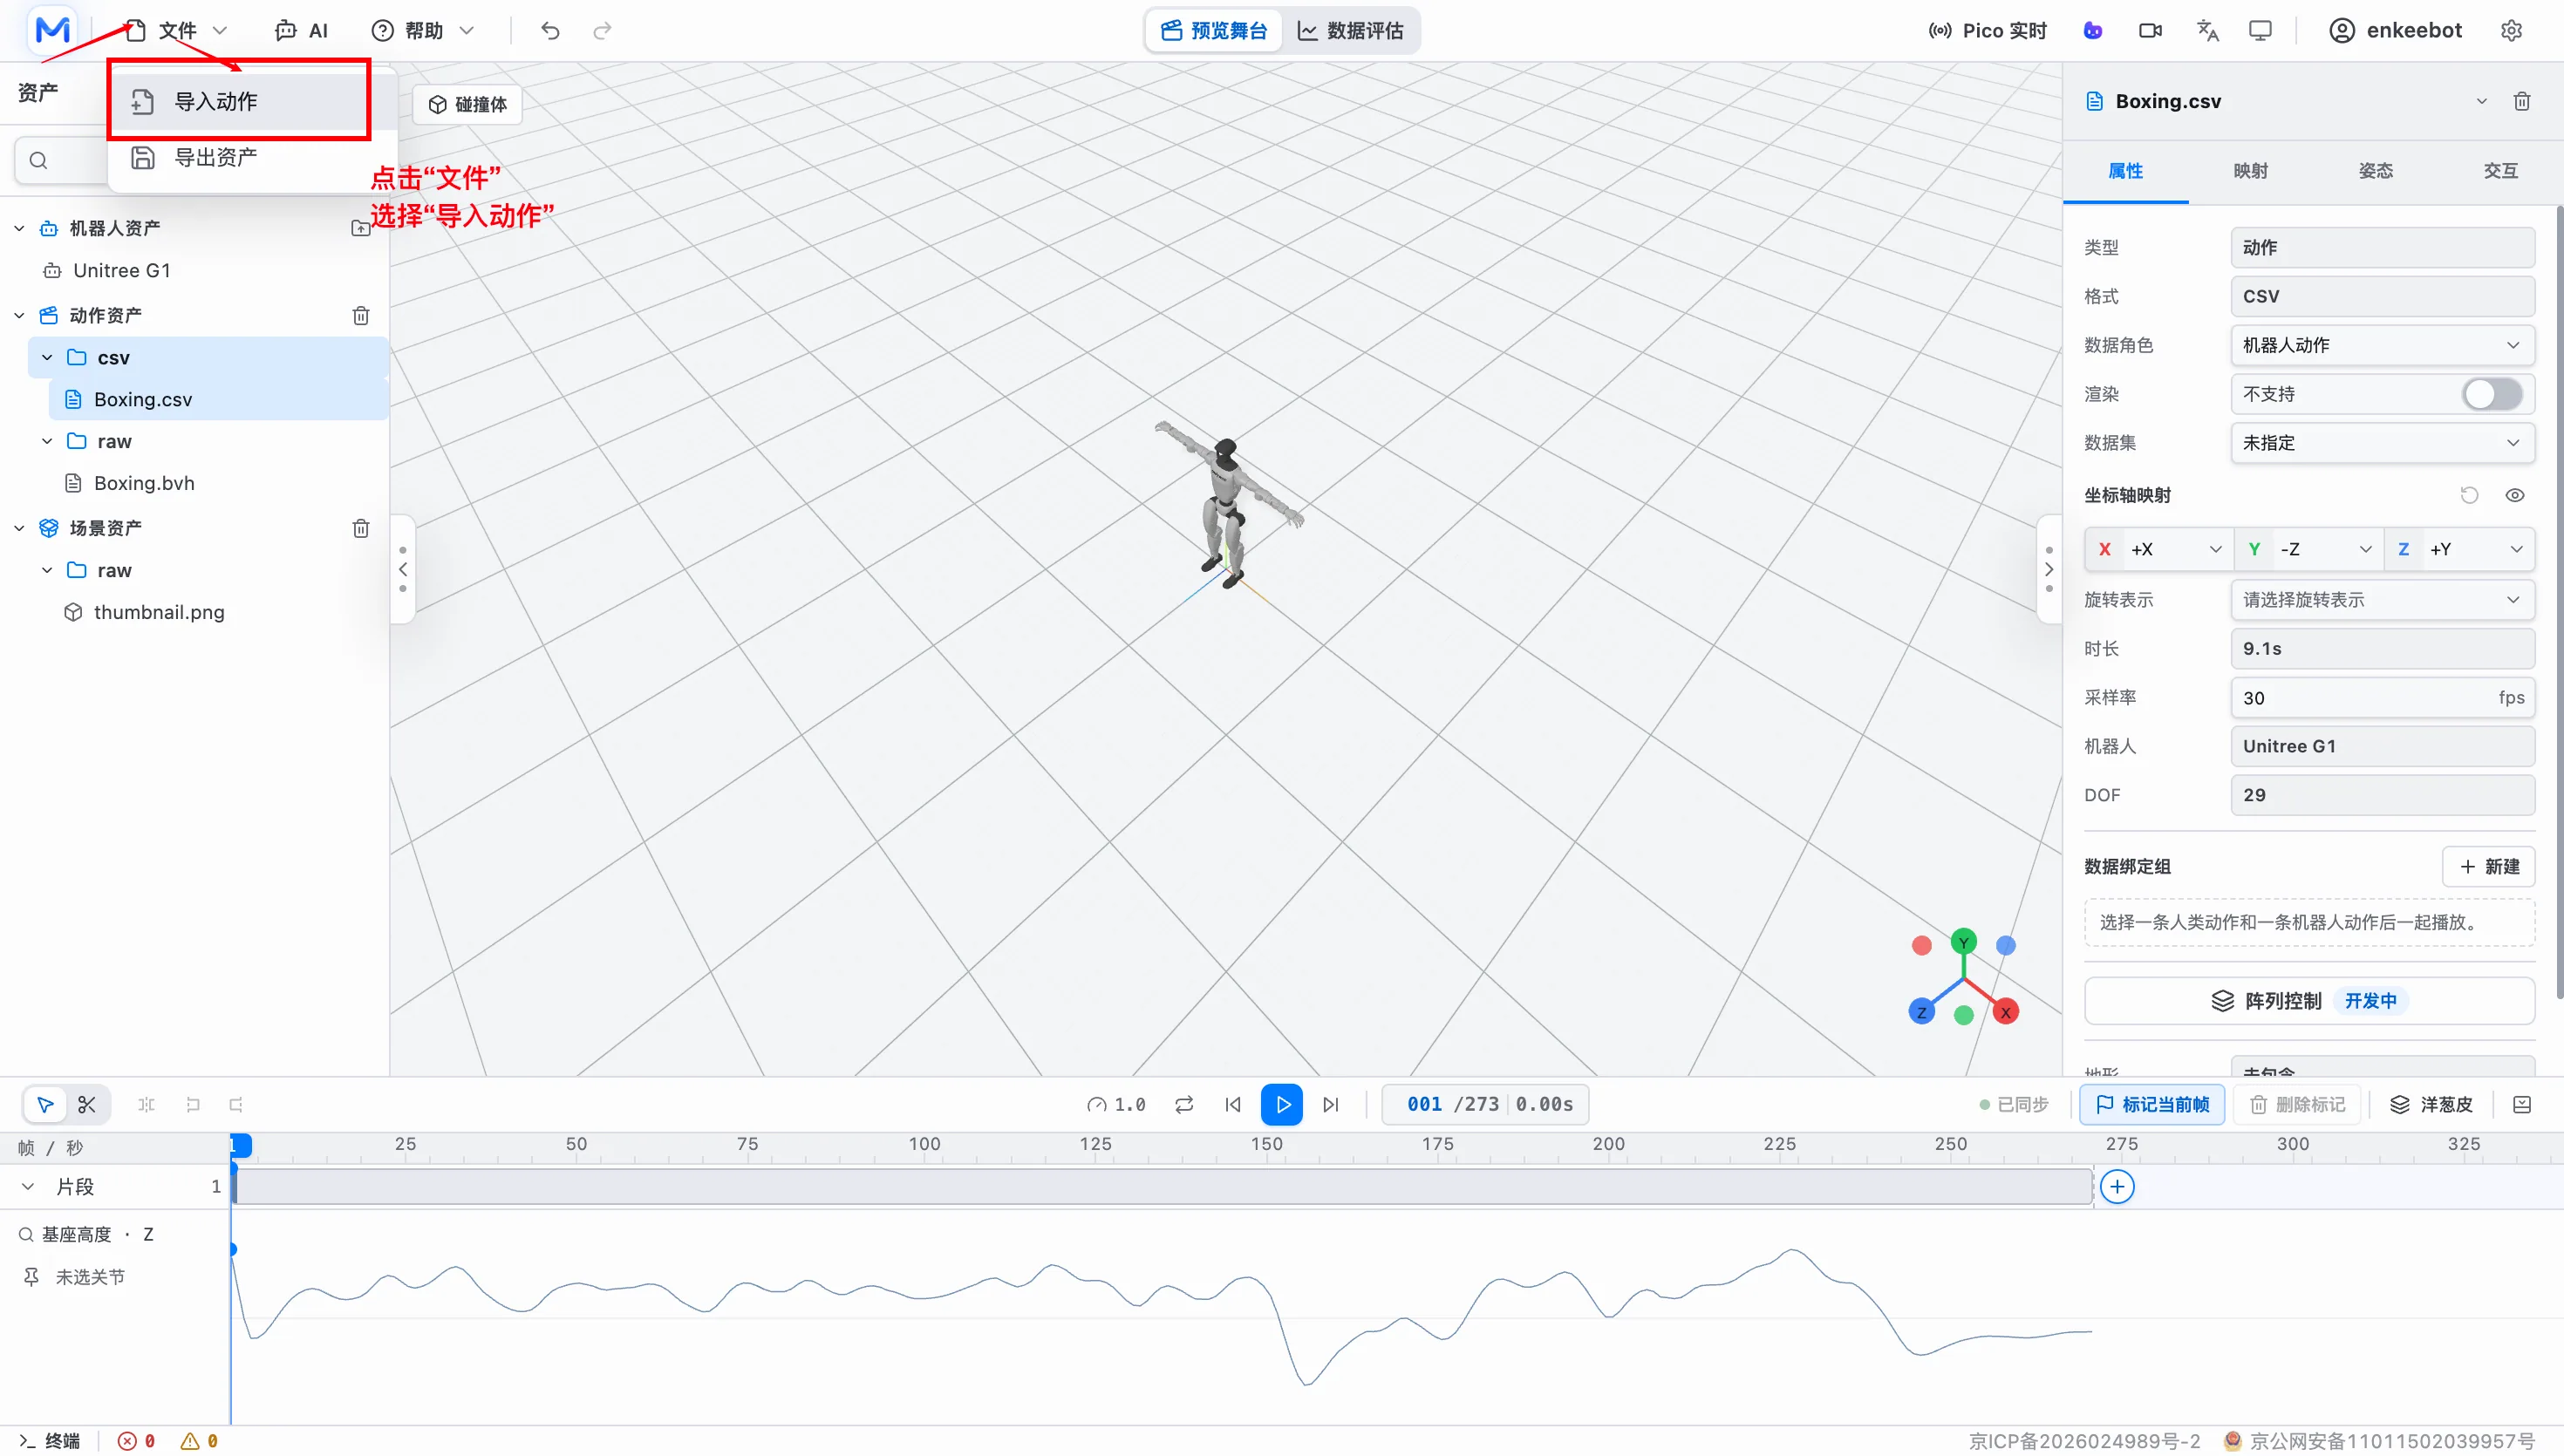
Click the top File menu, or use the add-file/add-folder entry in the asset panel.
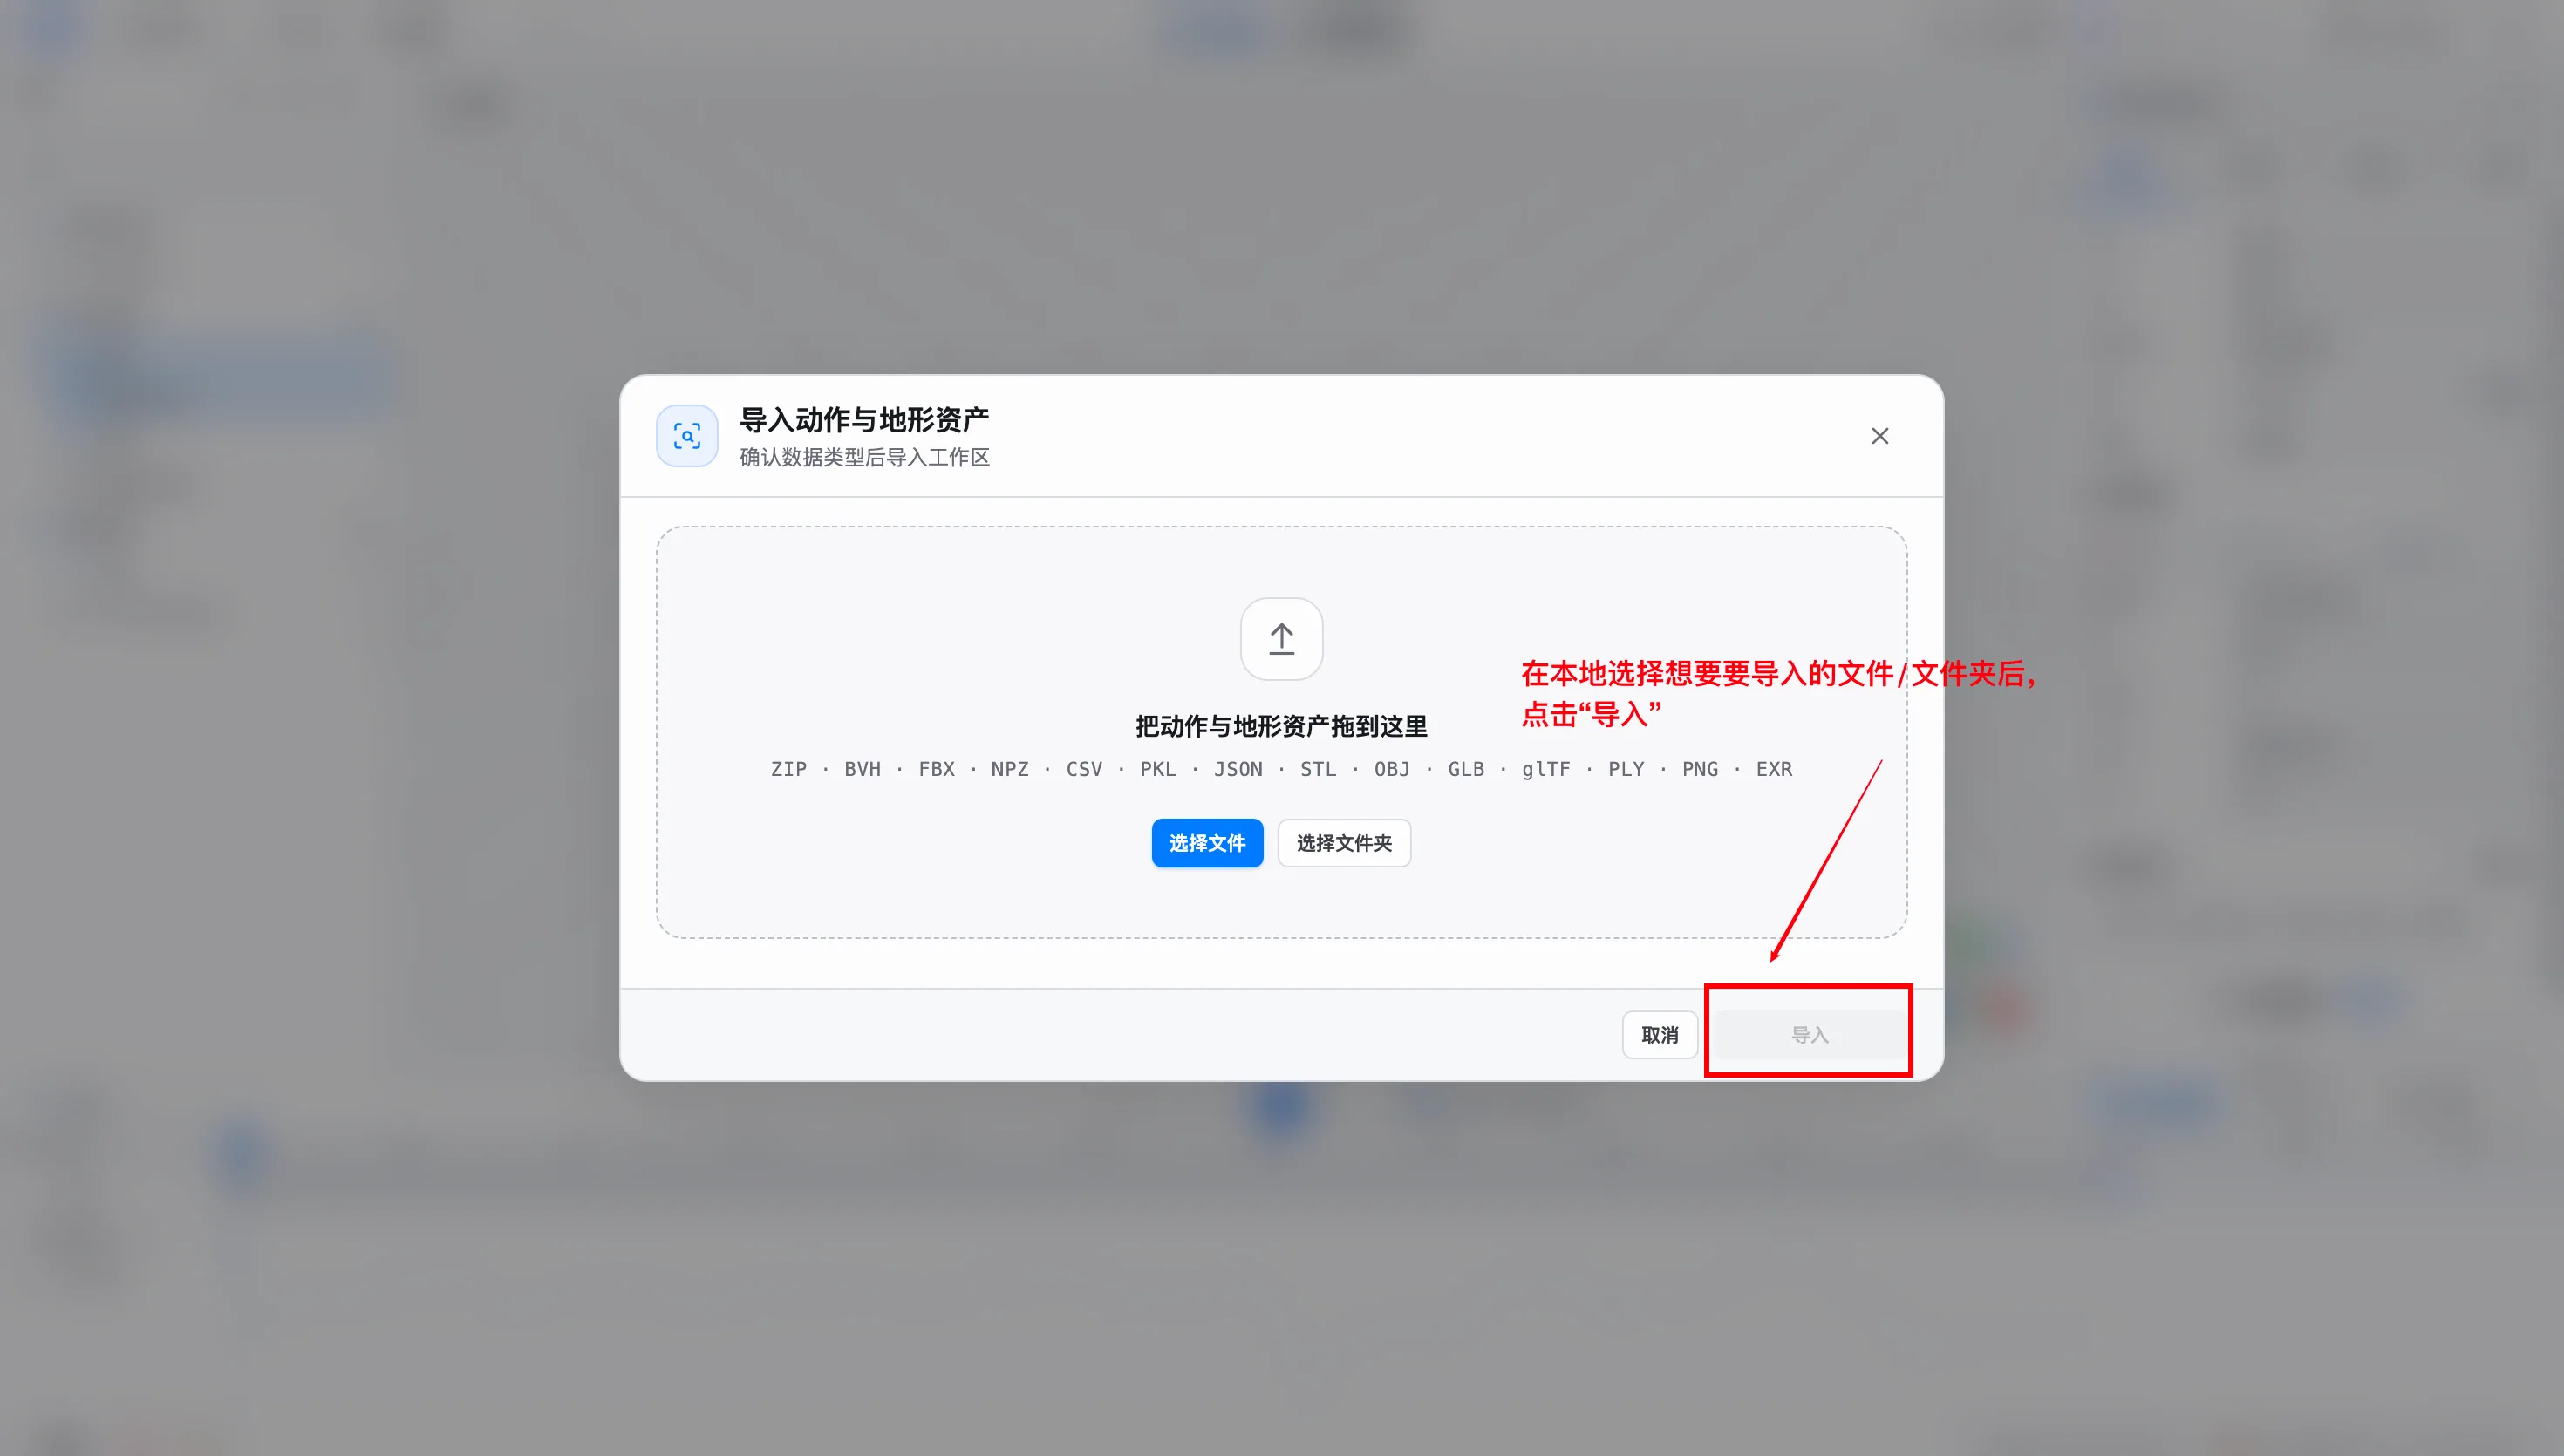
In the import dialog, drag in or choose a file, folder or ZIP package, then import it into the current workspace after confirming the selection.
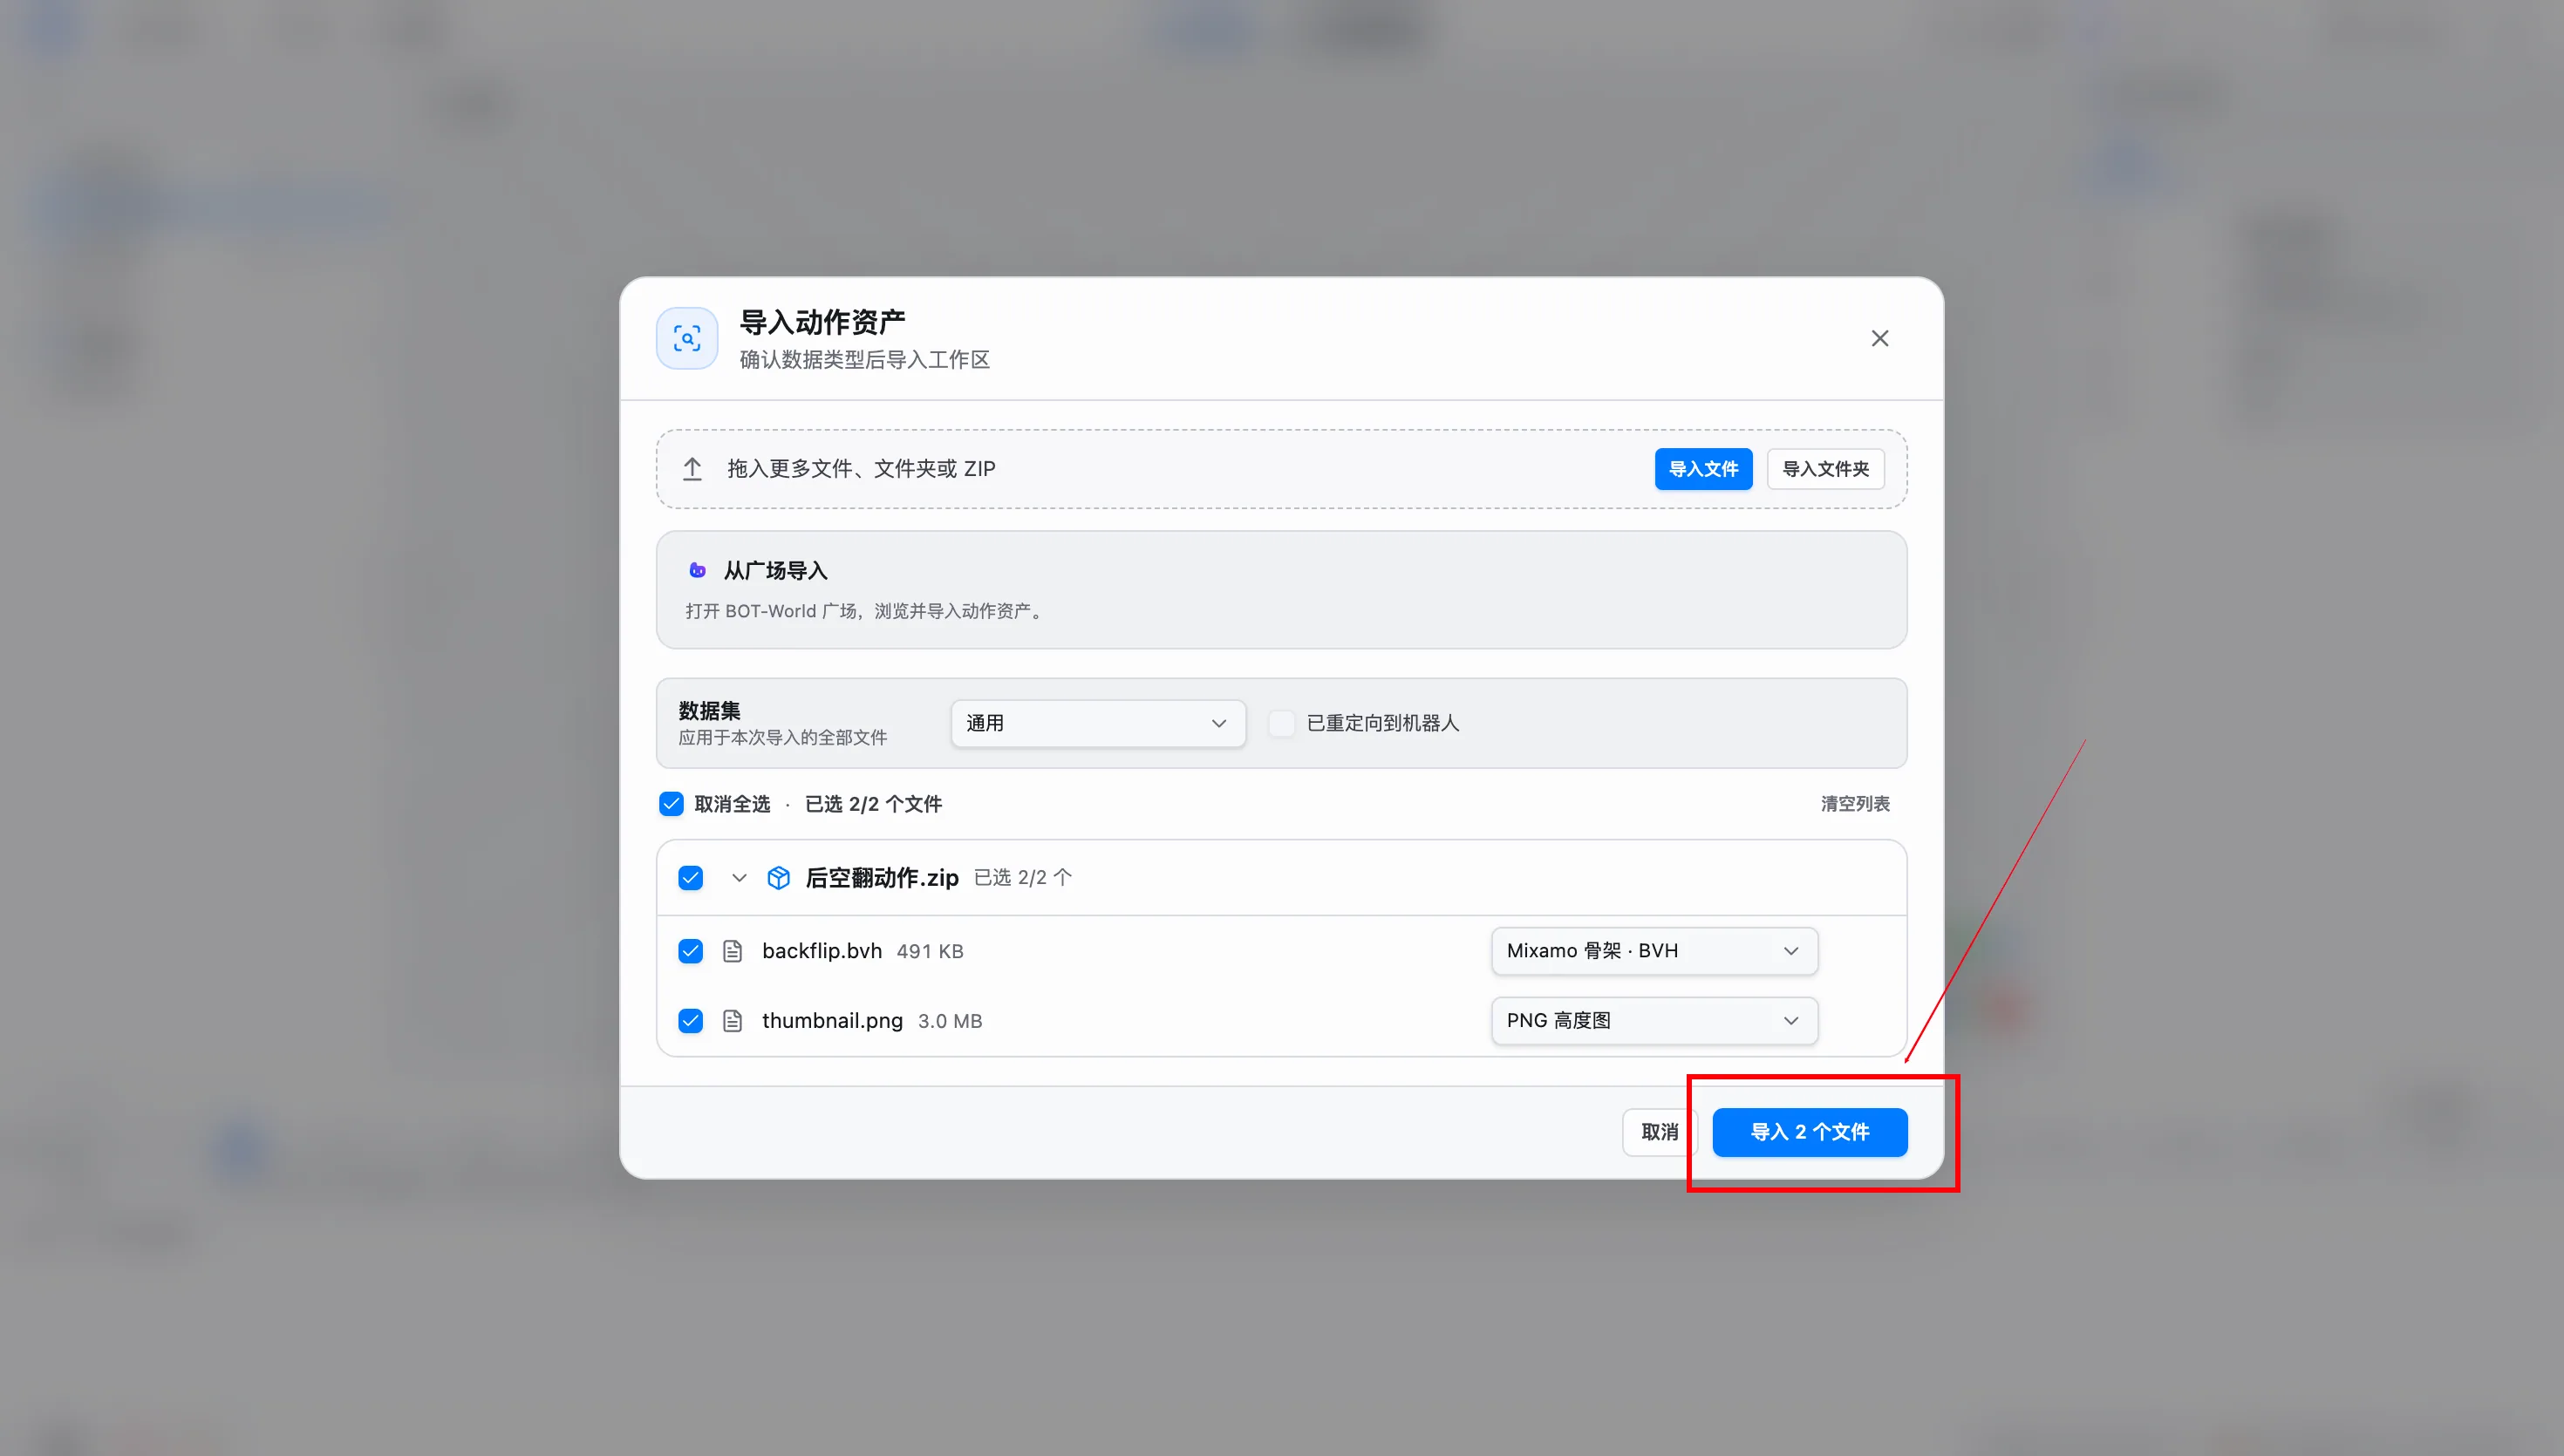
Motion Studio recognizes the file contents automatically. Check the recognized contents and click Import when they are correct; manually correct any recognition errors first.
Supported Asset Types
| Type | Supported formats | Purpose |
|---|---|---|
| Human motion | BVH, FBX, NPZ, CSV | Preview, calibration and human-to-robot mapping. |
| Robot motion | CSV, NPZ, PKL | Robot motion preview, pose editing and export. |
| Skeleton template | JSON | Custom skeleton mapping. |
| Scene/terrain | STL, OBJ, GLB, glTF, PLY, PNG, EXR | Scene preview, terrain and height maps. |
When a resource contains meshes, textures or other multi-file dependencies, import the complete folder or ZIP package first. After importing CSV, NPZ or PKL motion data, confirm the data role, axes, FPS and robot model in the right properties panel.
Data Support And Compatibility
Motion Studio supports common mocap systems, human motion datasets and robot motion data. After import, confirm the data role and coordinate axes in the right properties panel to avoid wrong motion direction, heading or root position.
Motion Capture Systems
| Source | Format | Object | Status |
|---|---|---|---|
| Xsens | BVH | Human | Supported |
| NOKOV | BVH | Human | Supported |
| CHINGMU | BVH | Human | Supported |
| Mixamo | BVH | Human | Supported |
| OptiTrack | BVH | Human | Supported |
BVH data supports skeleton parsing, automatic skeleton recognition, custom skeleton templates, T-pose calibration, joint mapping, timeline preview and robot motion remapping. For non-standard joint names or skeleton hierarchies, save a custom skeleton template and reuse that mapping configuration.
Datasets And Project Data
| Dataset | Format | Object | Status |
|---|---|---|---|
| LAFAN | CSV | Robot | Supported |
| LAFAN | NPZ | Robot | Supported |
| AMASS | NPZ | Human | Supported |
| SMPL/X | NPZ | Human | Supported |
| MotionDecode | CSV | Human | Supported |
| BONES-SEED | CSV | Robot | Supported |
| SONIC | CSV | Robot | Supported |
| SONIC | NPZ | Robot | Supported |
| SONIC | Single-motion PKL | Robot | Supported |
| SONIC | Multi-motion dataset PKL | Robot | Not supported yet |
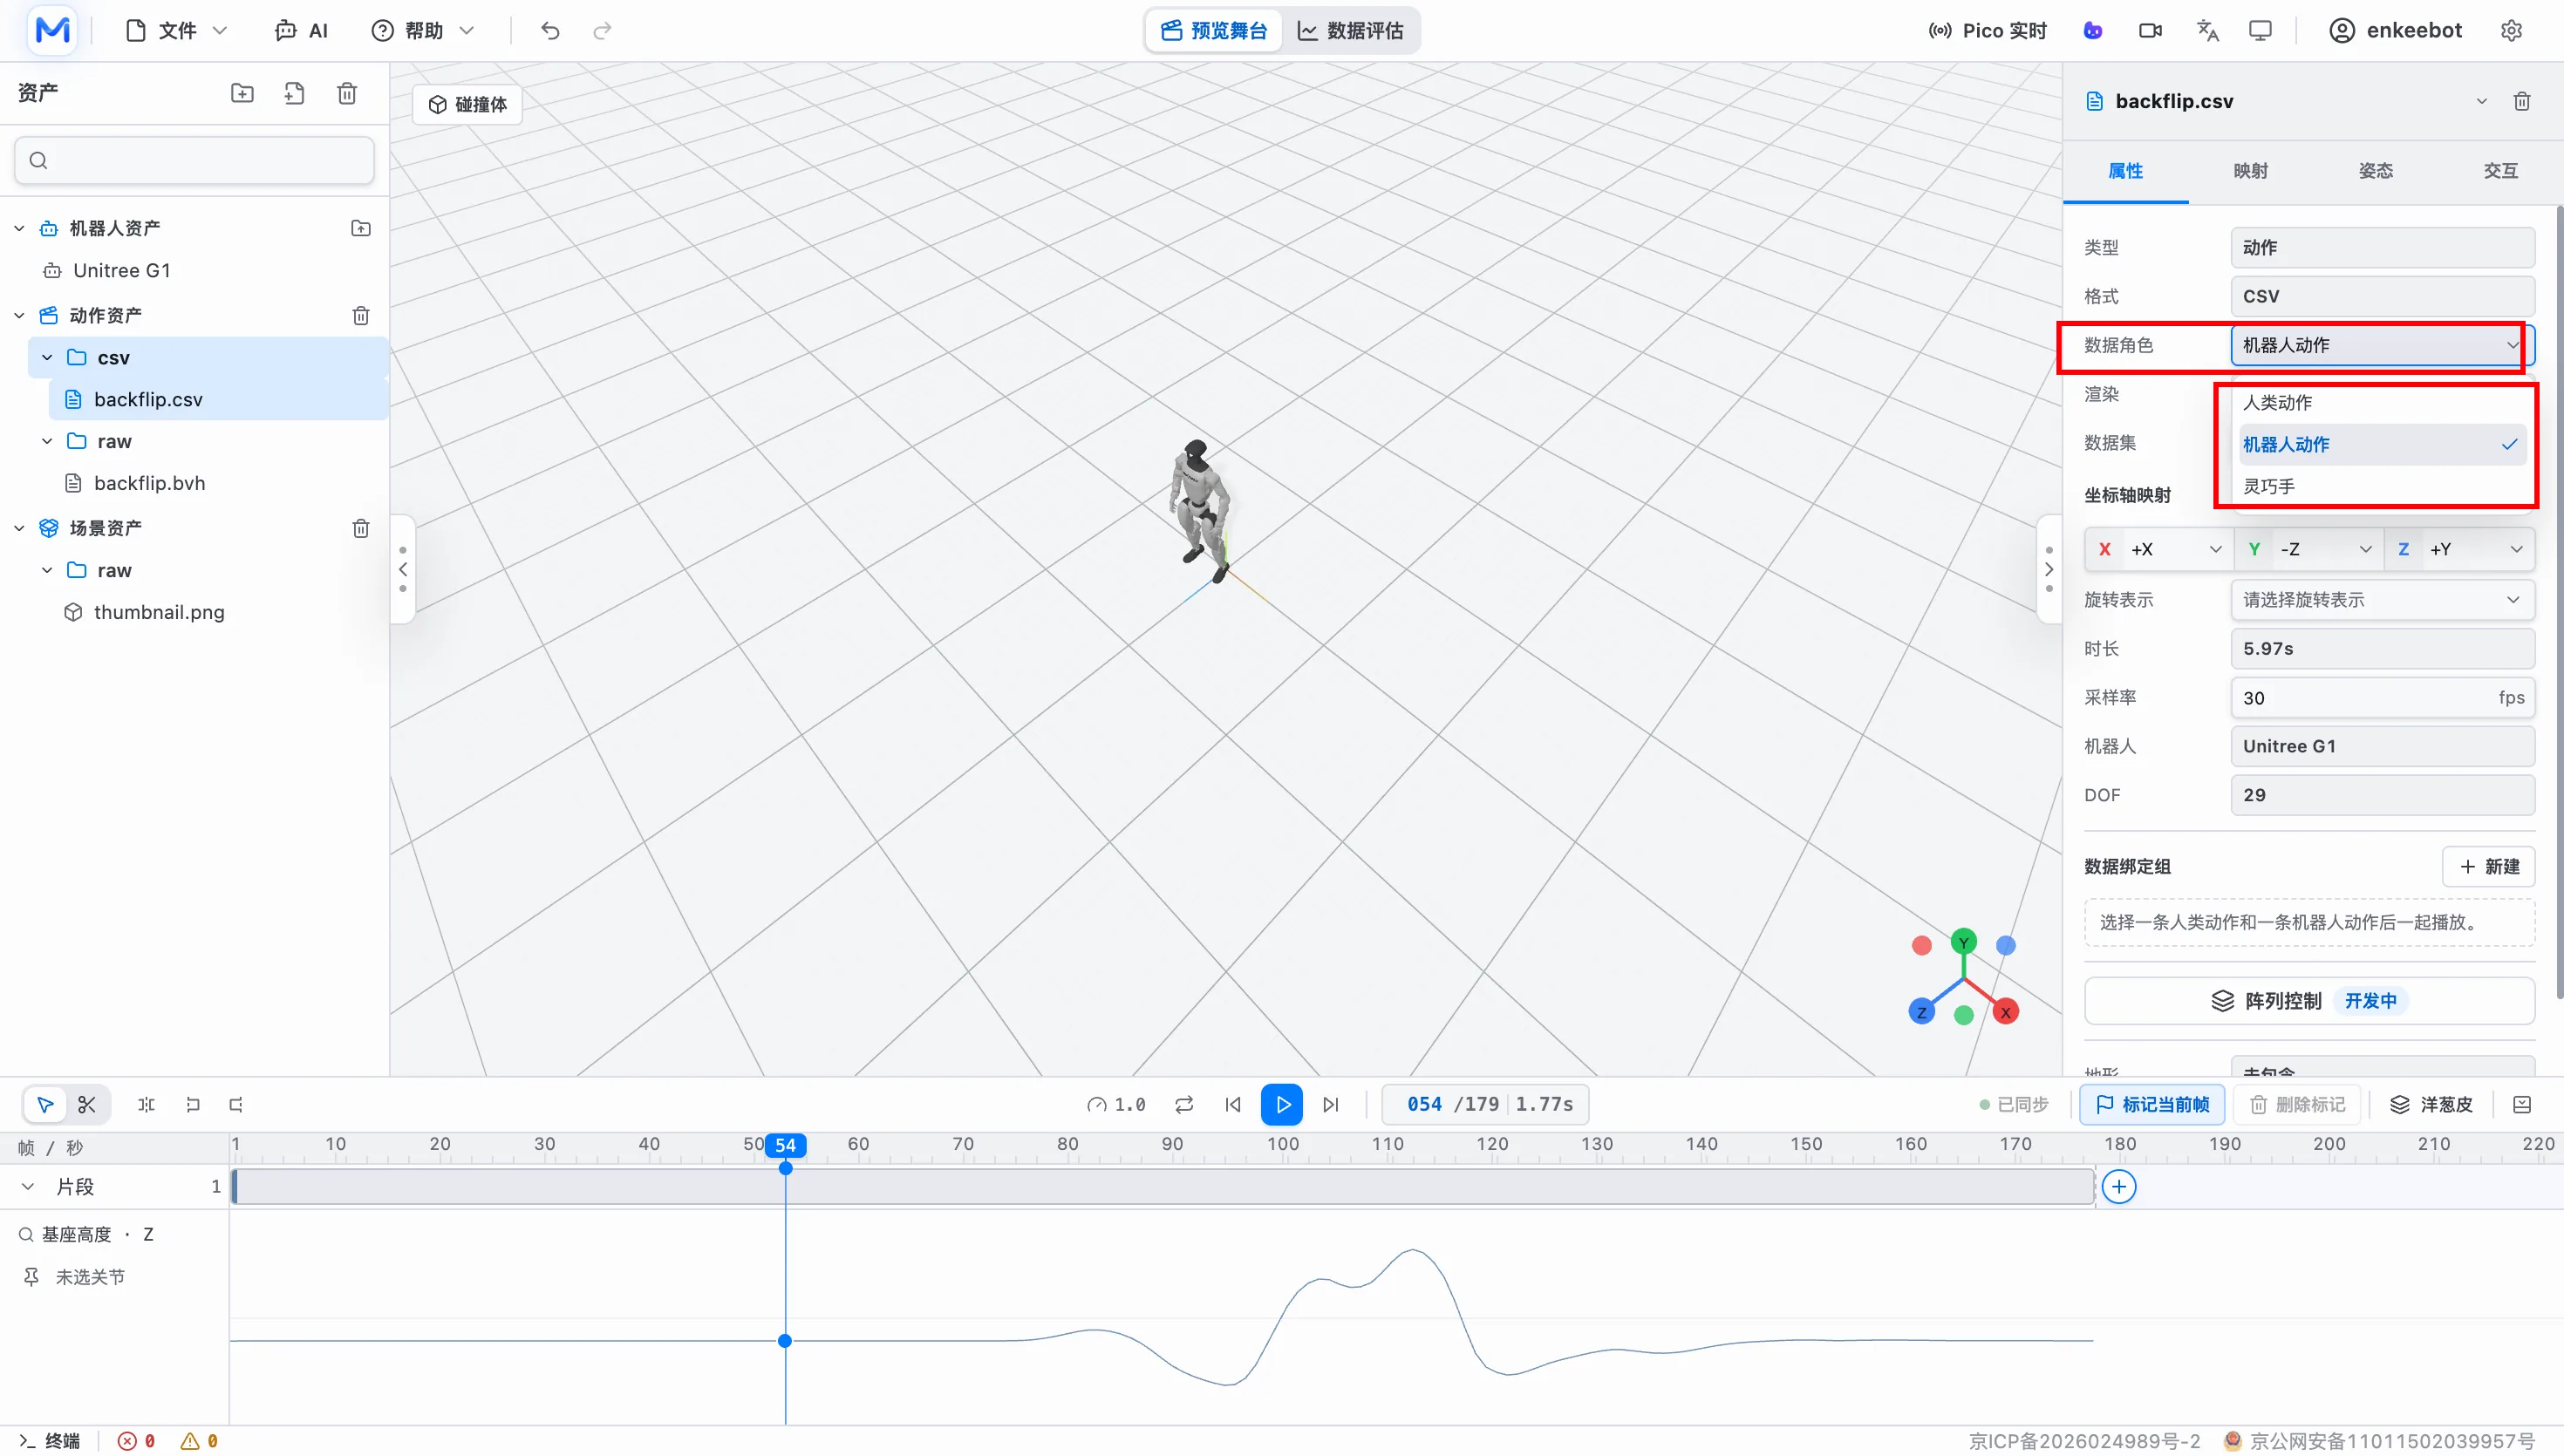
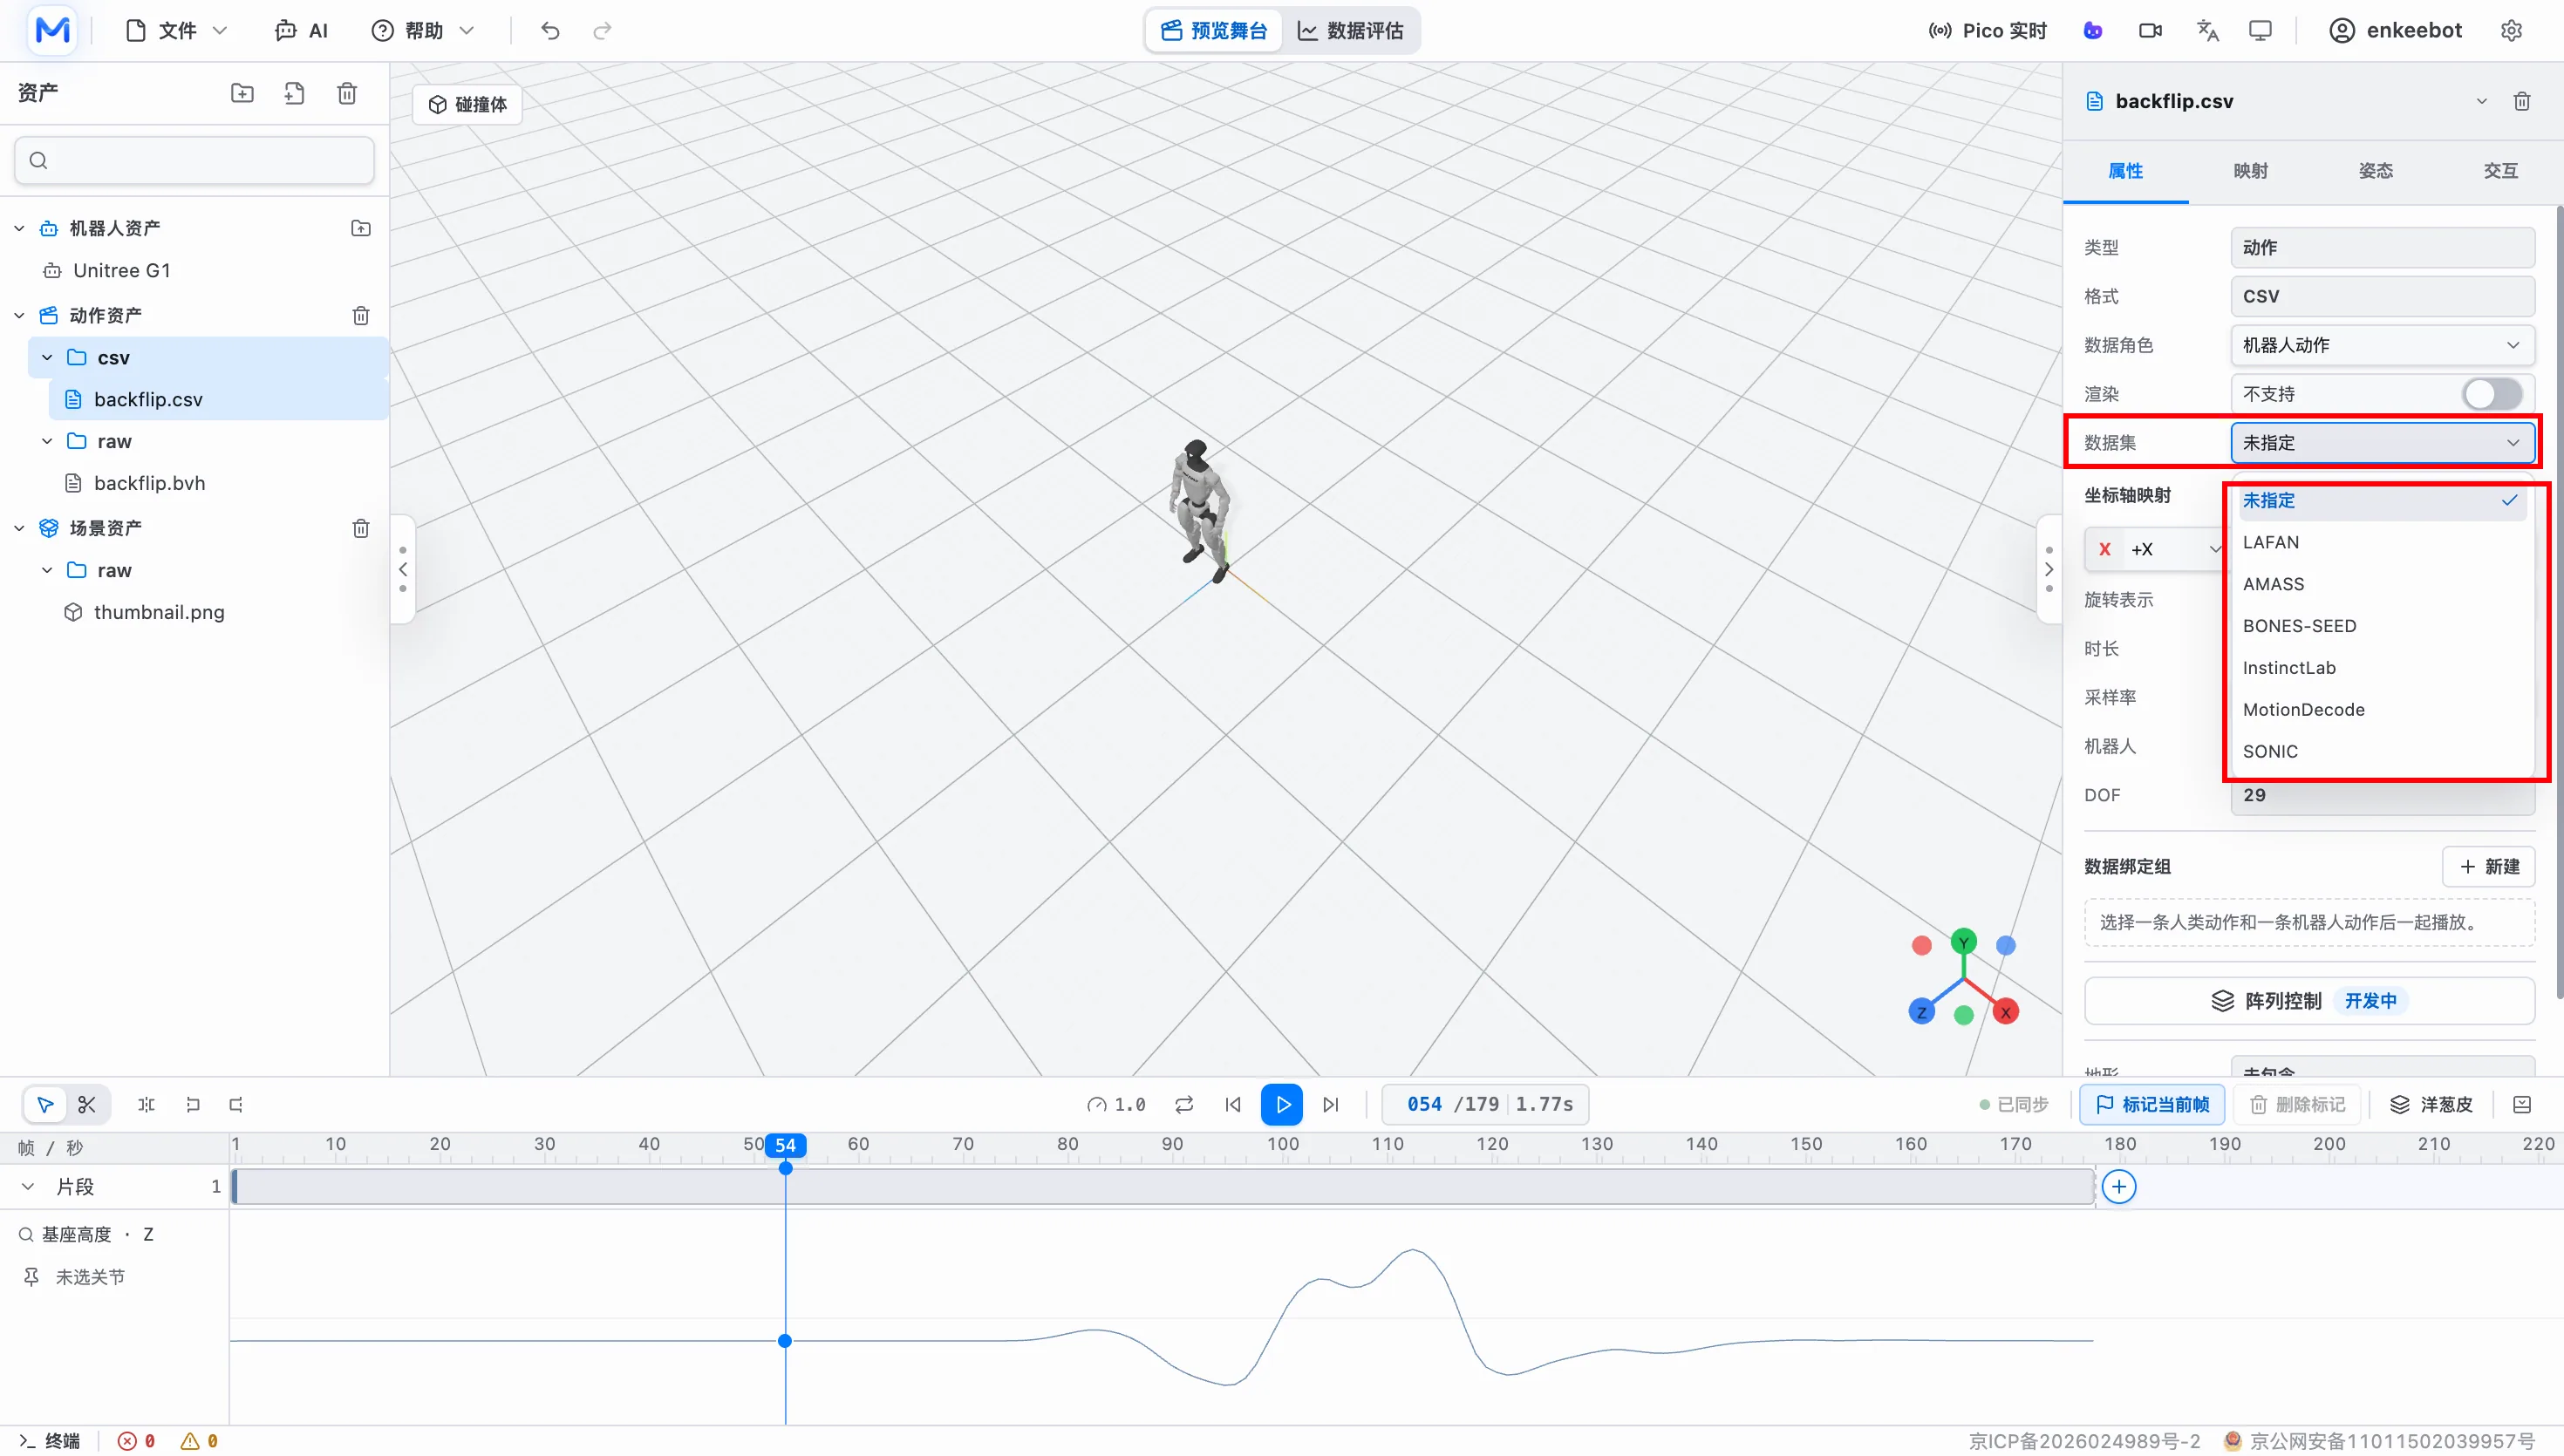
Imported assets are recognized automatically in Motion Studio. If the recognition is wrong, correct it manually in the properties panel.
For example, correct the data role.
For example, correct the dataset.
Understanding The Interface
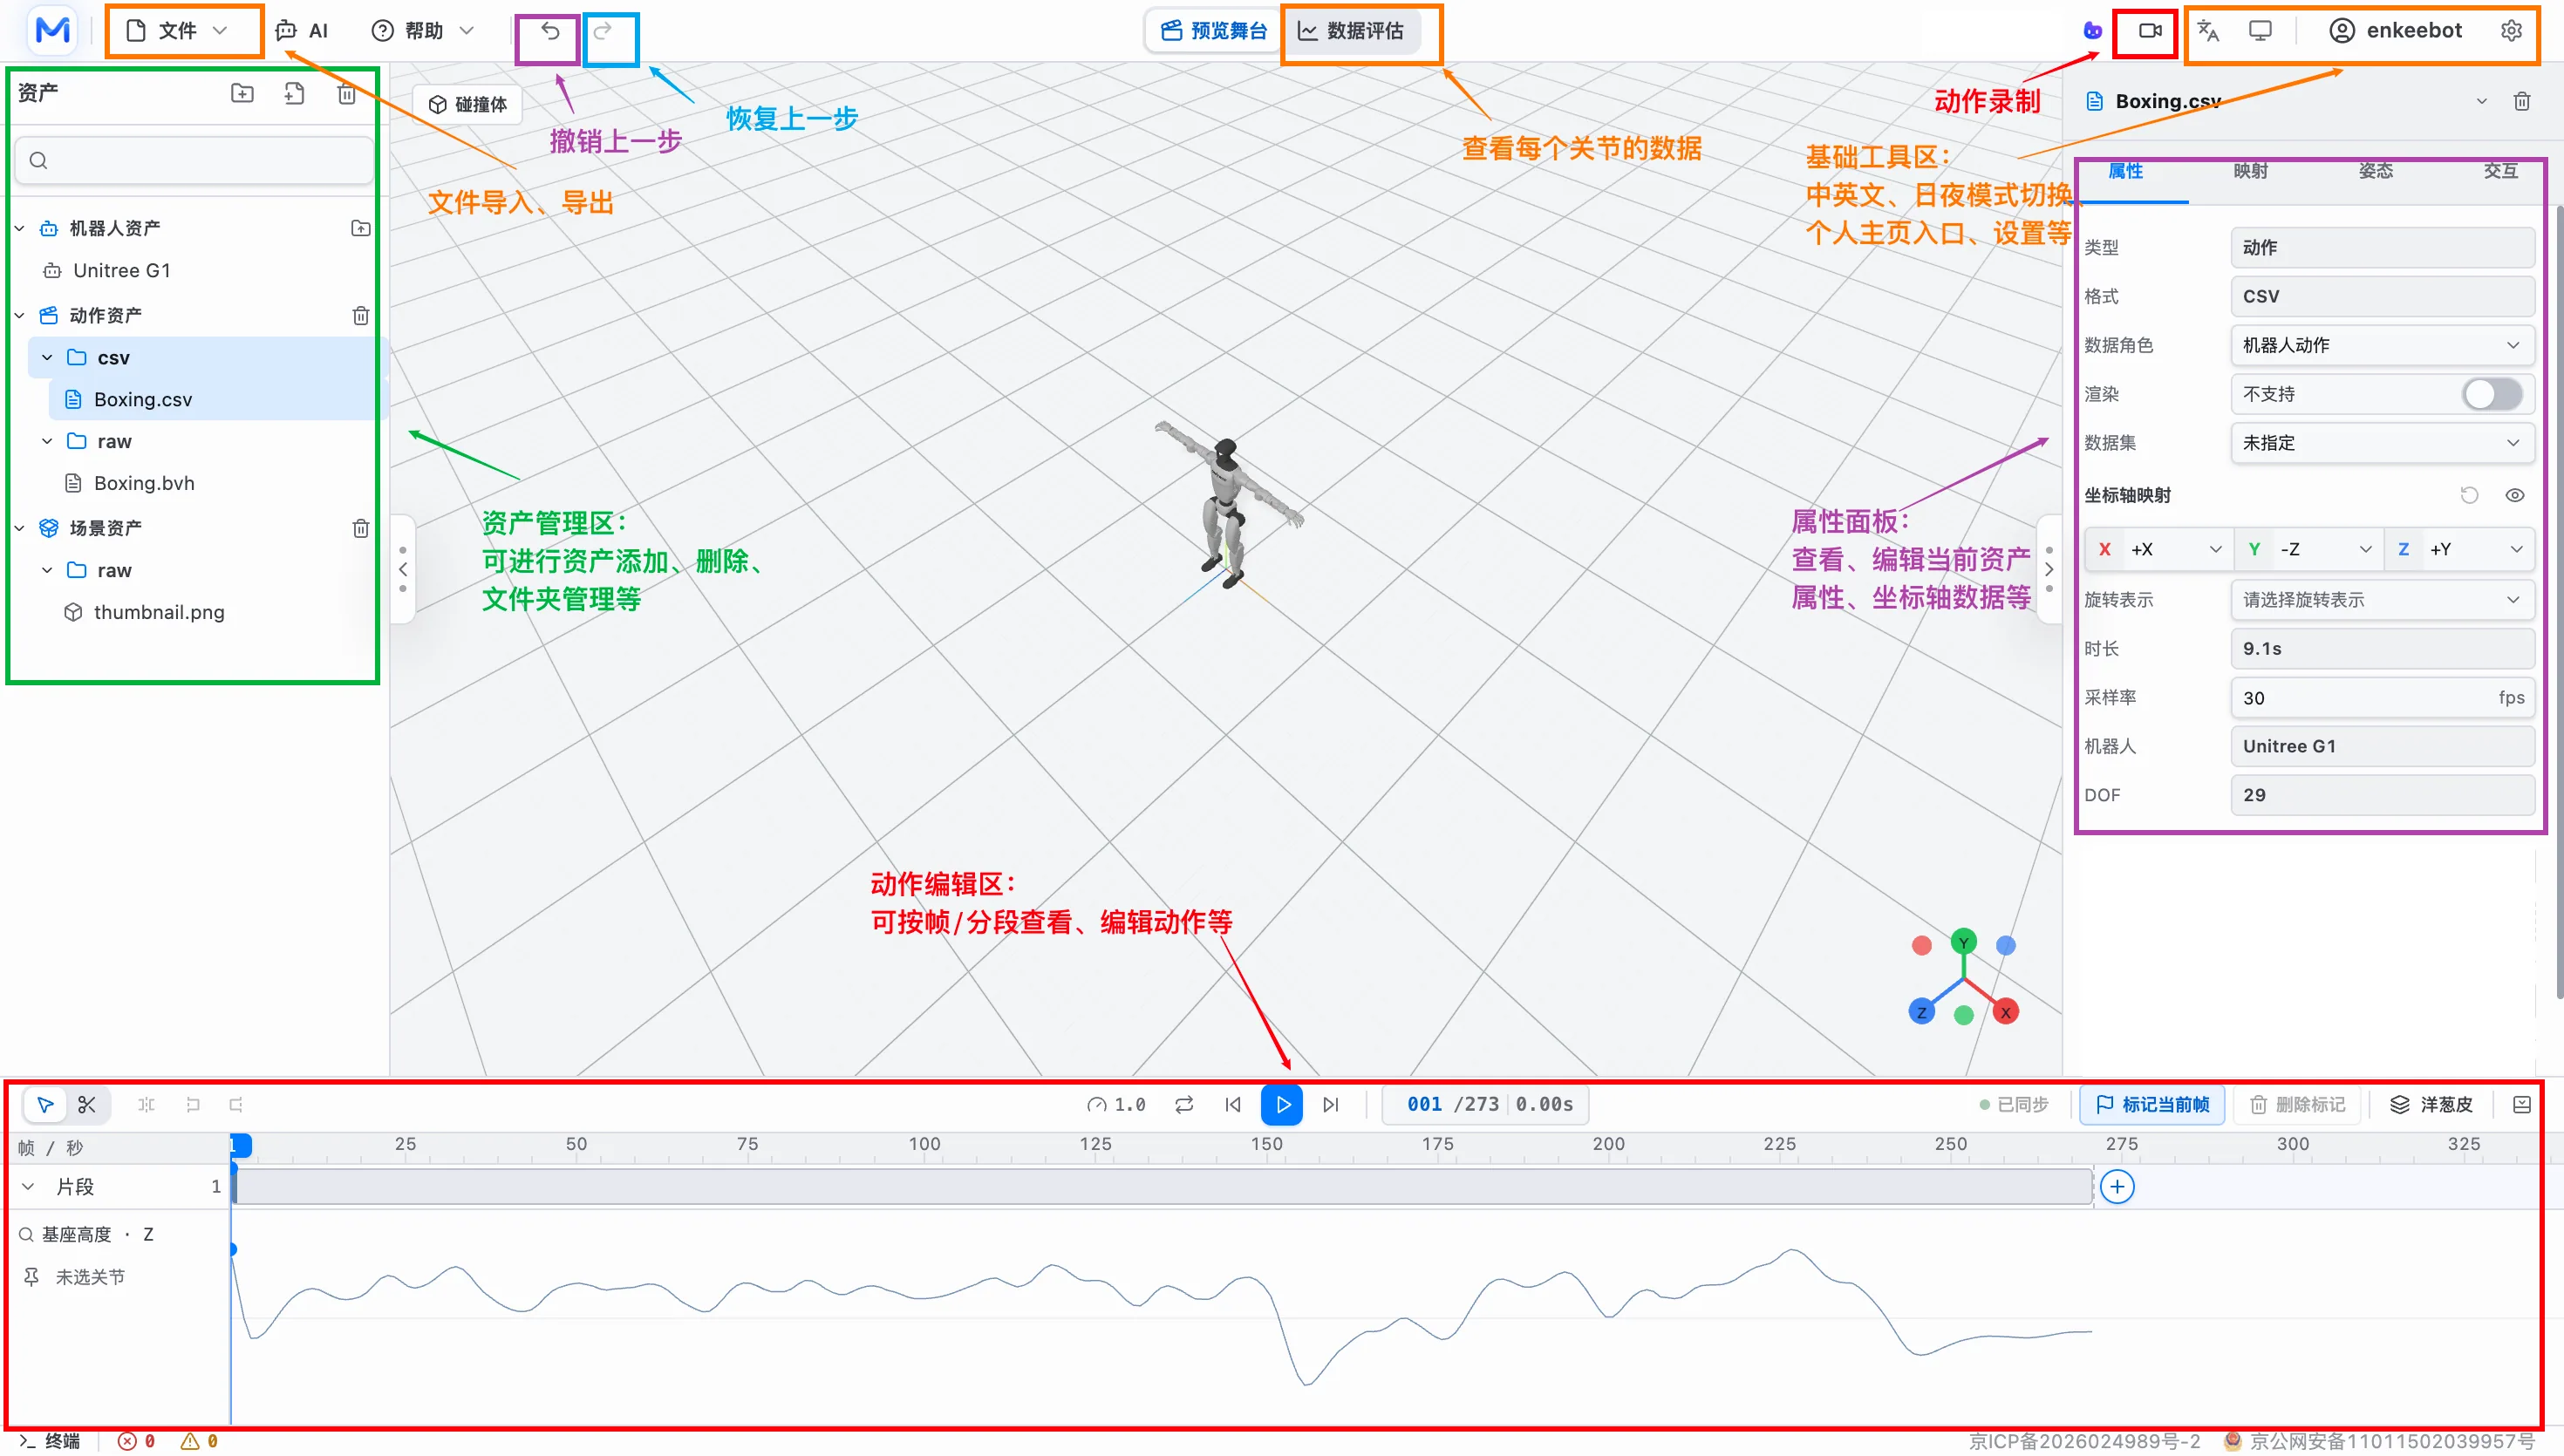
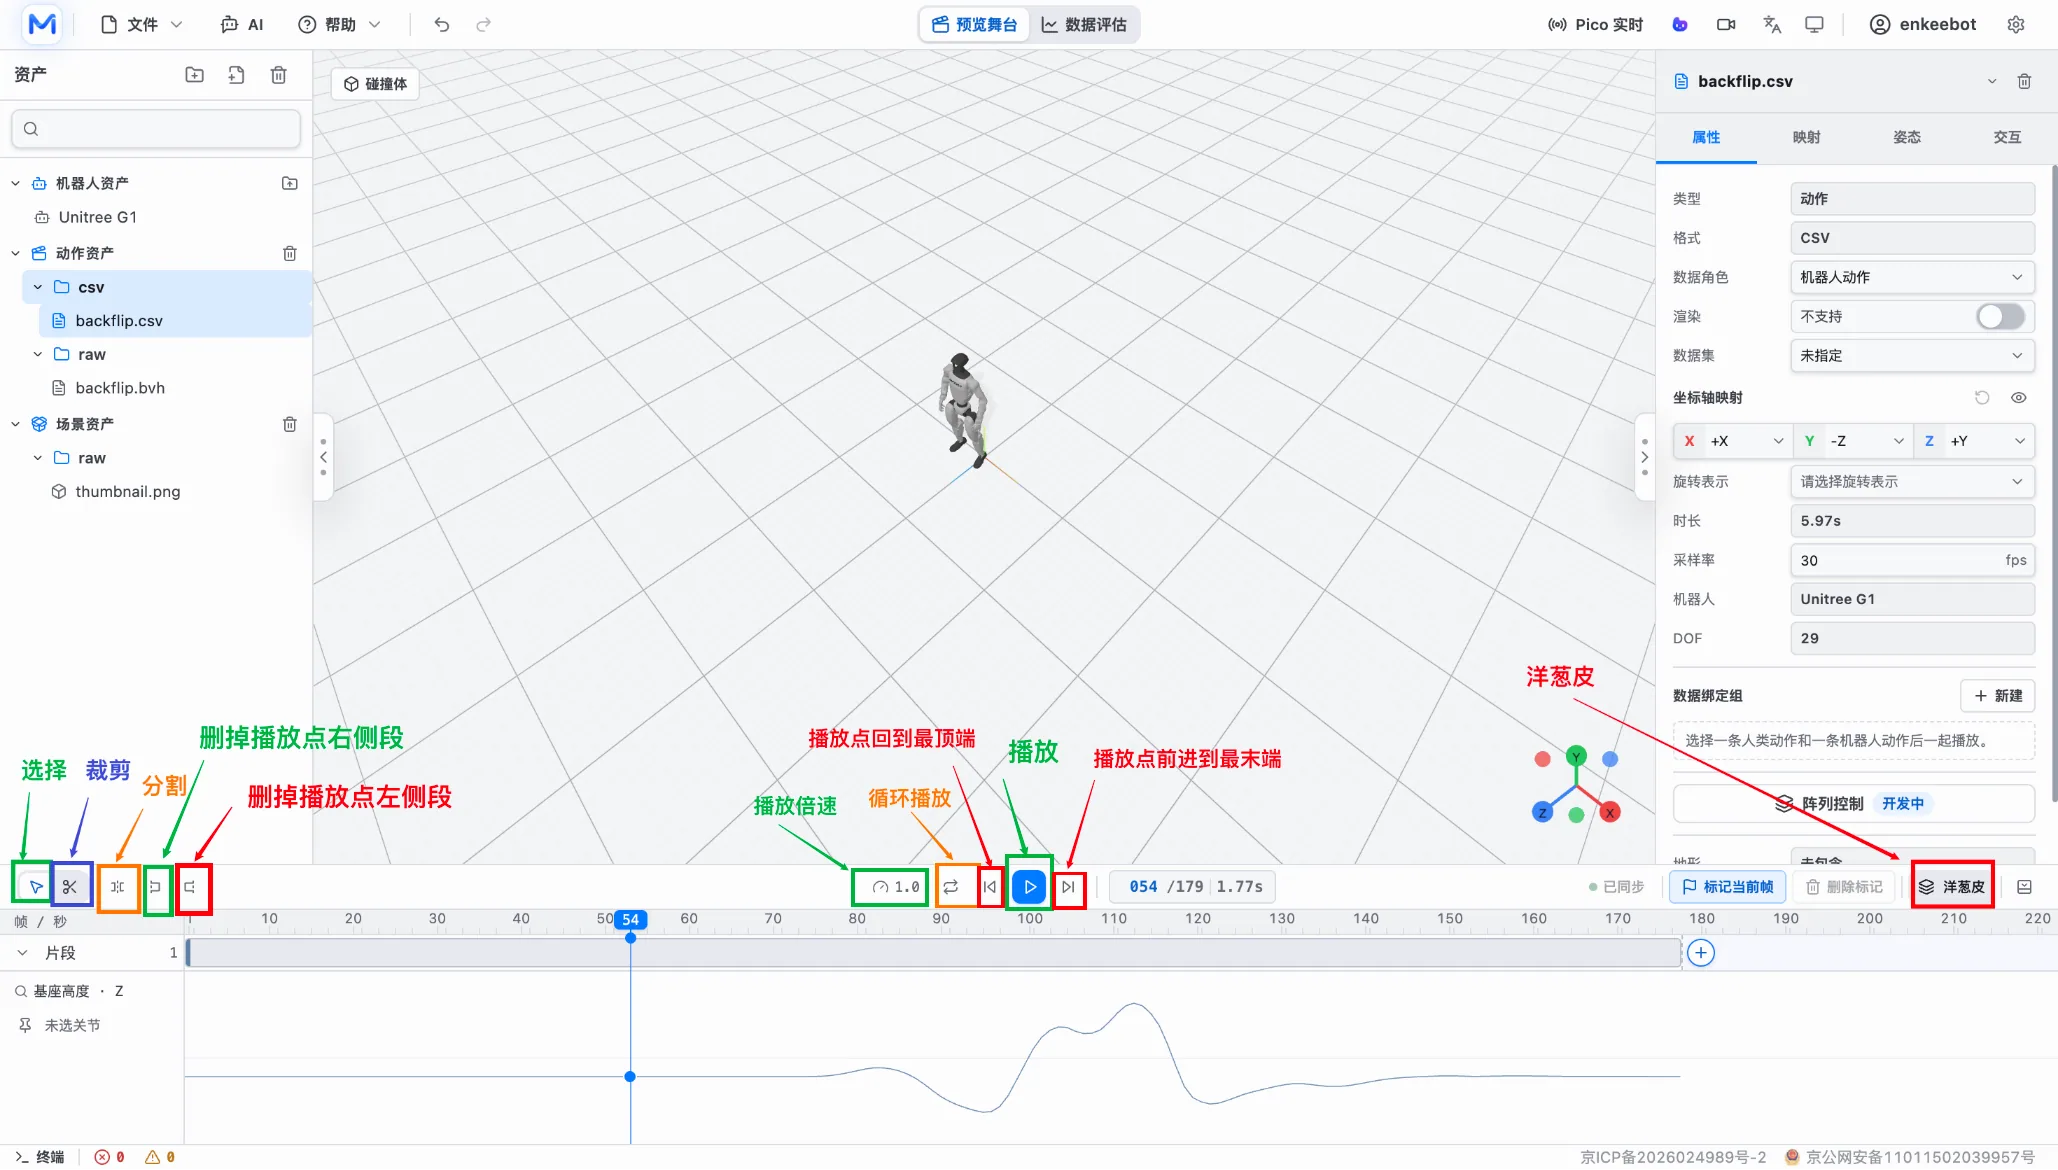
After importing resources, review the interface areas before editing. The current layout is workstation-style: global tools at the top, asset management on the left, preview in the center, properties on the right and motion timeline editing at the bottom.
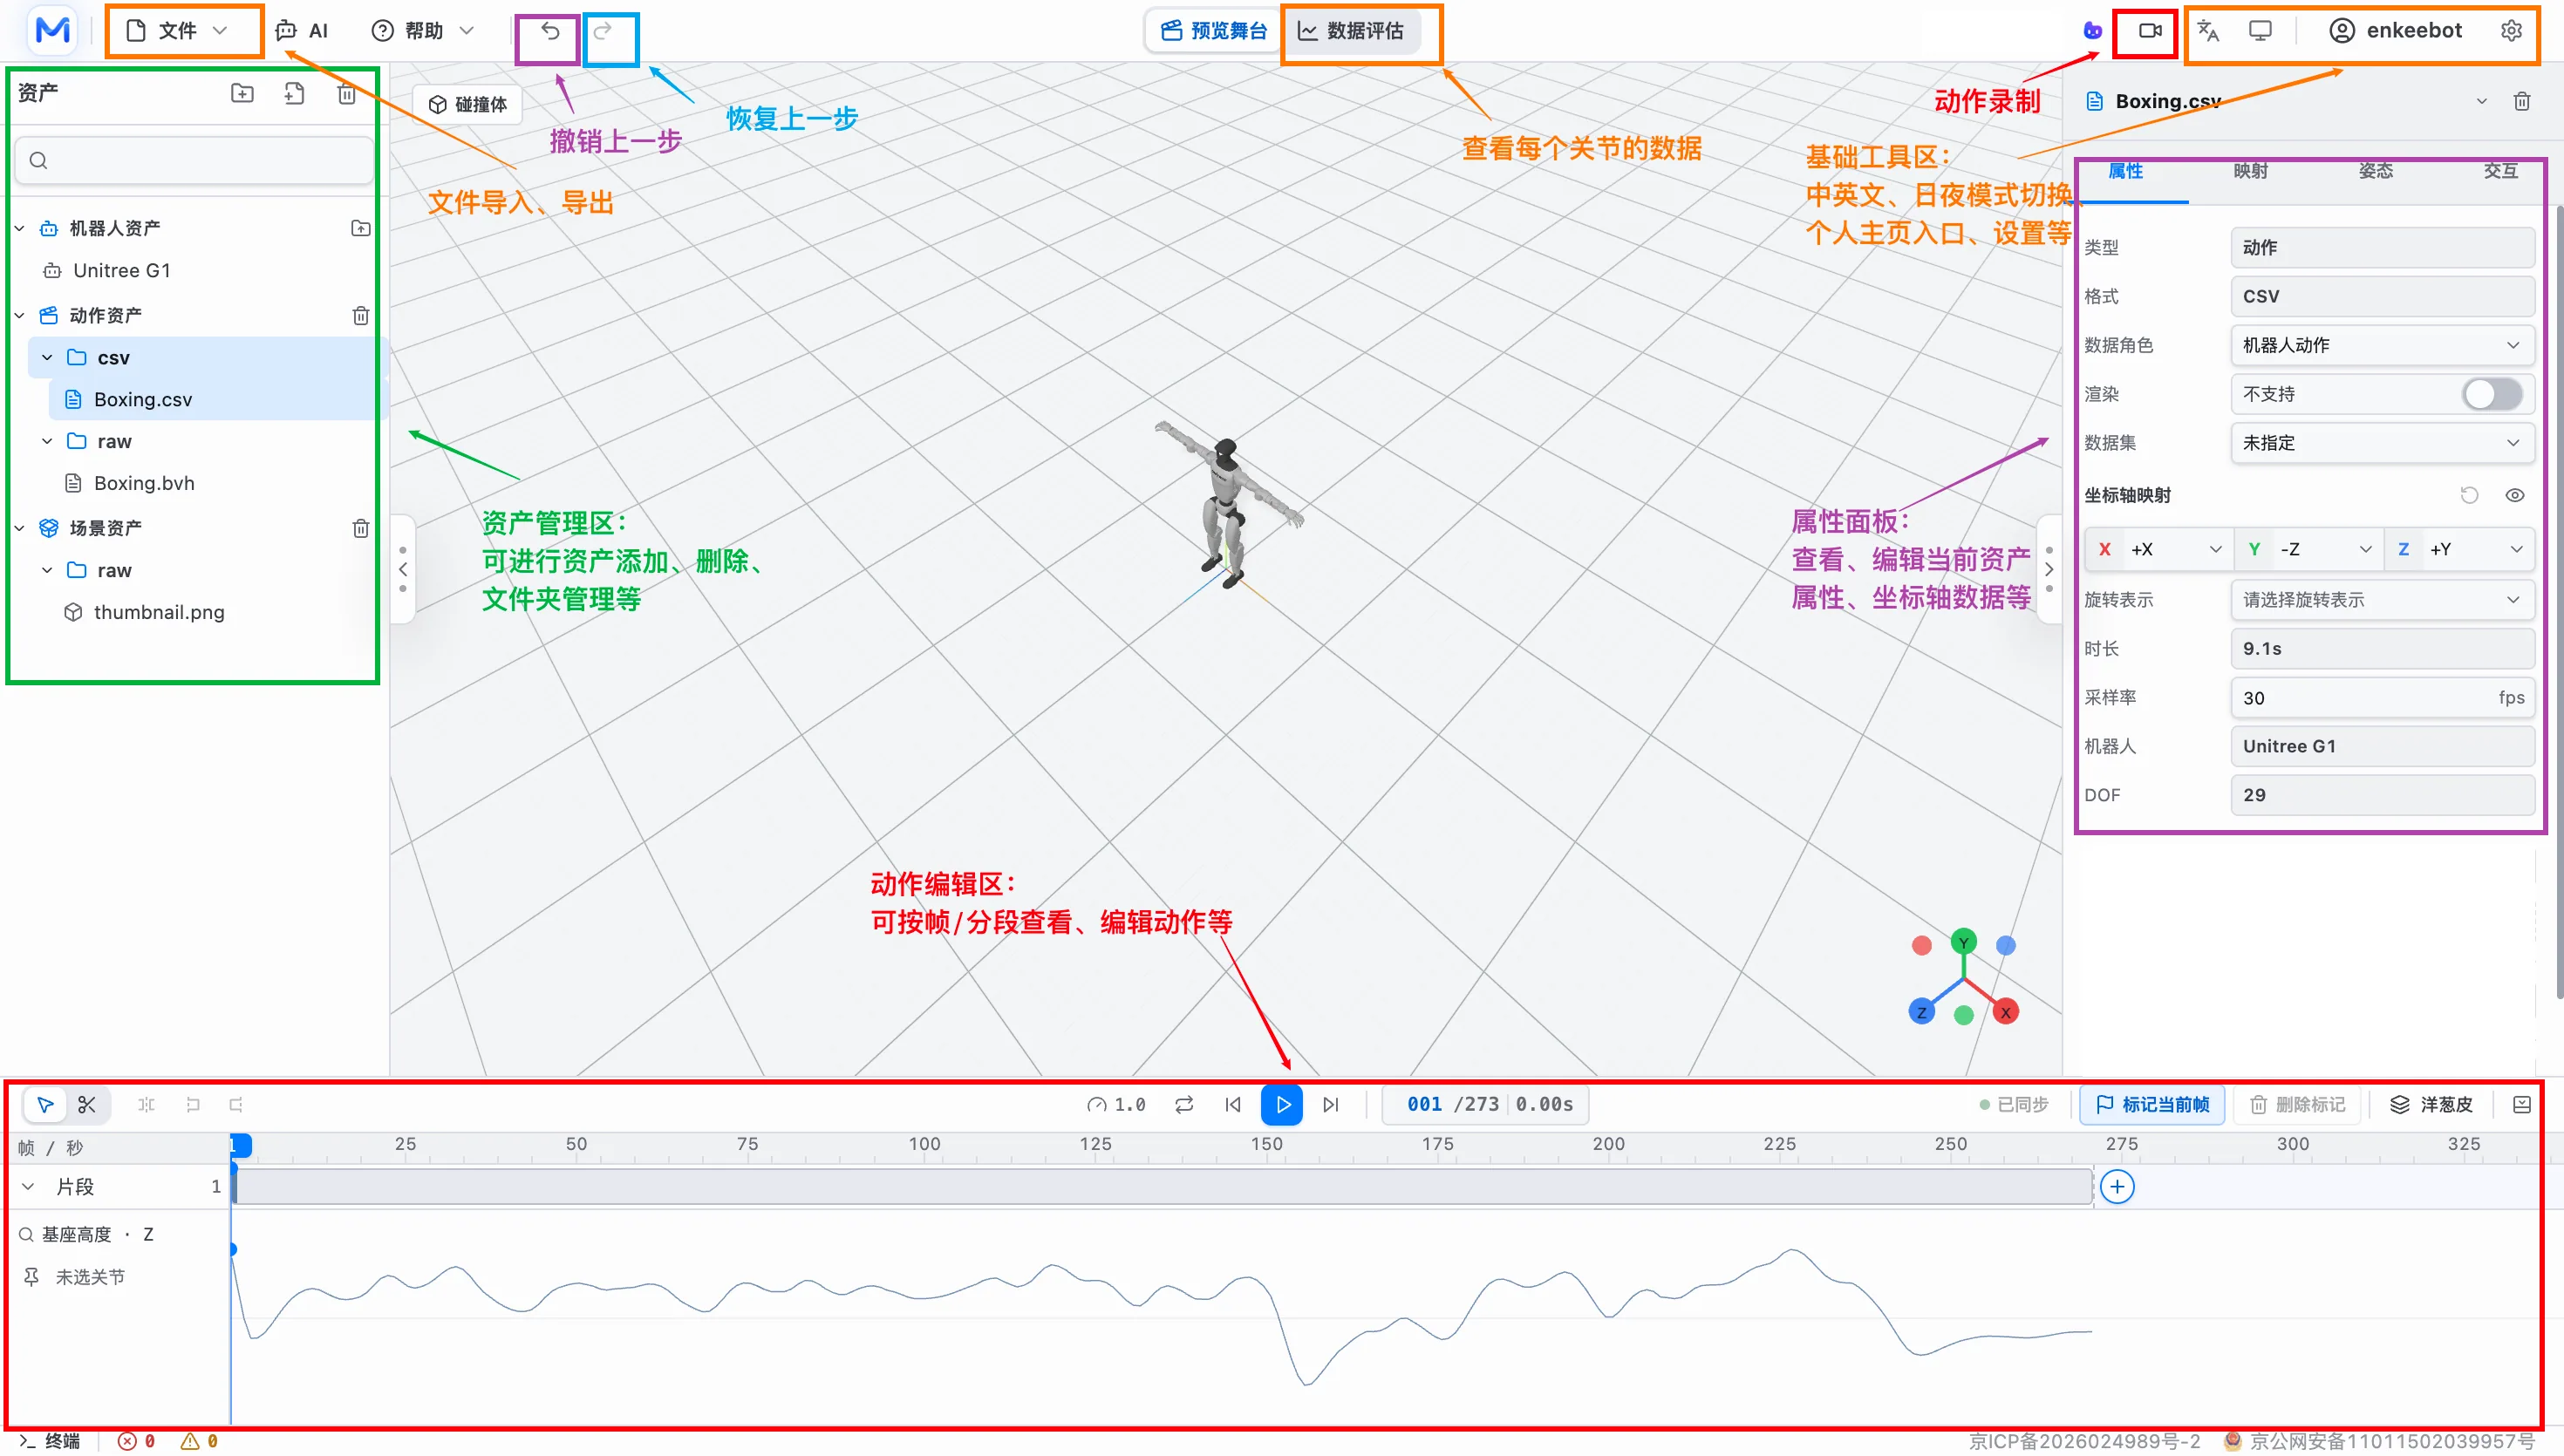
| Area | Main contents | User purpose |
|---|---|---|
| Top toolbar | File, AI, help, undo, redo, Preview Stage, Data Evaluation, recording, language, display, account and settings | Import/export, workspace switching and global actions. |
| Left asset panel | Robot assets, motion assets, scene assets, search, add, delete and folders | Select the resource currently being processed. |
| Center preview stage | 3D grid, robot/motion/scene display, collision toggles and coordinate helpers | Check whether resources are loaded correctly. |
| Right properties panel | Properties, Mapping, Pose and Interaction | Inspect parameters, set axes, run mapping, pose and interaction actions. |
| Bottom timeline | Playback, frame number, speed, clips, curves, markers, onion skin and terminal logs | Inspect and edit motion by frame or clip. |
Top Toolbar
- File imports and exports assets.
- Undo and redo move backward or forward through edits.
- Preview Stage shows robots, motions and scenes.
- Data Evaluation shows motion-related data and quality checks.
- Motion recording supports real-time data and recording workflows.
- The top-right tool area includes language, theme, profile and settings entries.
Left Asset Panel
The left asset panel is the main entry point after import. Users can add, delete, search and organize assets in folders. The screenshot includes Unitree G1, Boxing.csv, Boxing.bvh and thumbnail.png.
Right Properties Panel
When an asset is selected, the right properties panel shows type, format, data role, render capability, dataset, axis mapping, rotation representation, duration, sampling rate, robot model and DOF. In the screenshot, Boxing.csv is set as Robot Motion, sampled at 30 fps, using Unitree G1 with 29 DOF.
Bottom Timeline
The bottom timeline is used to play motion, inspect frames, split clips and edit motion. Users can view curves, mark the current frame, delete markers, enable onion skin display and read runtime messages in the terminal below.
Previewing And Checking Motion
After import, first check whether resources display correctly on the Preview Stage. Timeline playback updates the stage to the current frame pose.
This step catches obvious problems before mapping or editing, such as wrong axes, incorrect sampling rate, robot model mismatch or discontinuous motion.
- Select a robot, motion or scene asset in the left asset panel.
- Check the right properties page for type, format, data role, sampling rate, robot model and DOF.
- Confirm the axis mapping, such as which global direction each X/Y/Z axis points to.
- Rotate the stage view to inspect scale, pose, ground relationship and collision display.
- Use the bottom playback controls to check continuity, jitter and penetration.
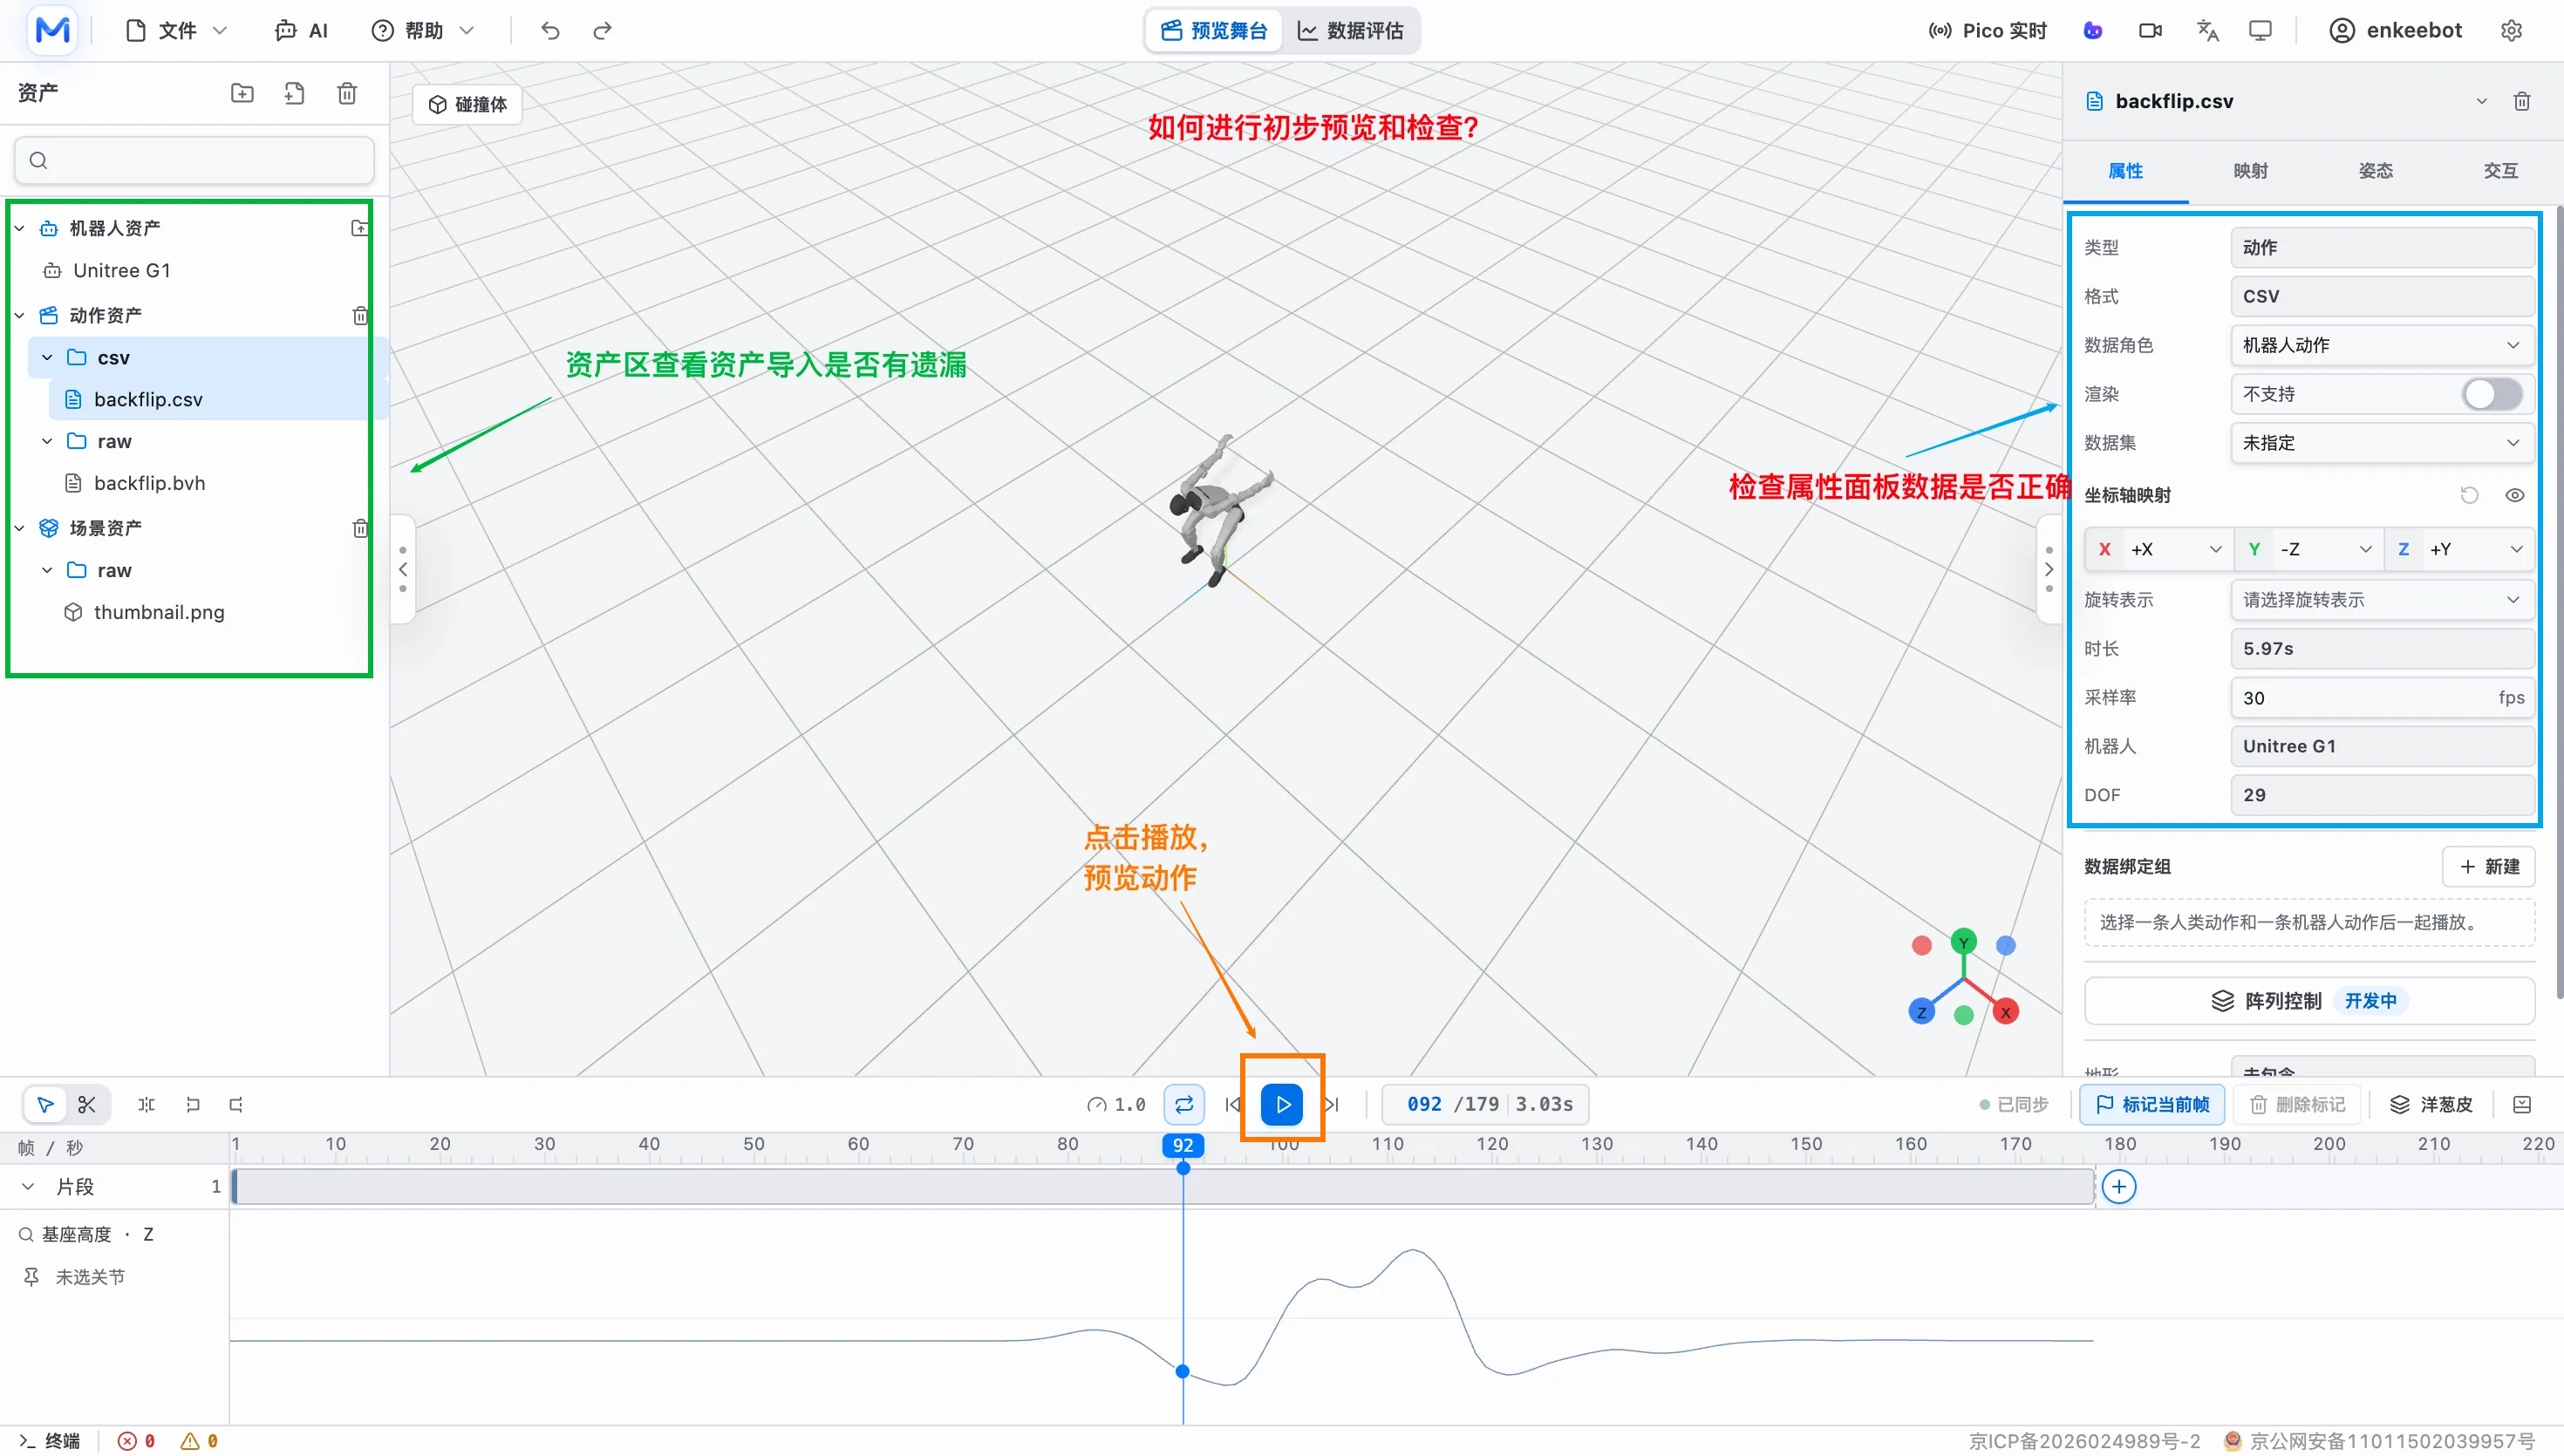
Check axes and rotation representation first when the motion direction is wrong. Check data role, robot model, DOF and joint order first when the robot pose is wrong.
Motion Mapping And Retargeting
Human To Robot
Human-to-robot mapping converts BVH, SMPL/SMPL-X and similar human motion into motion that can be played by a target robot. Choose either the default robot model, which automatically maps to Unitree G1, or a specified robot model.
Default Model Mapping
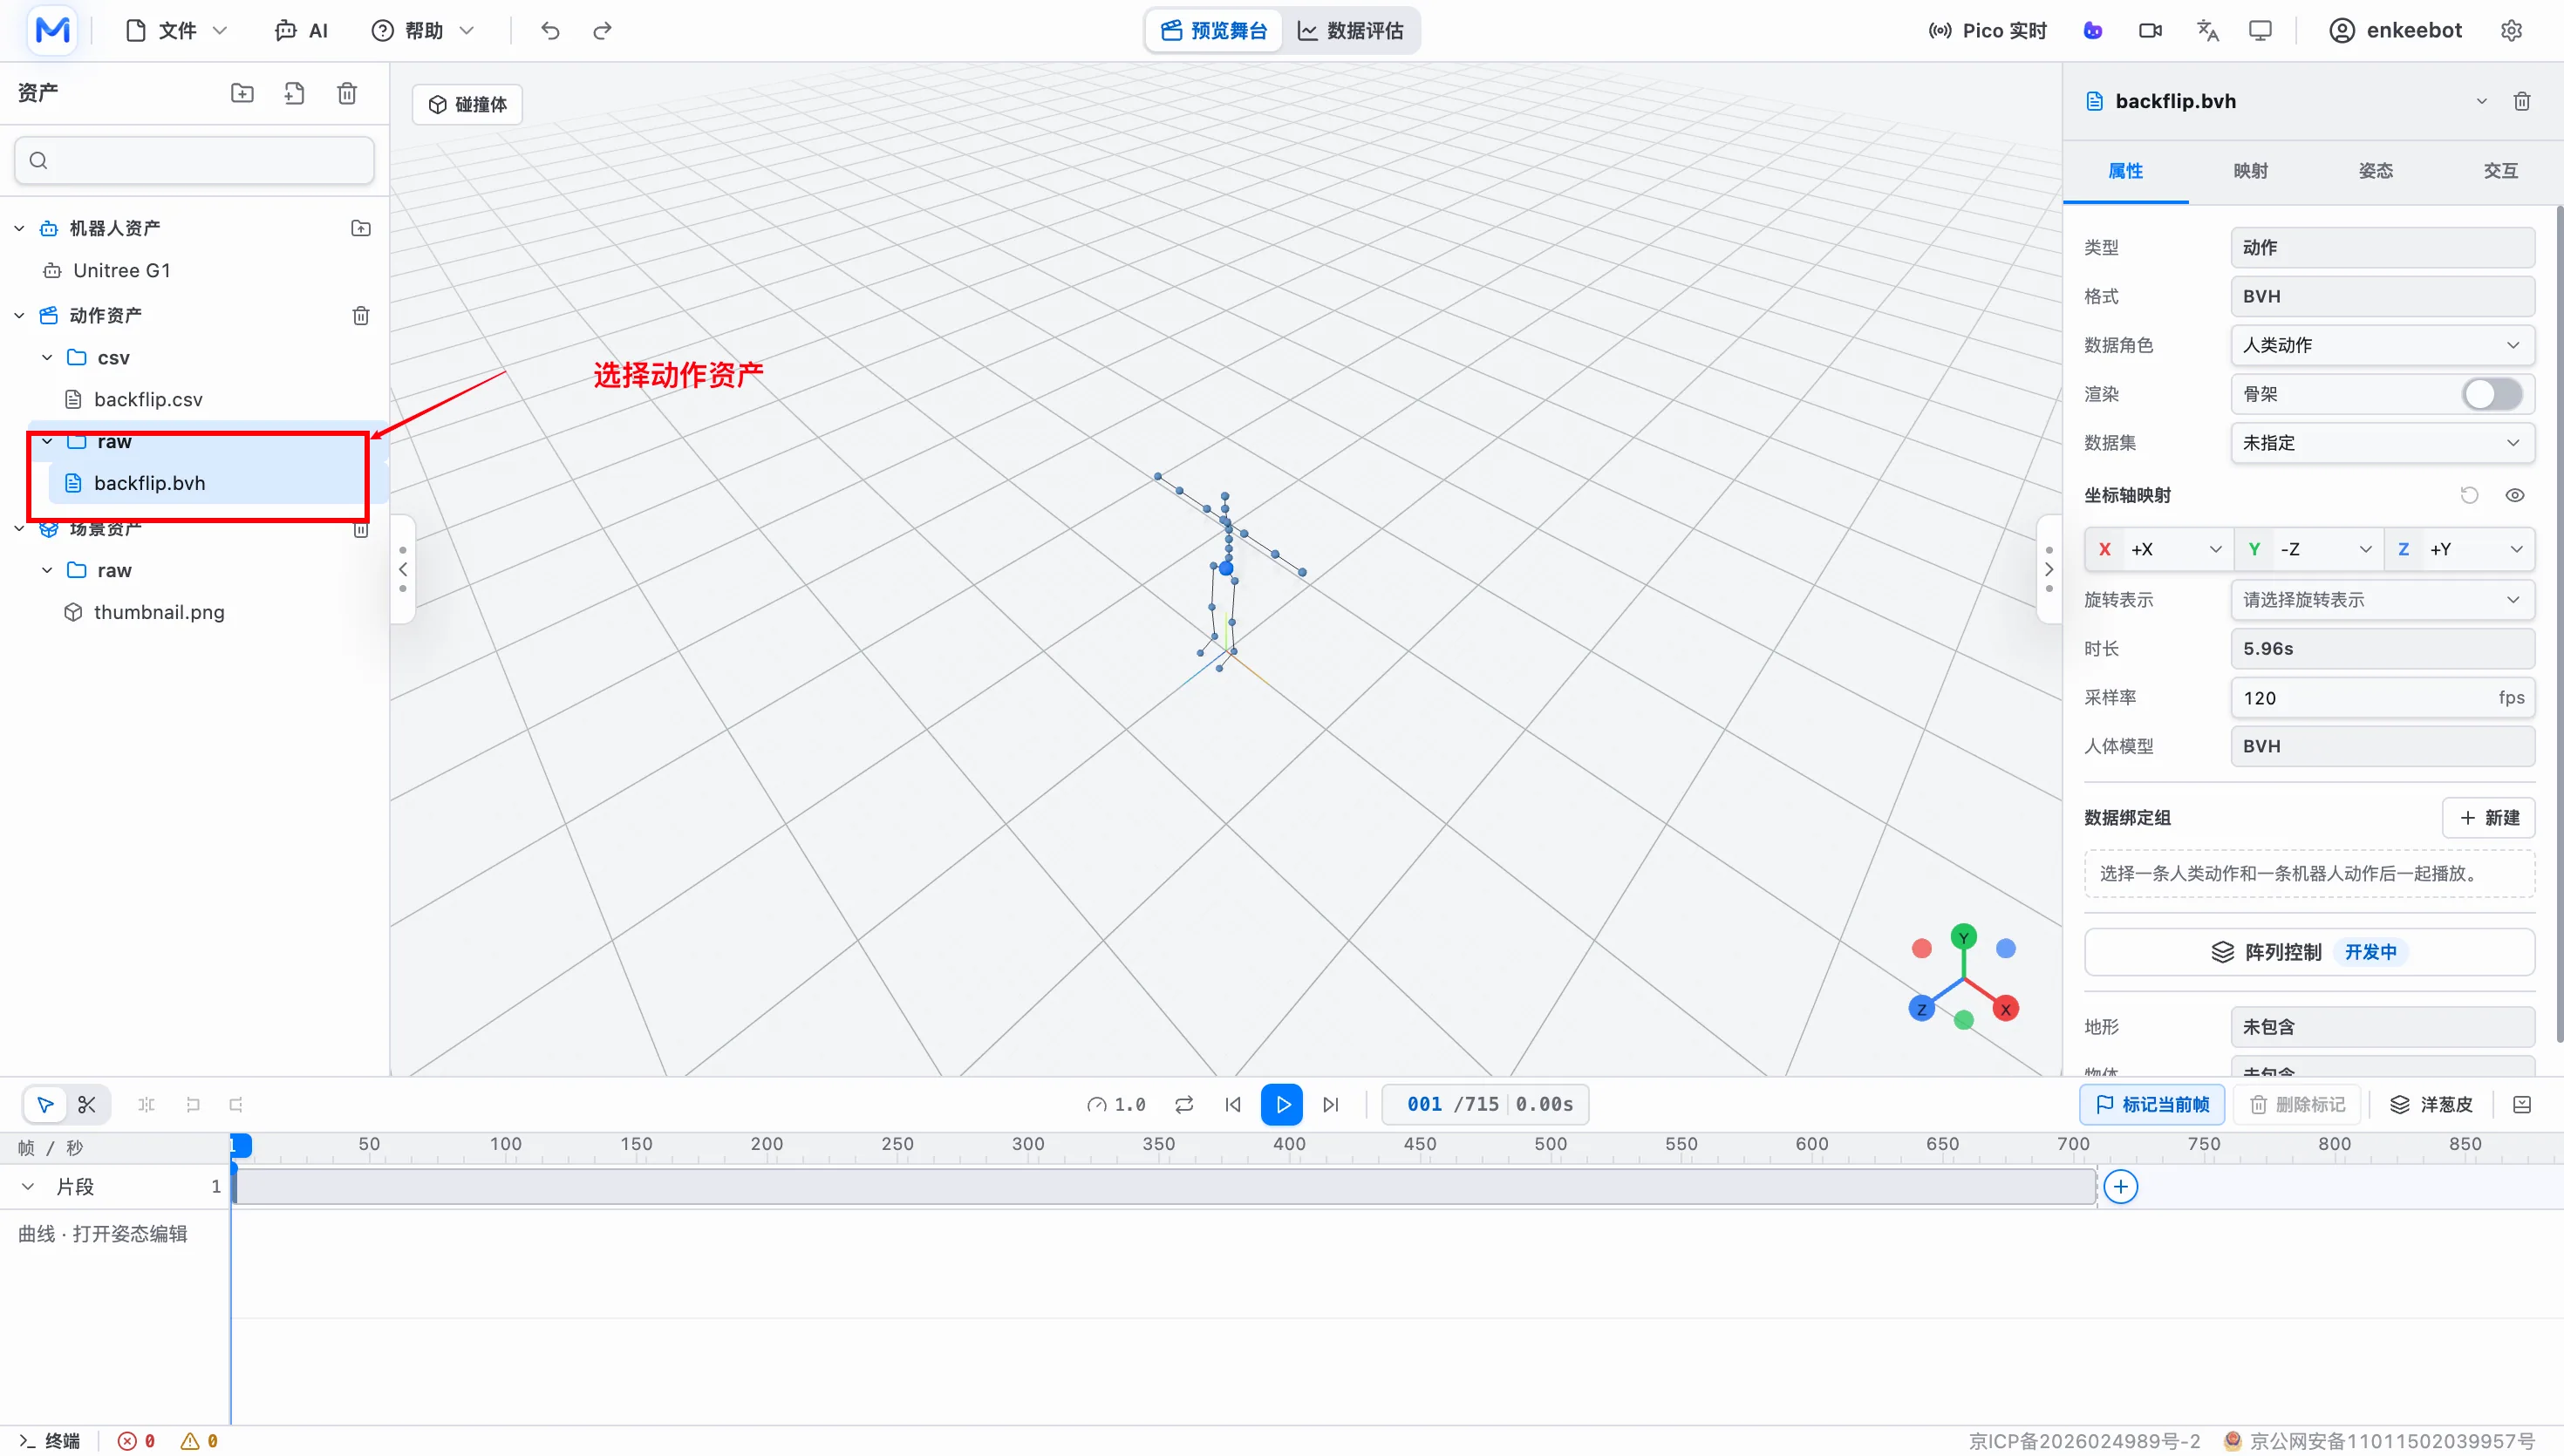
Select the motion asset to map.
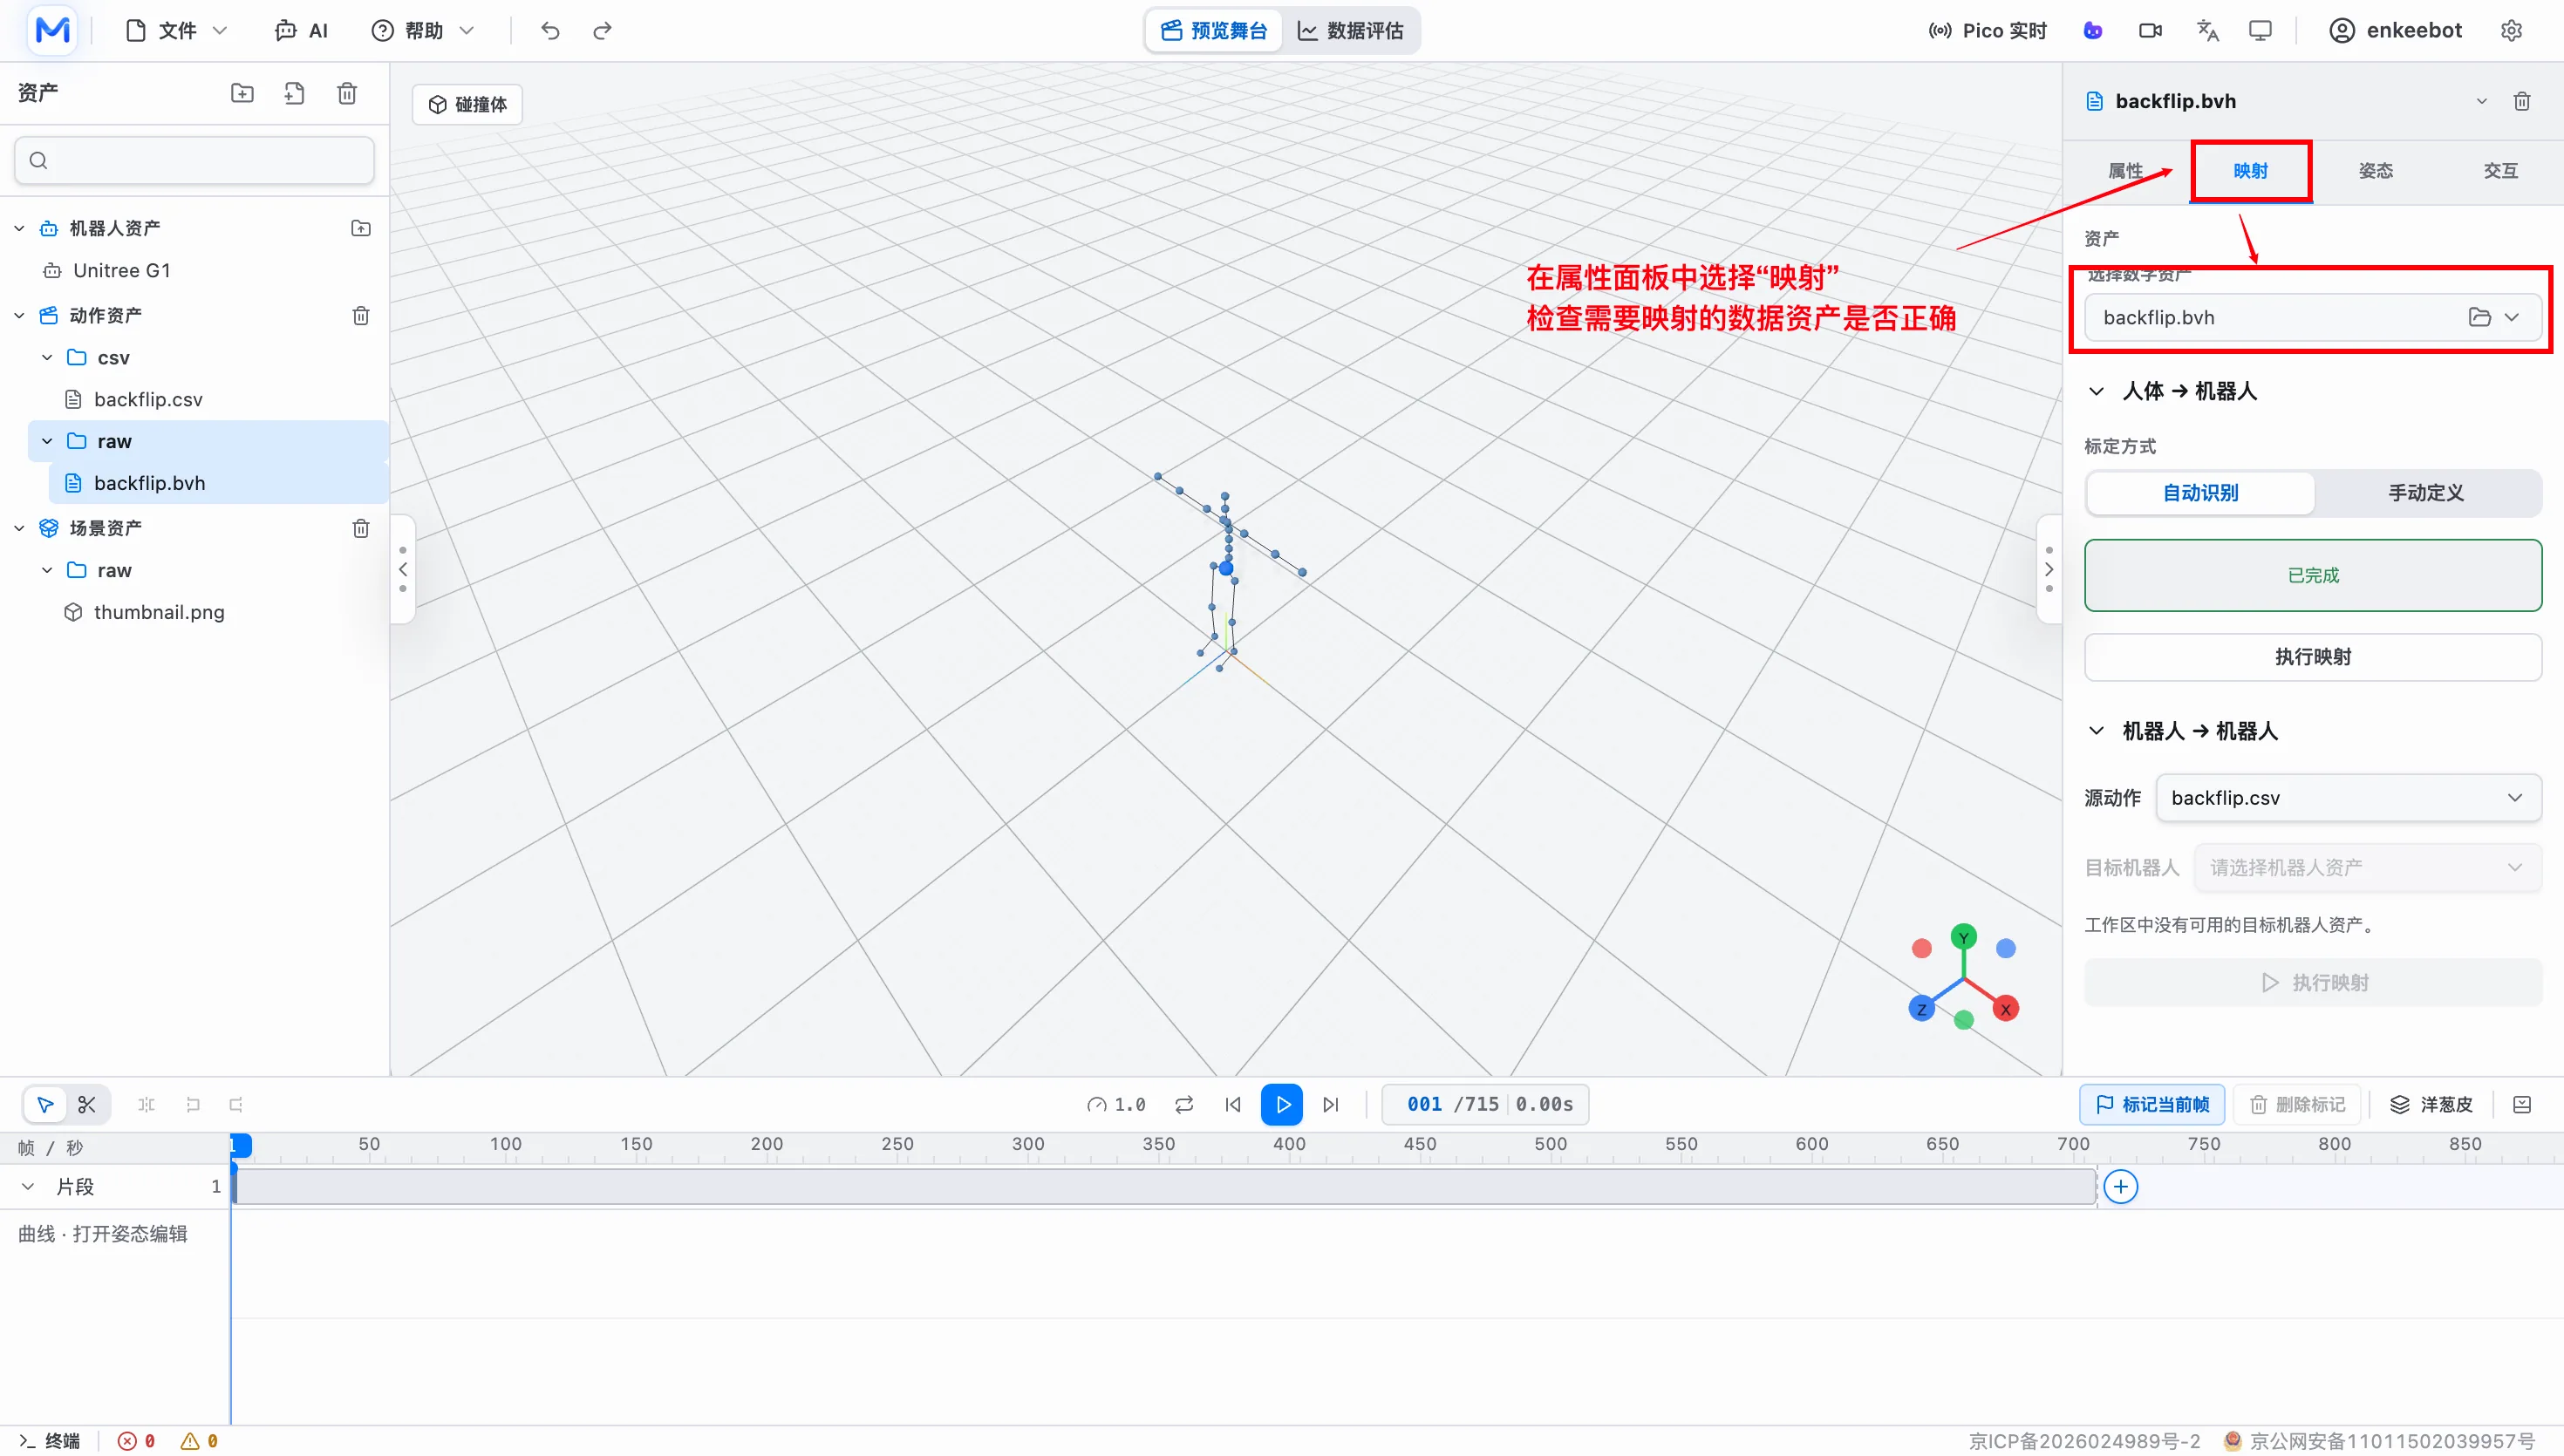
Choose Mapping in the properties panel, then check the source motion and target robot, such as Unitree G1. If no robot model is imported or manually selected, mapping uses Unitree G1 by default.
Run mapping to map the motion asset onto the robot model automatically.
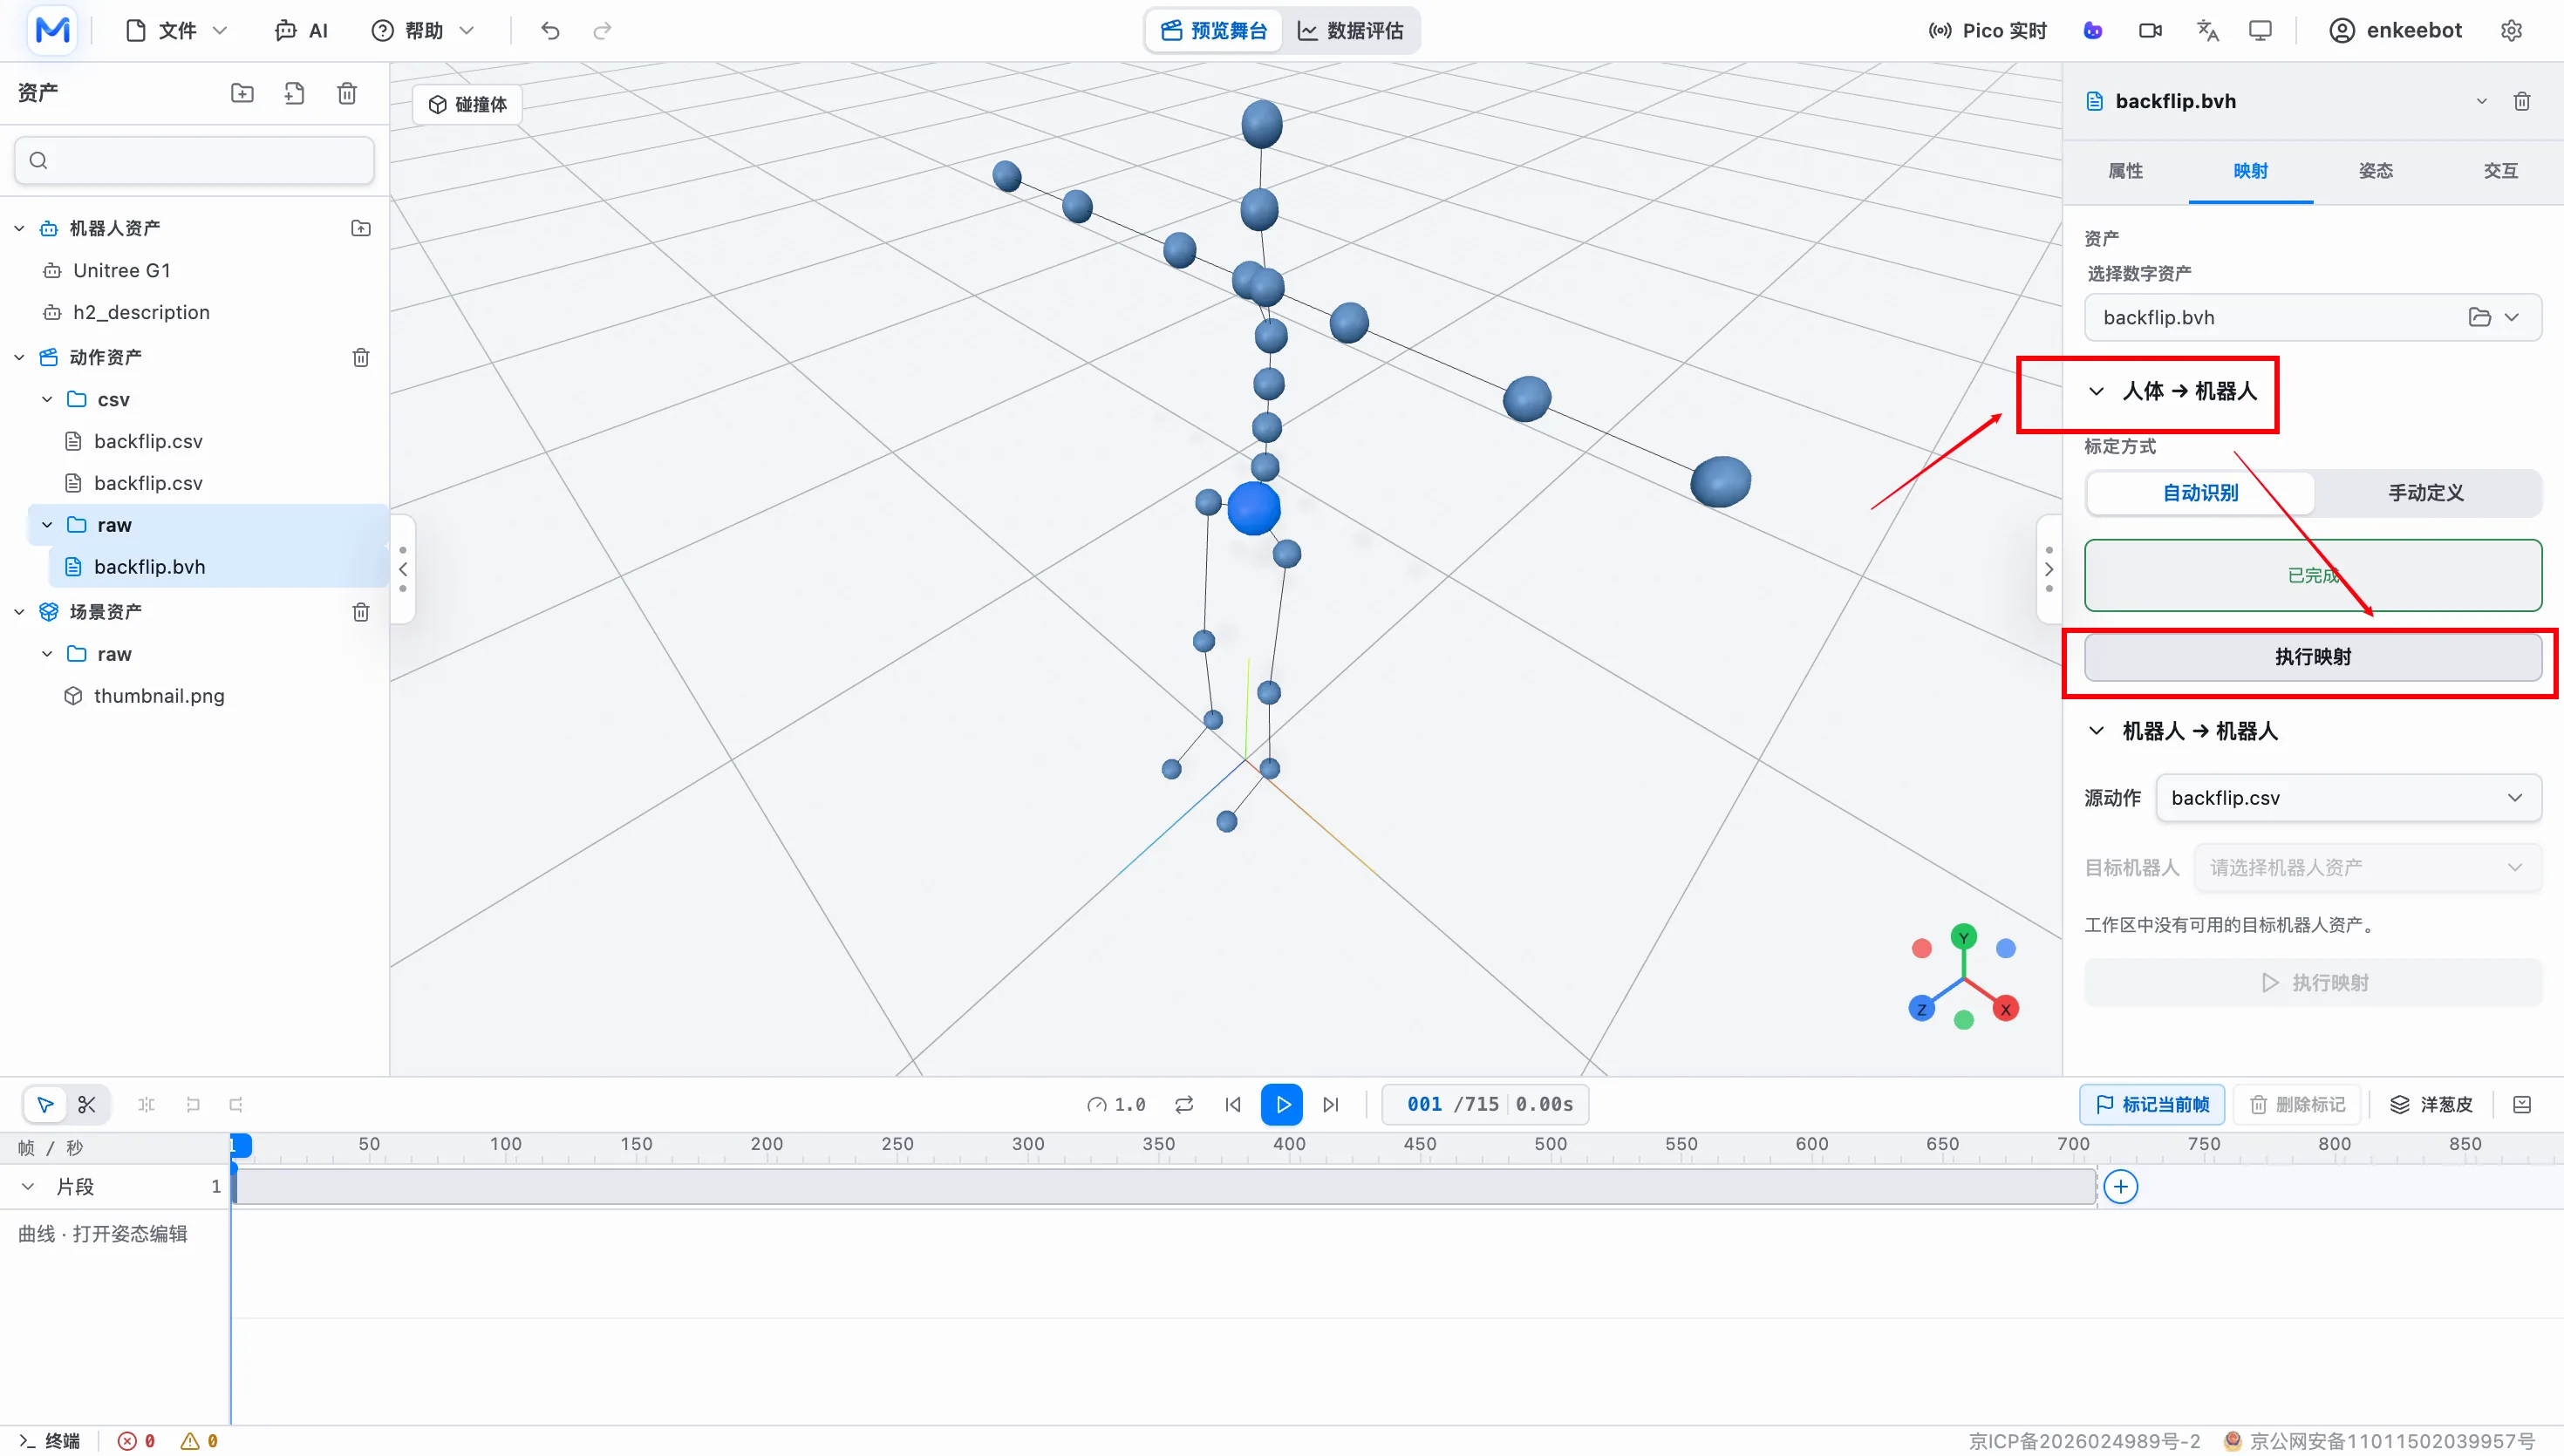
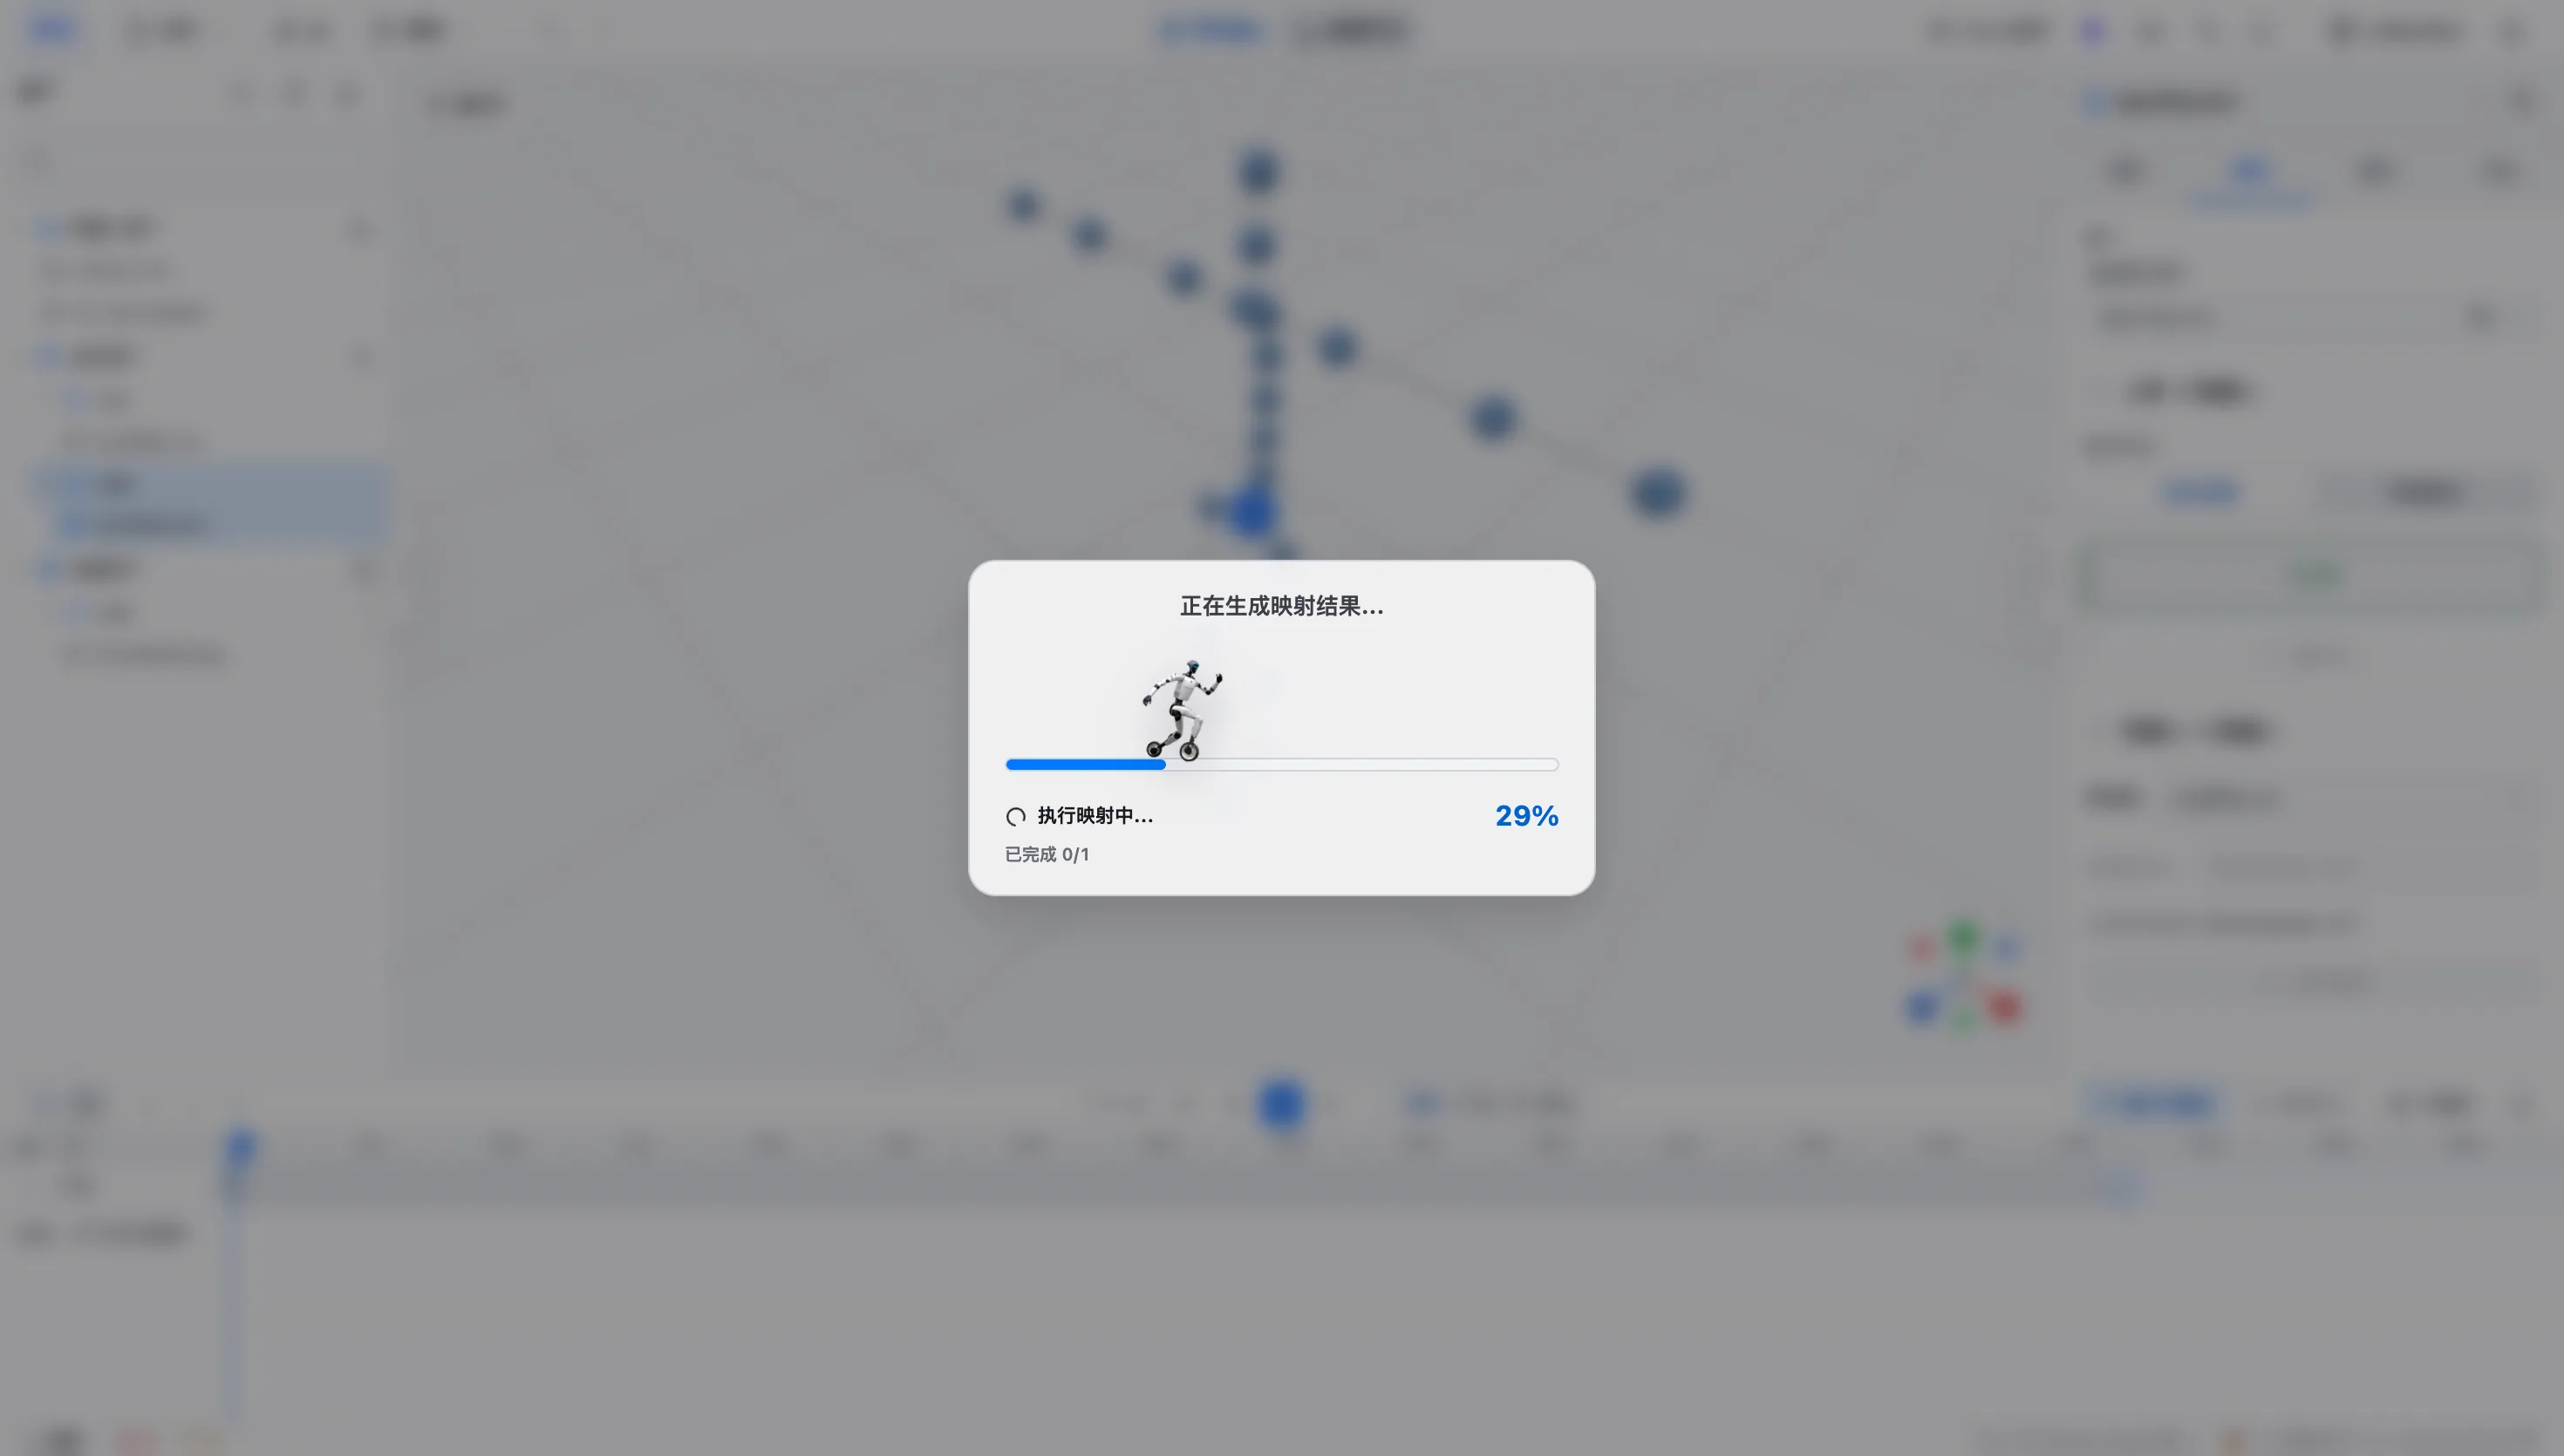
Wait for the progress indicator to finish.
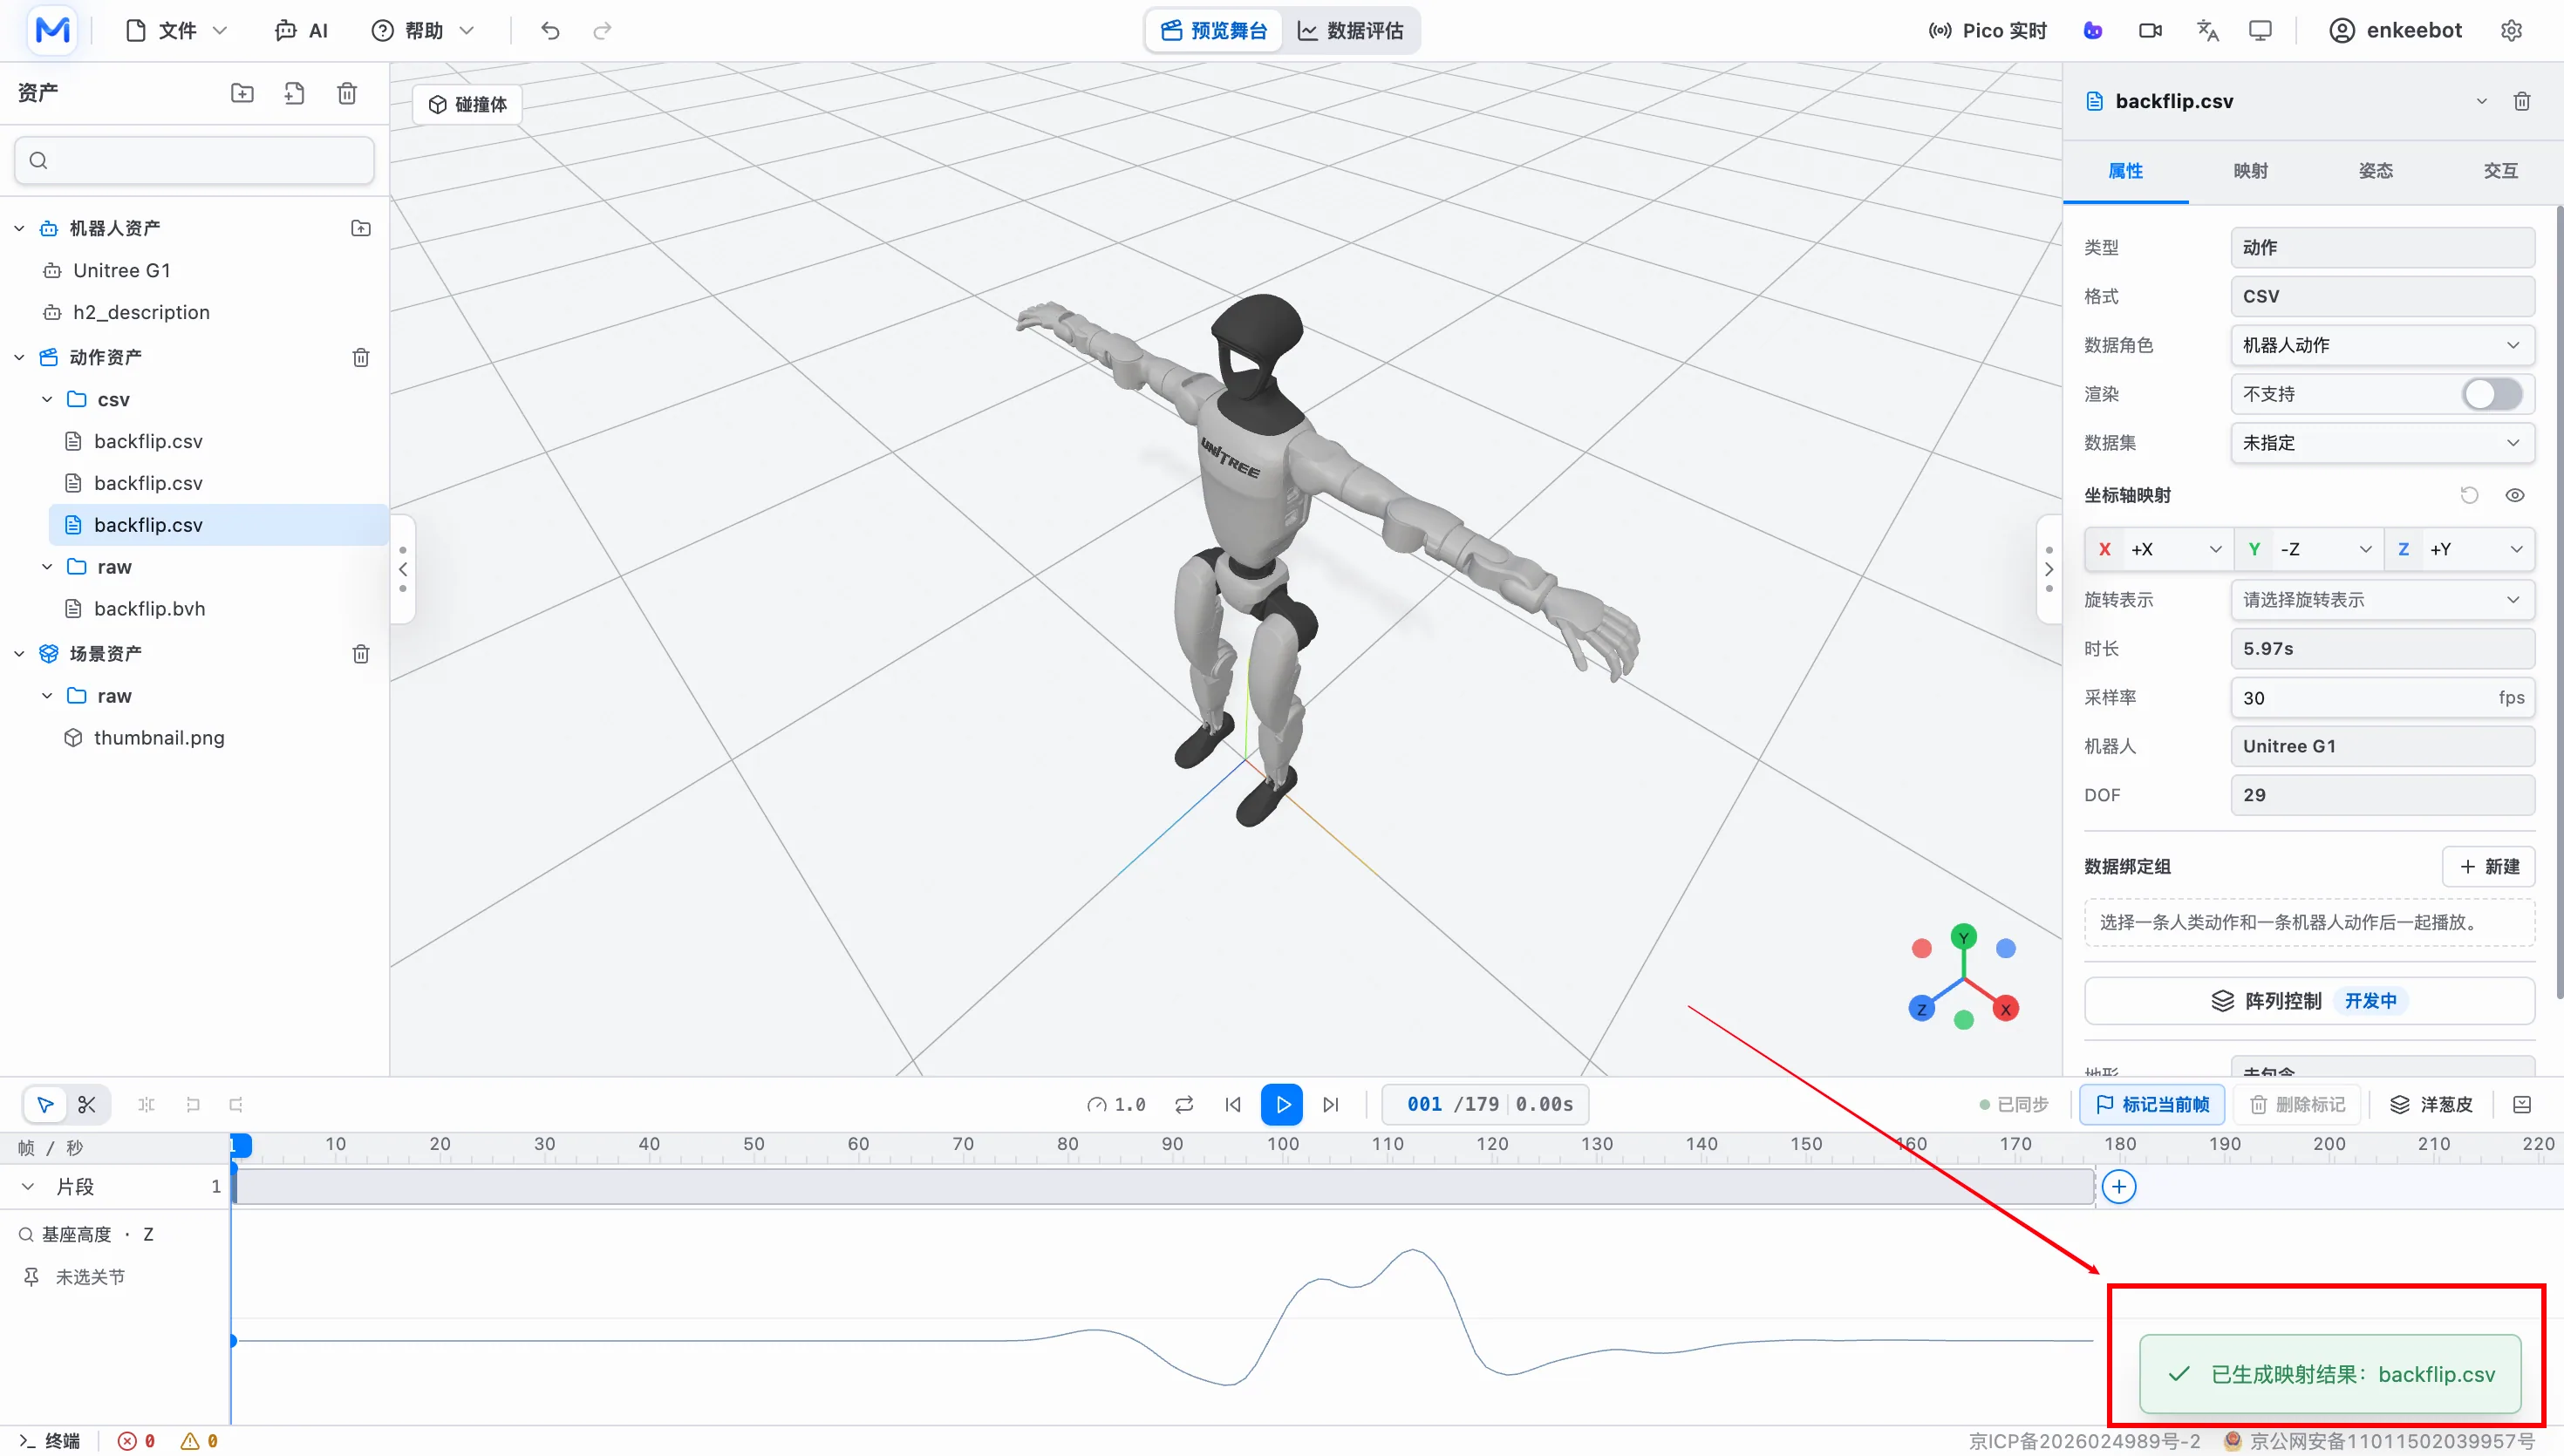
After mapping succeeds, the following interface and message appear.
Custom Model Mapping
To map a custom robot model, follow these steps.
Step 1: Open Motion Studio and import the local motion file that needs to be mapped.
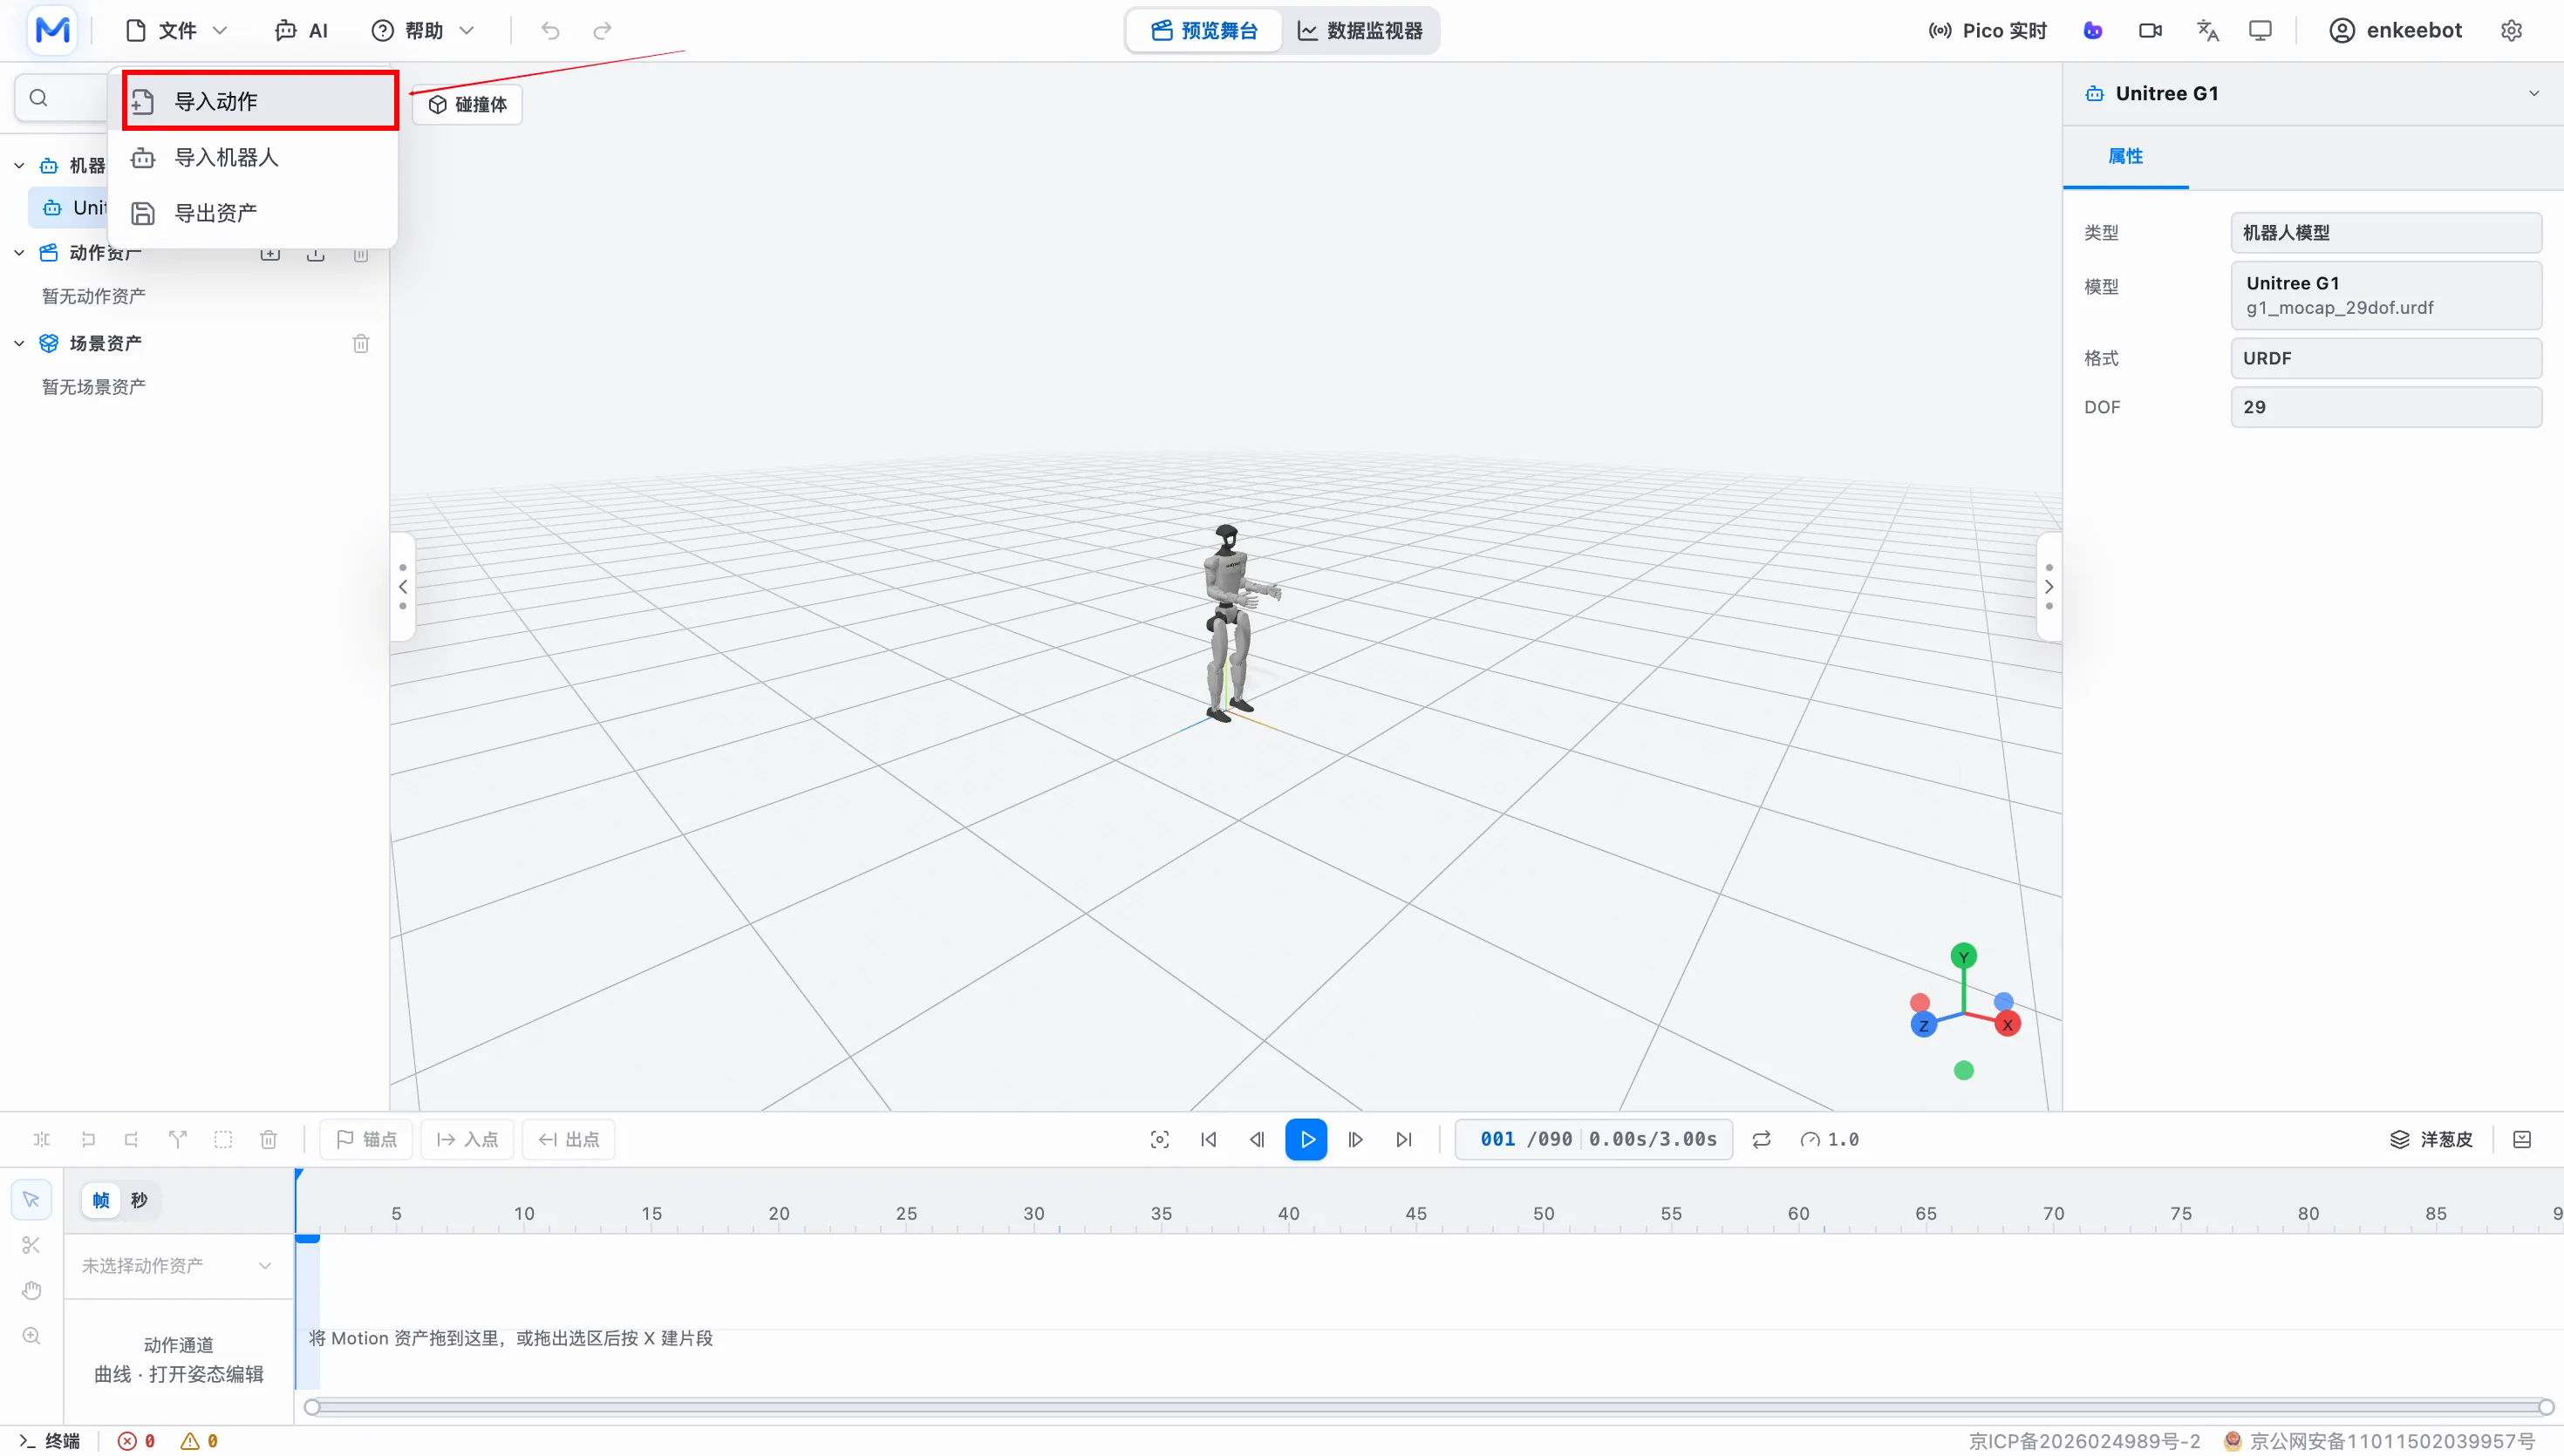
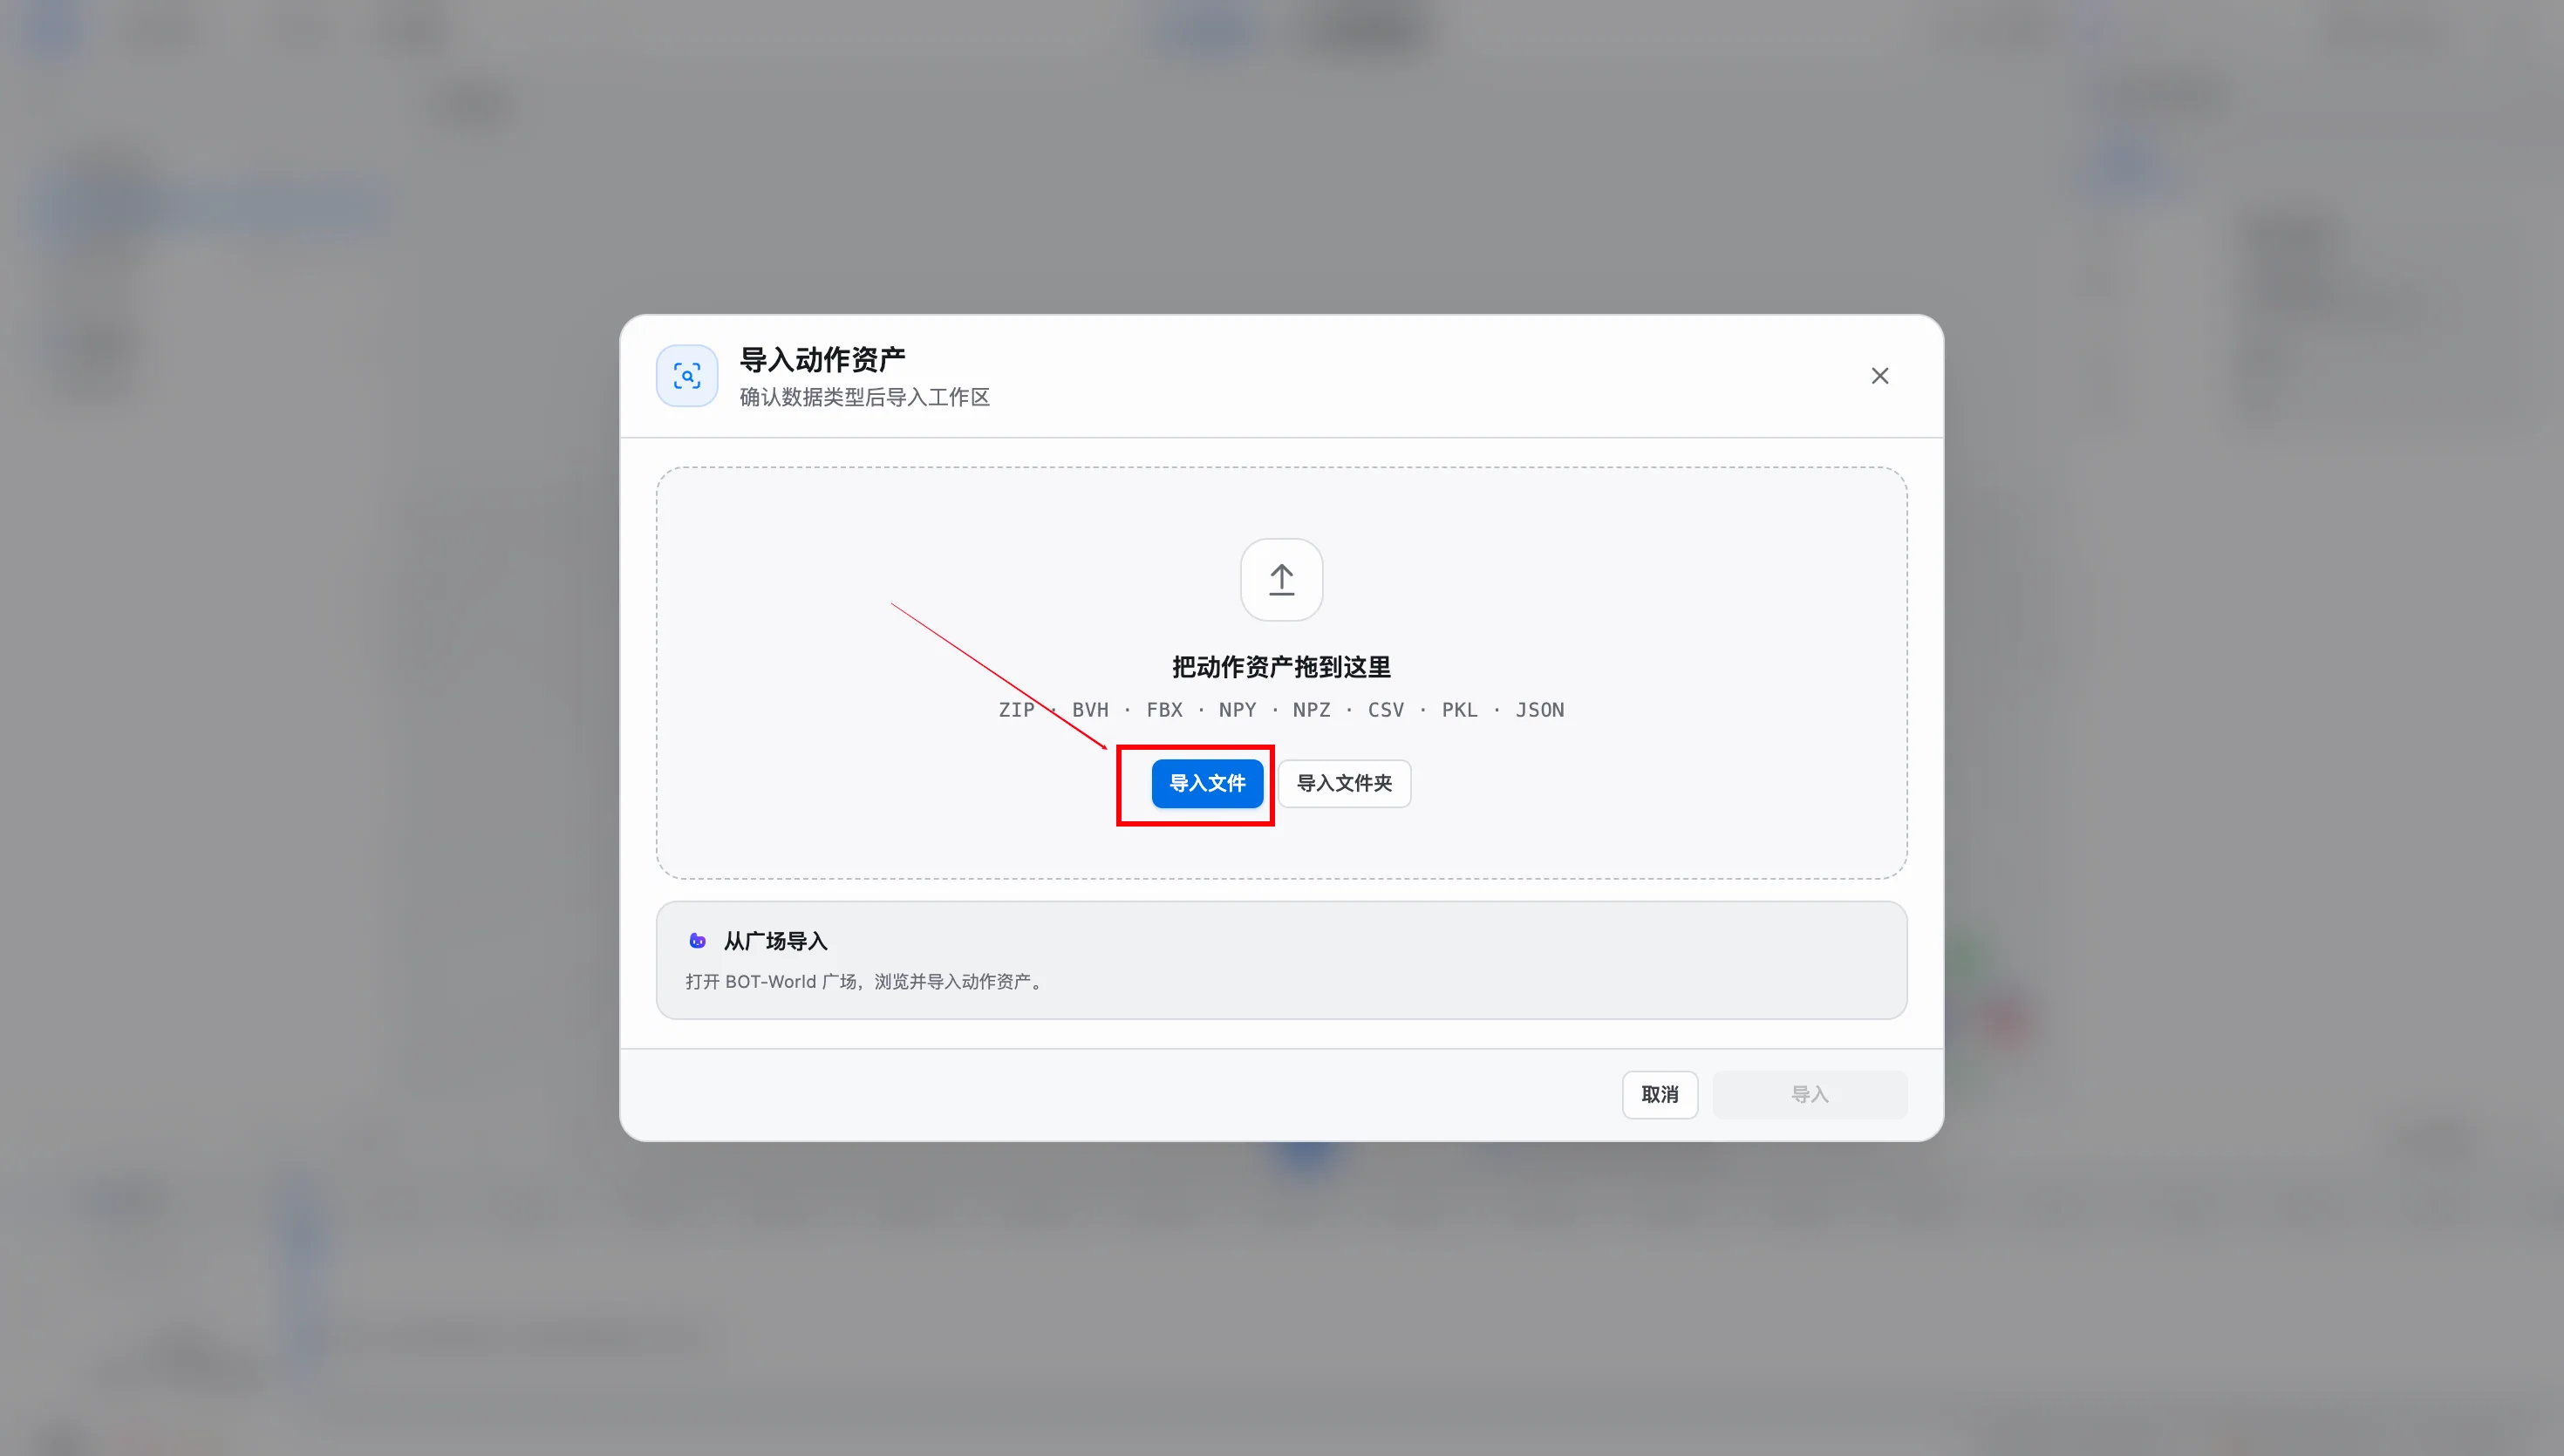
Step 2: Select and import the local motion file.
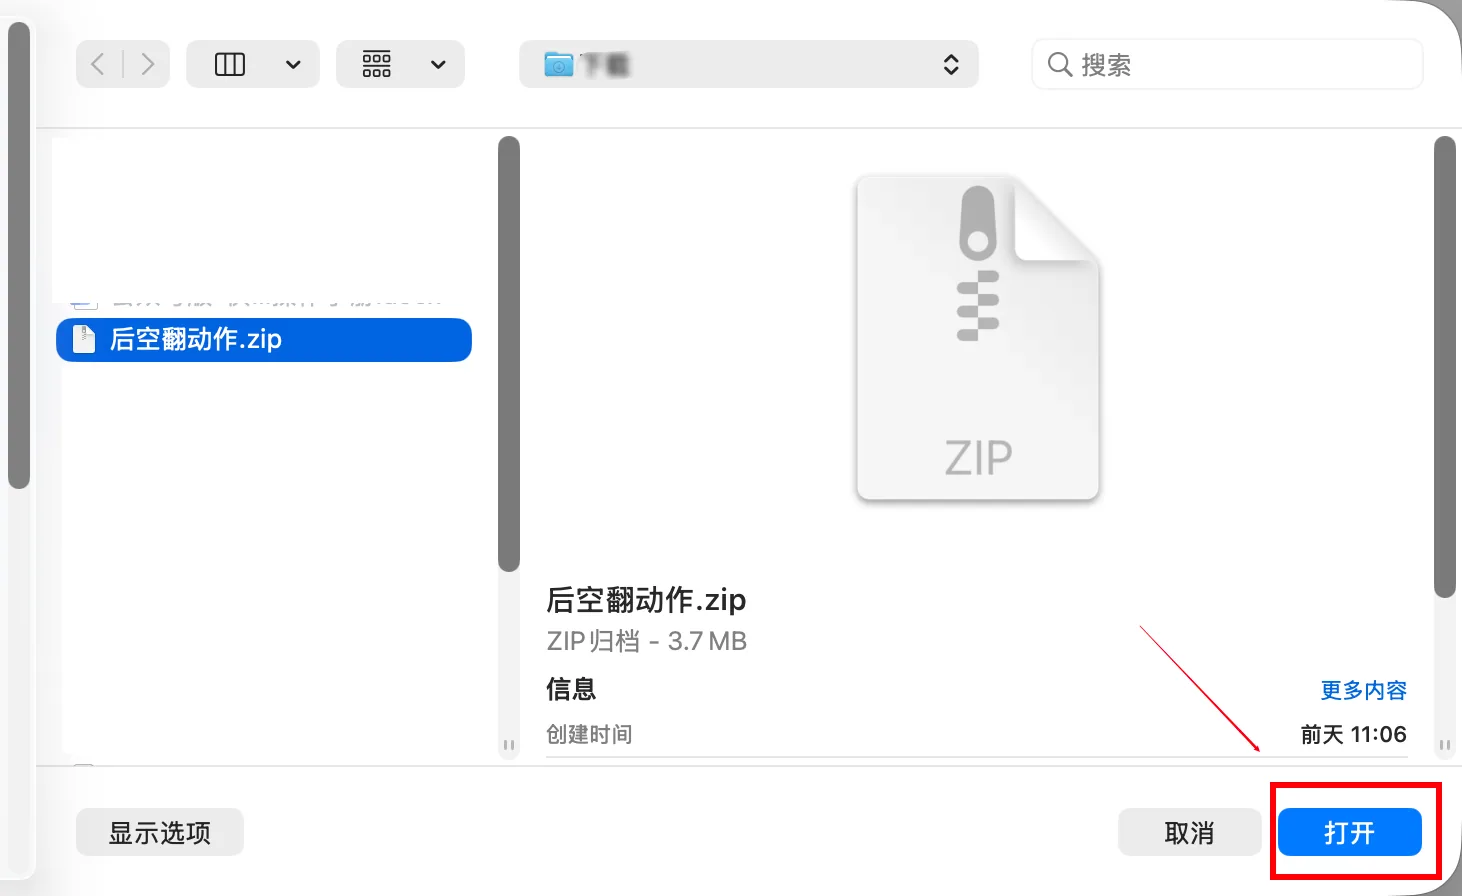
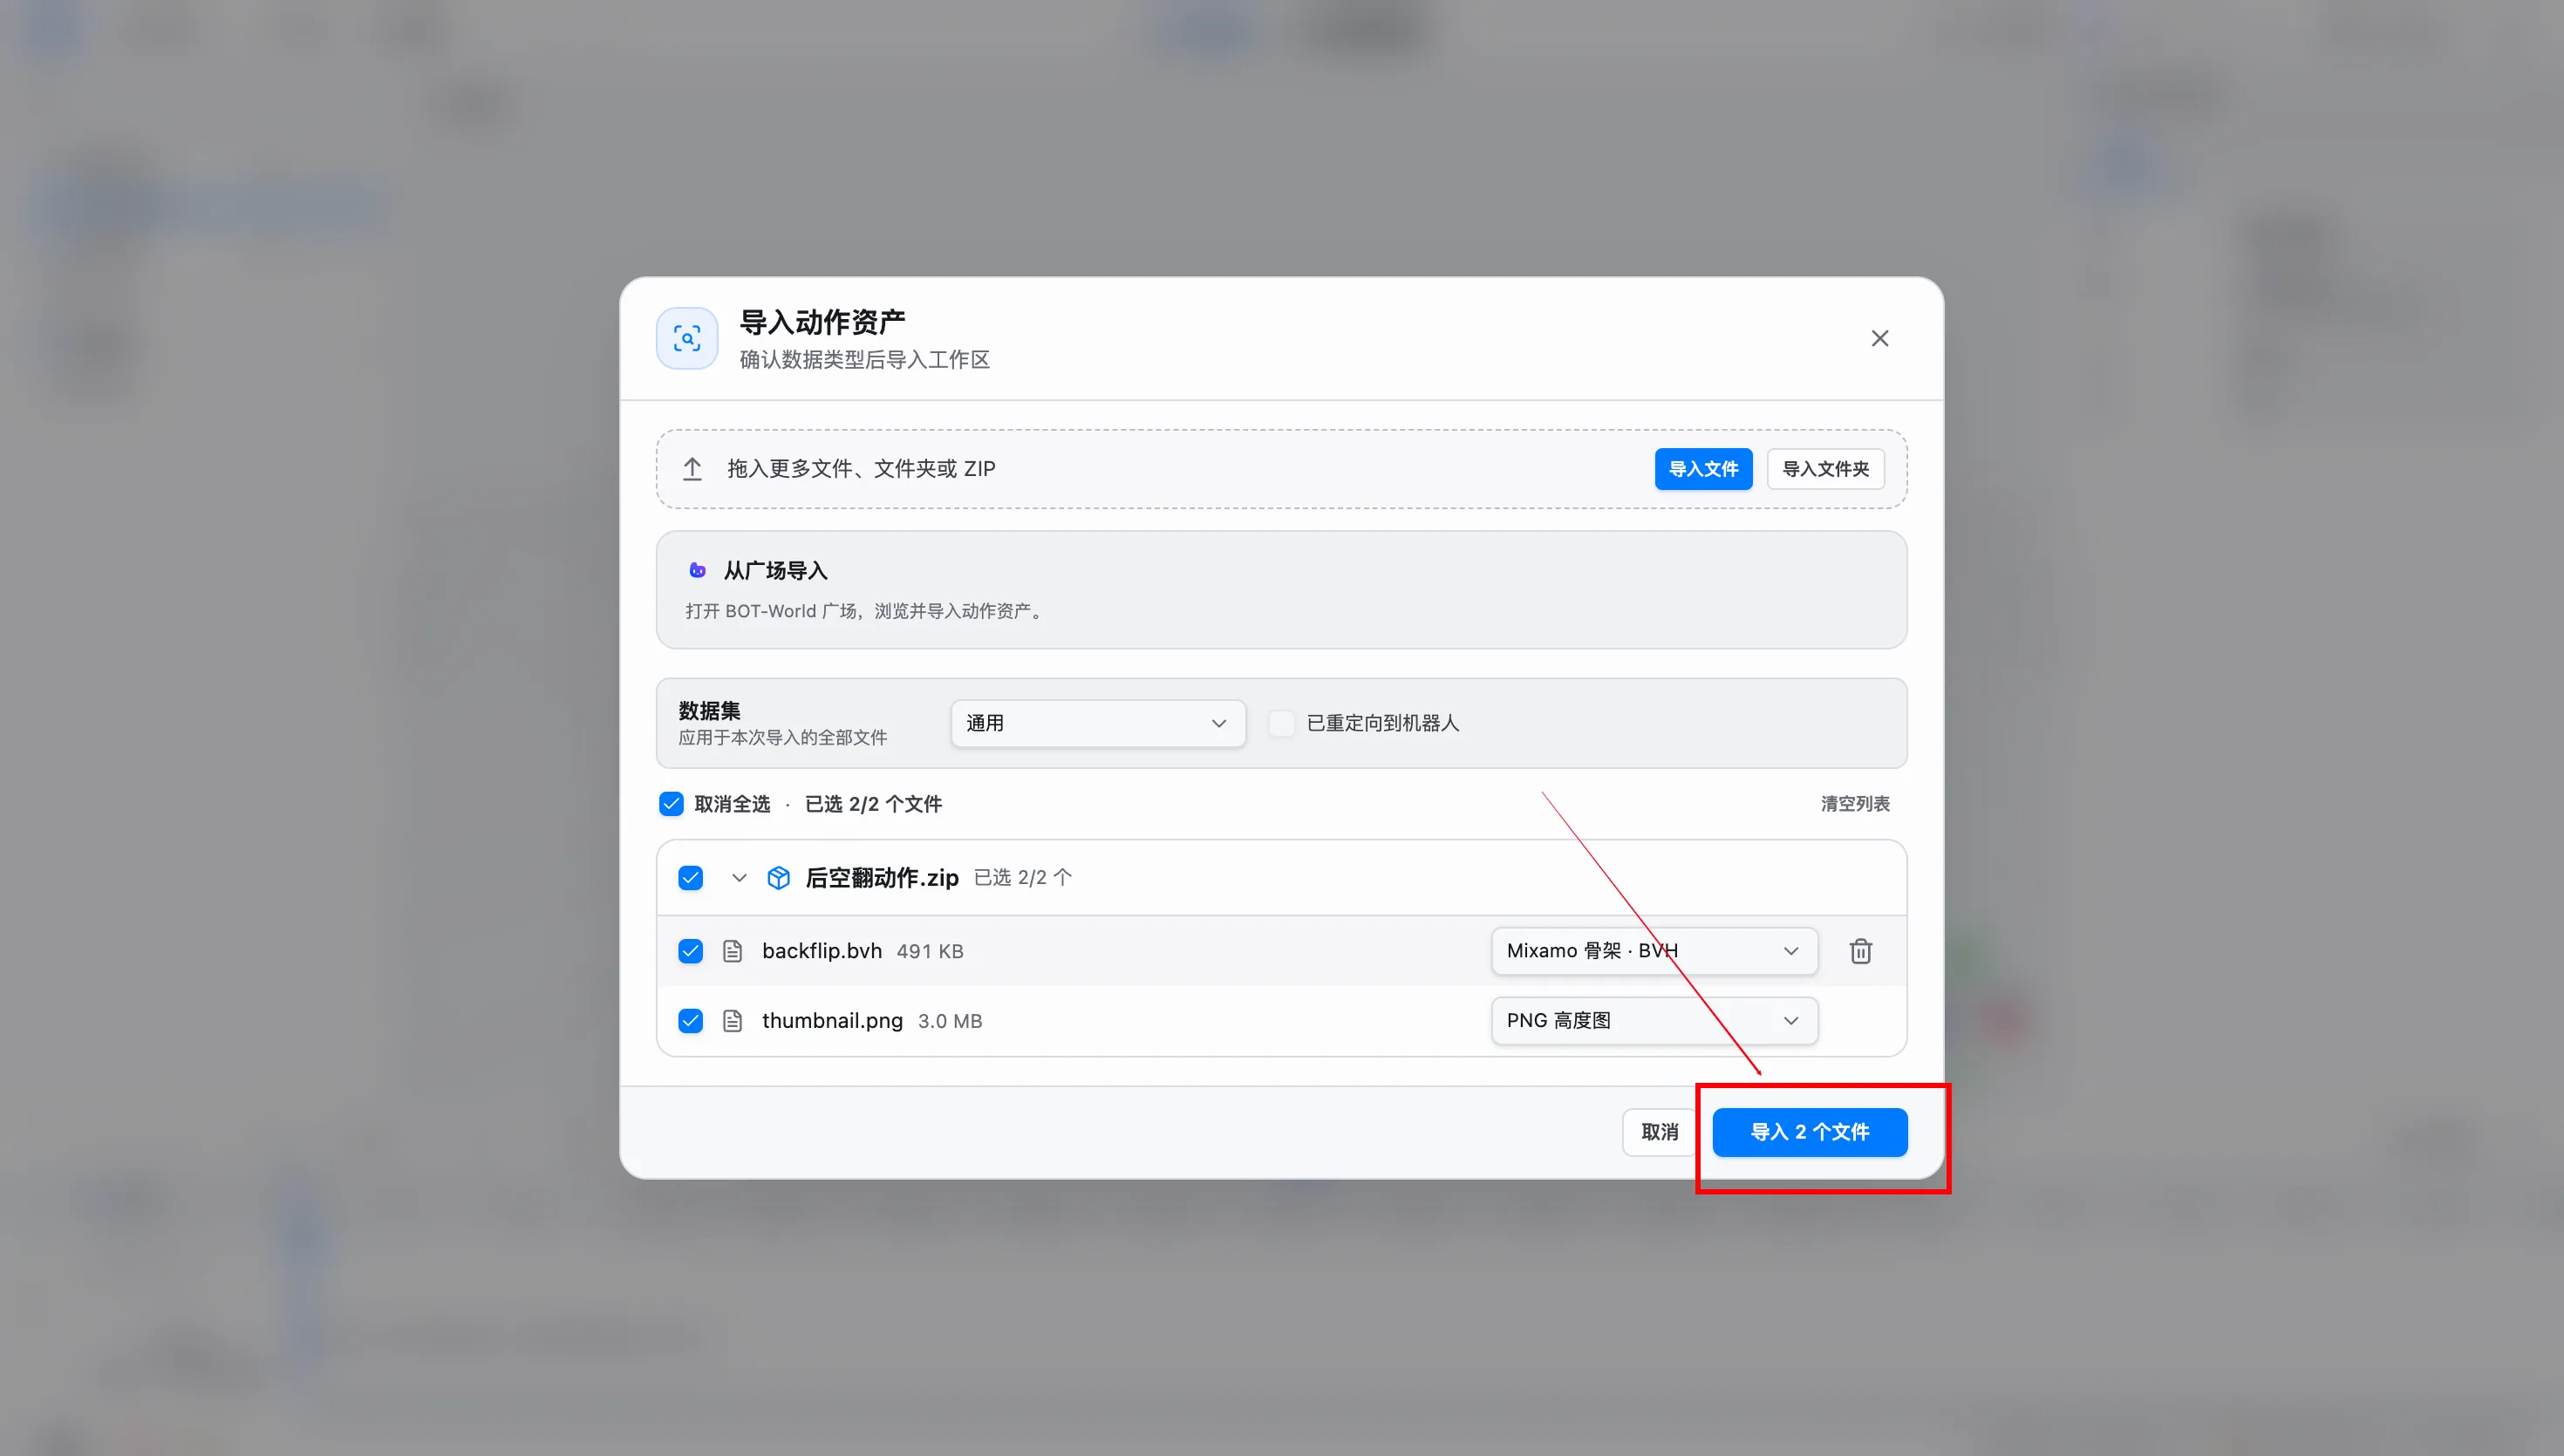
Step 3: Import the local robot model file.
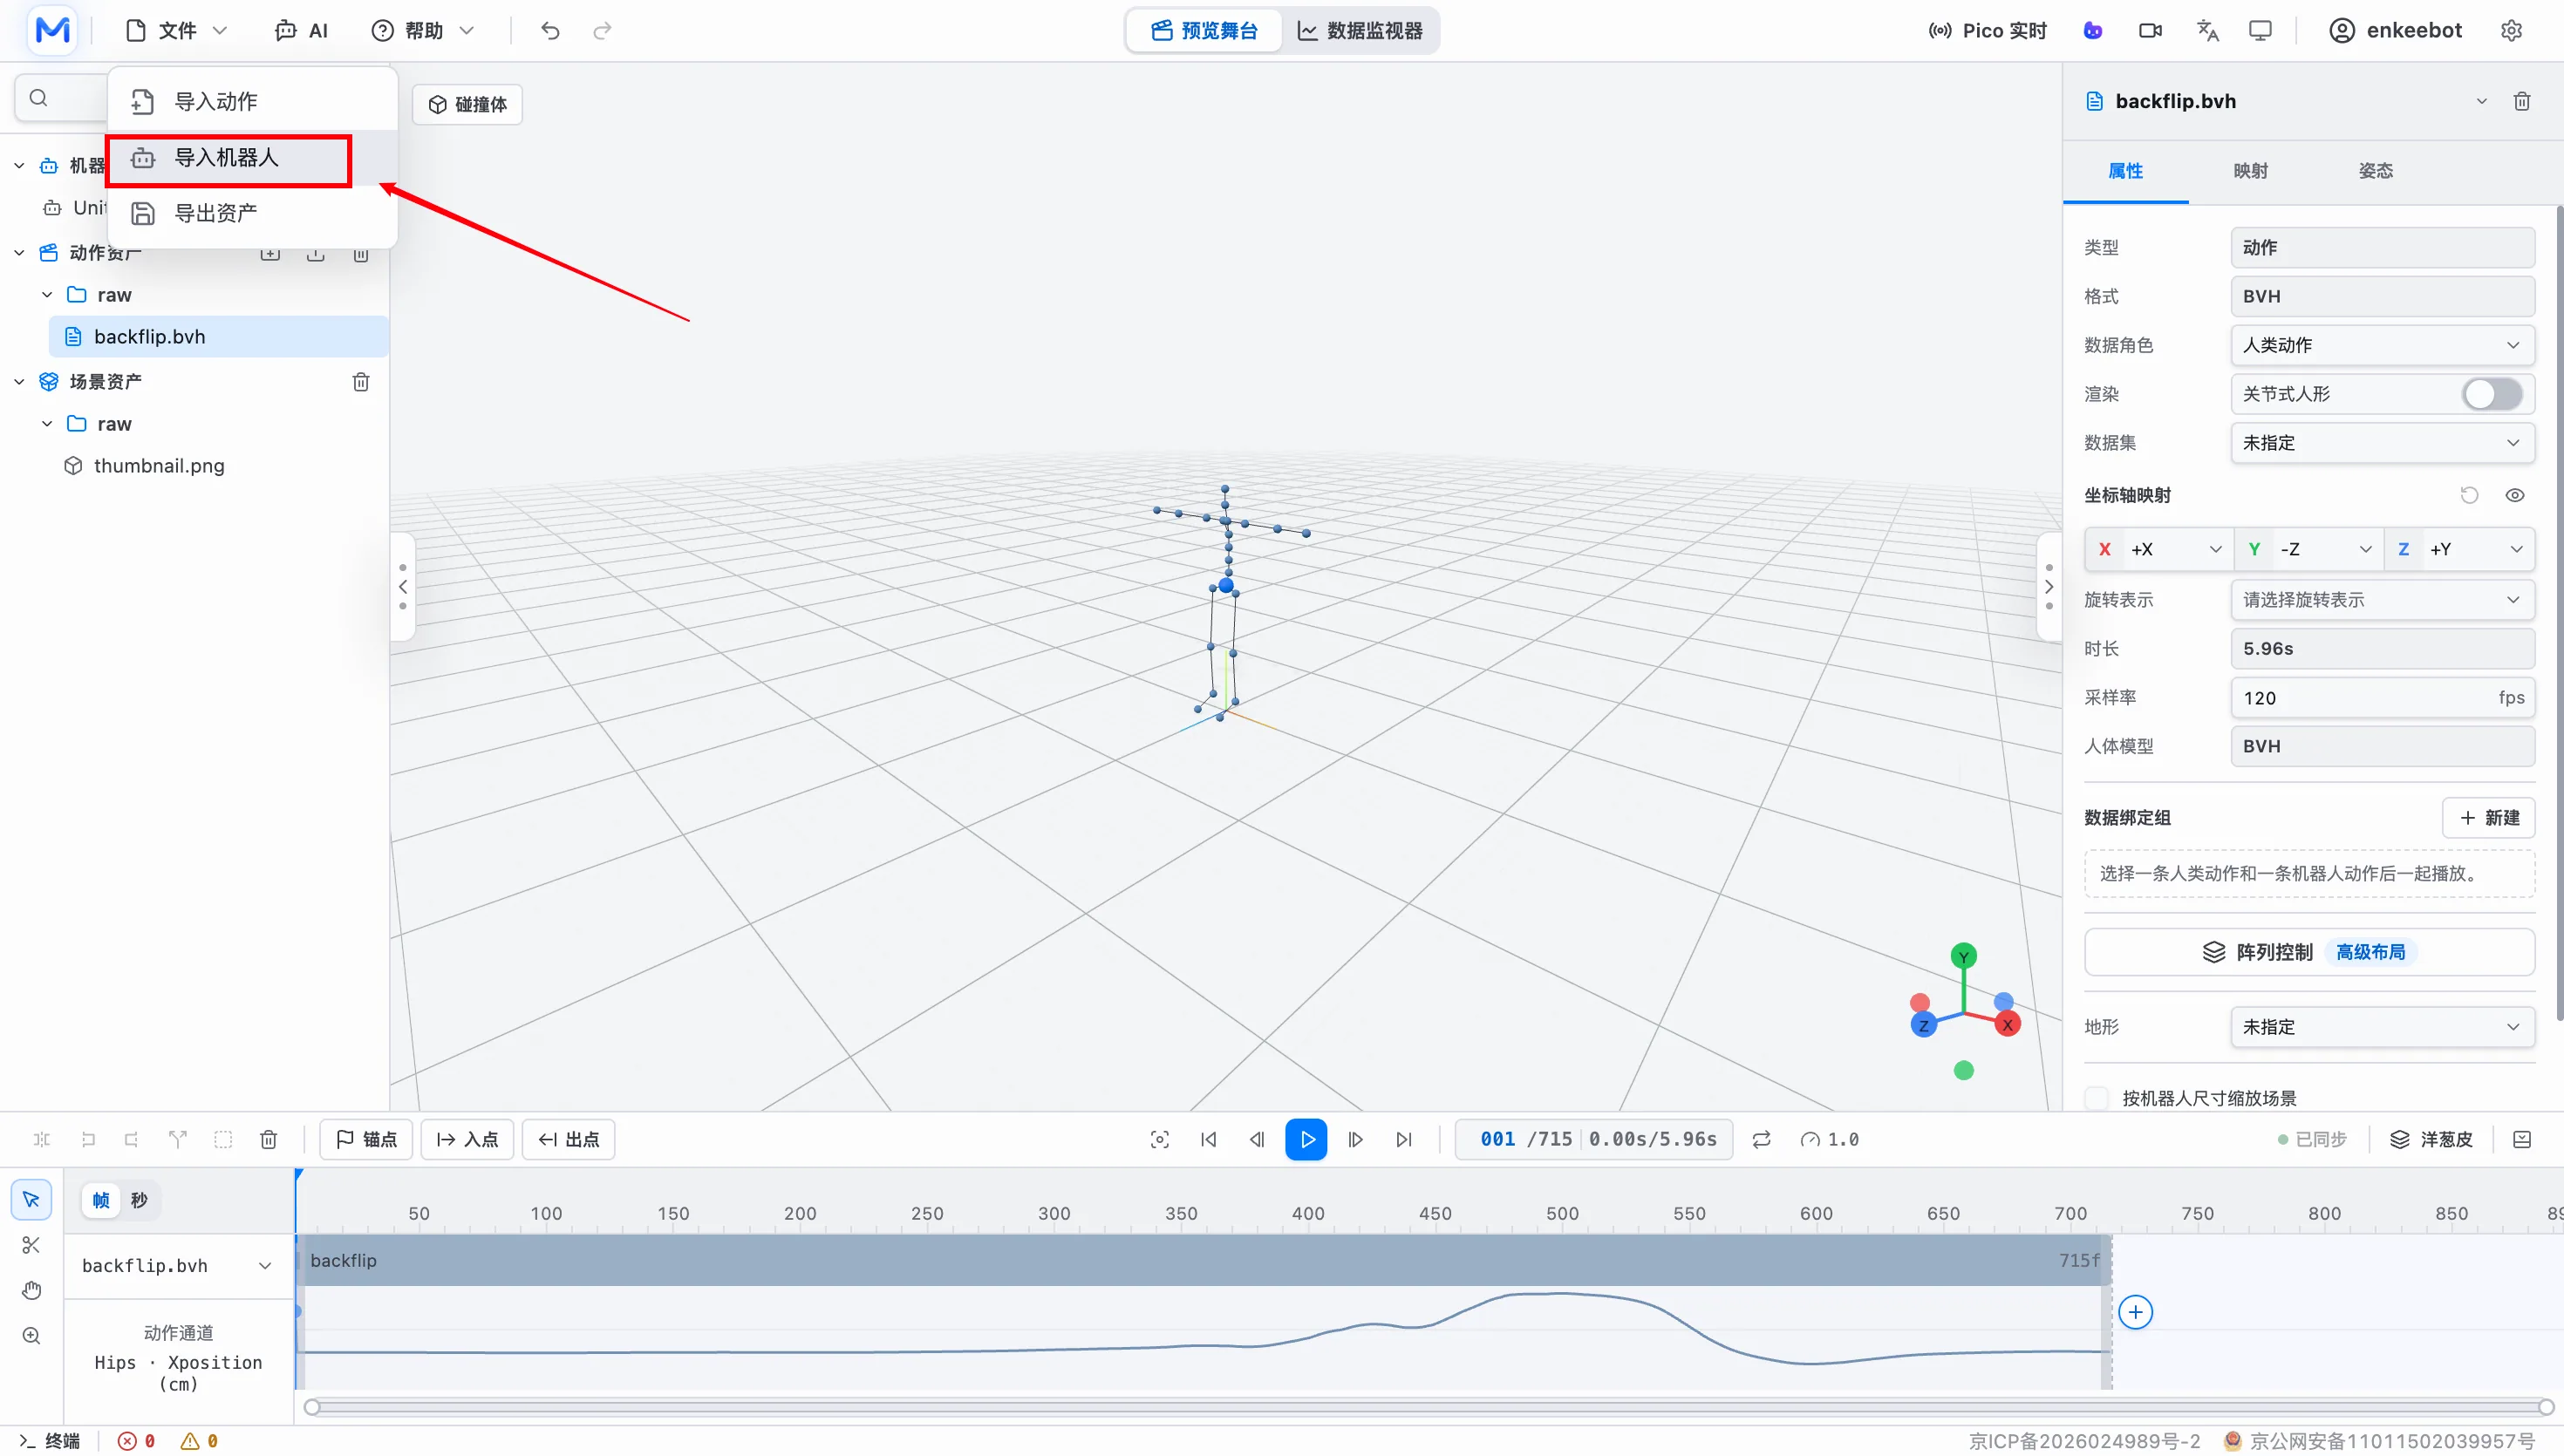
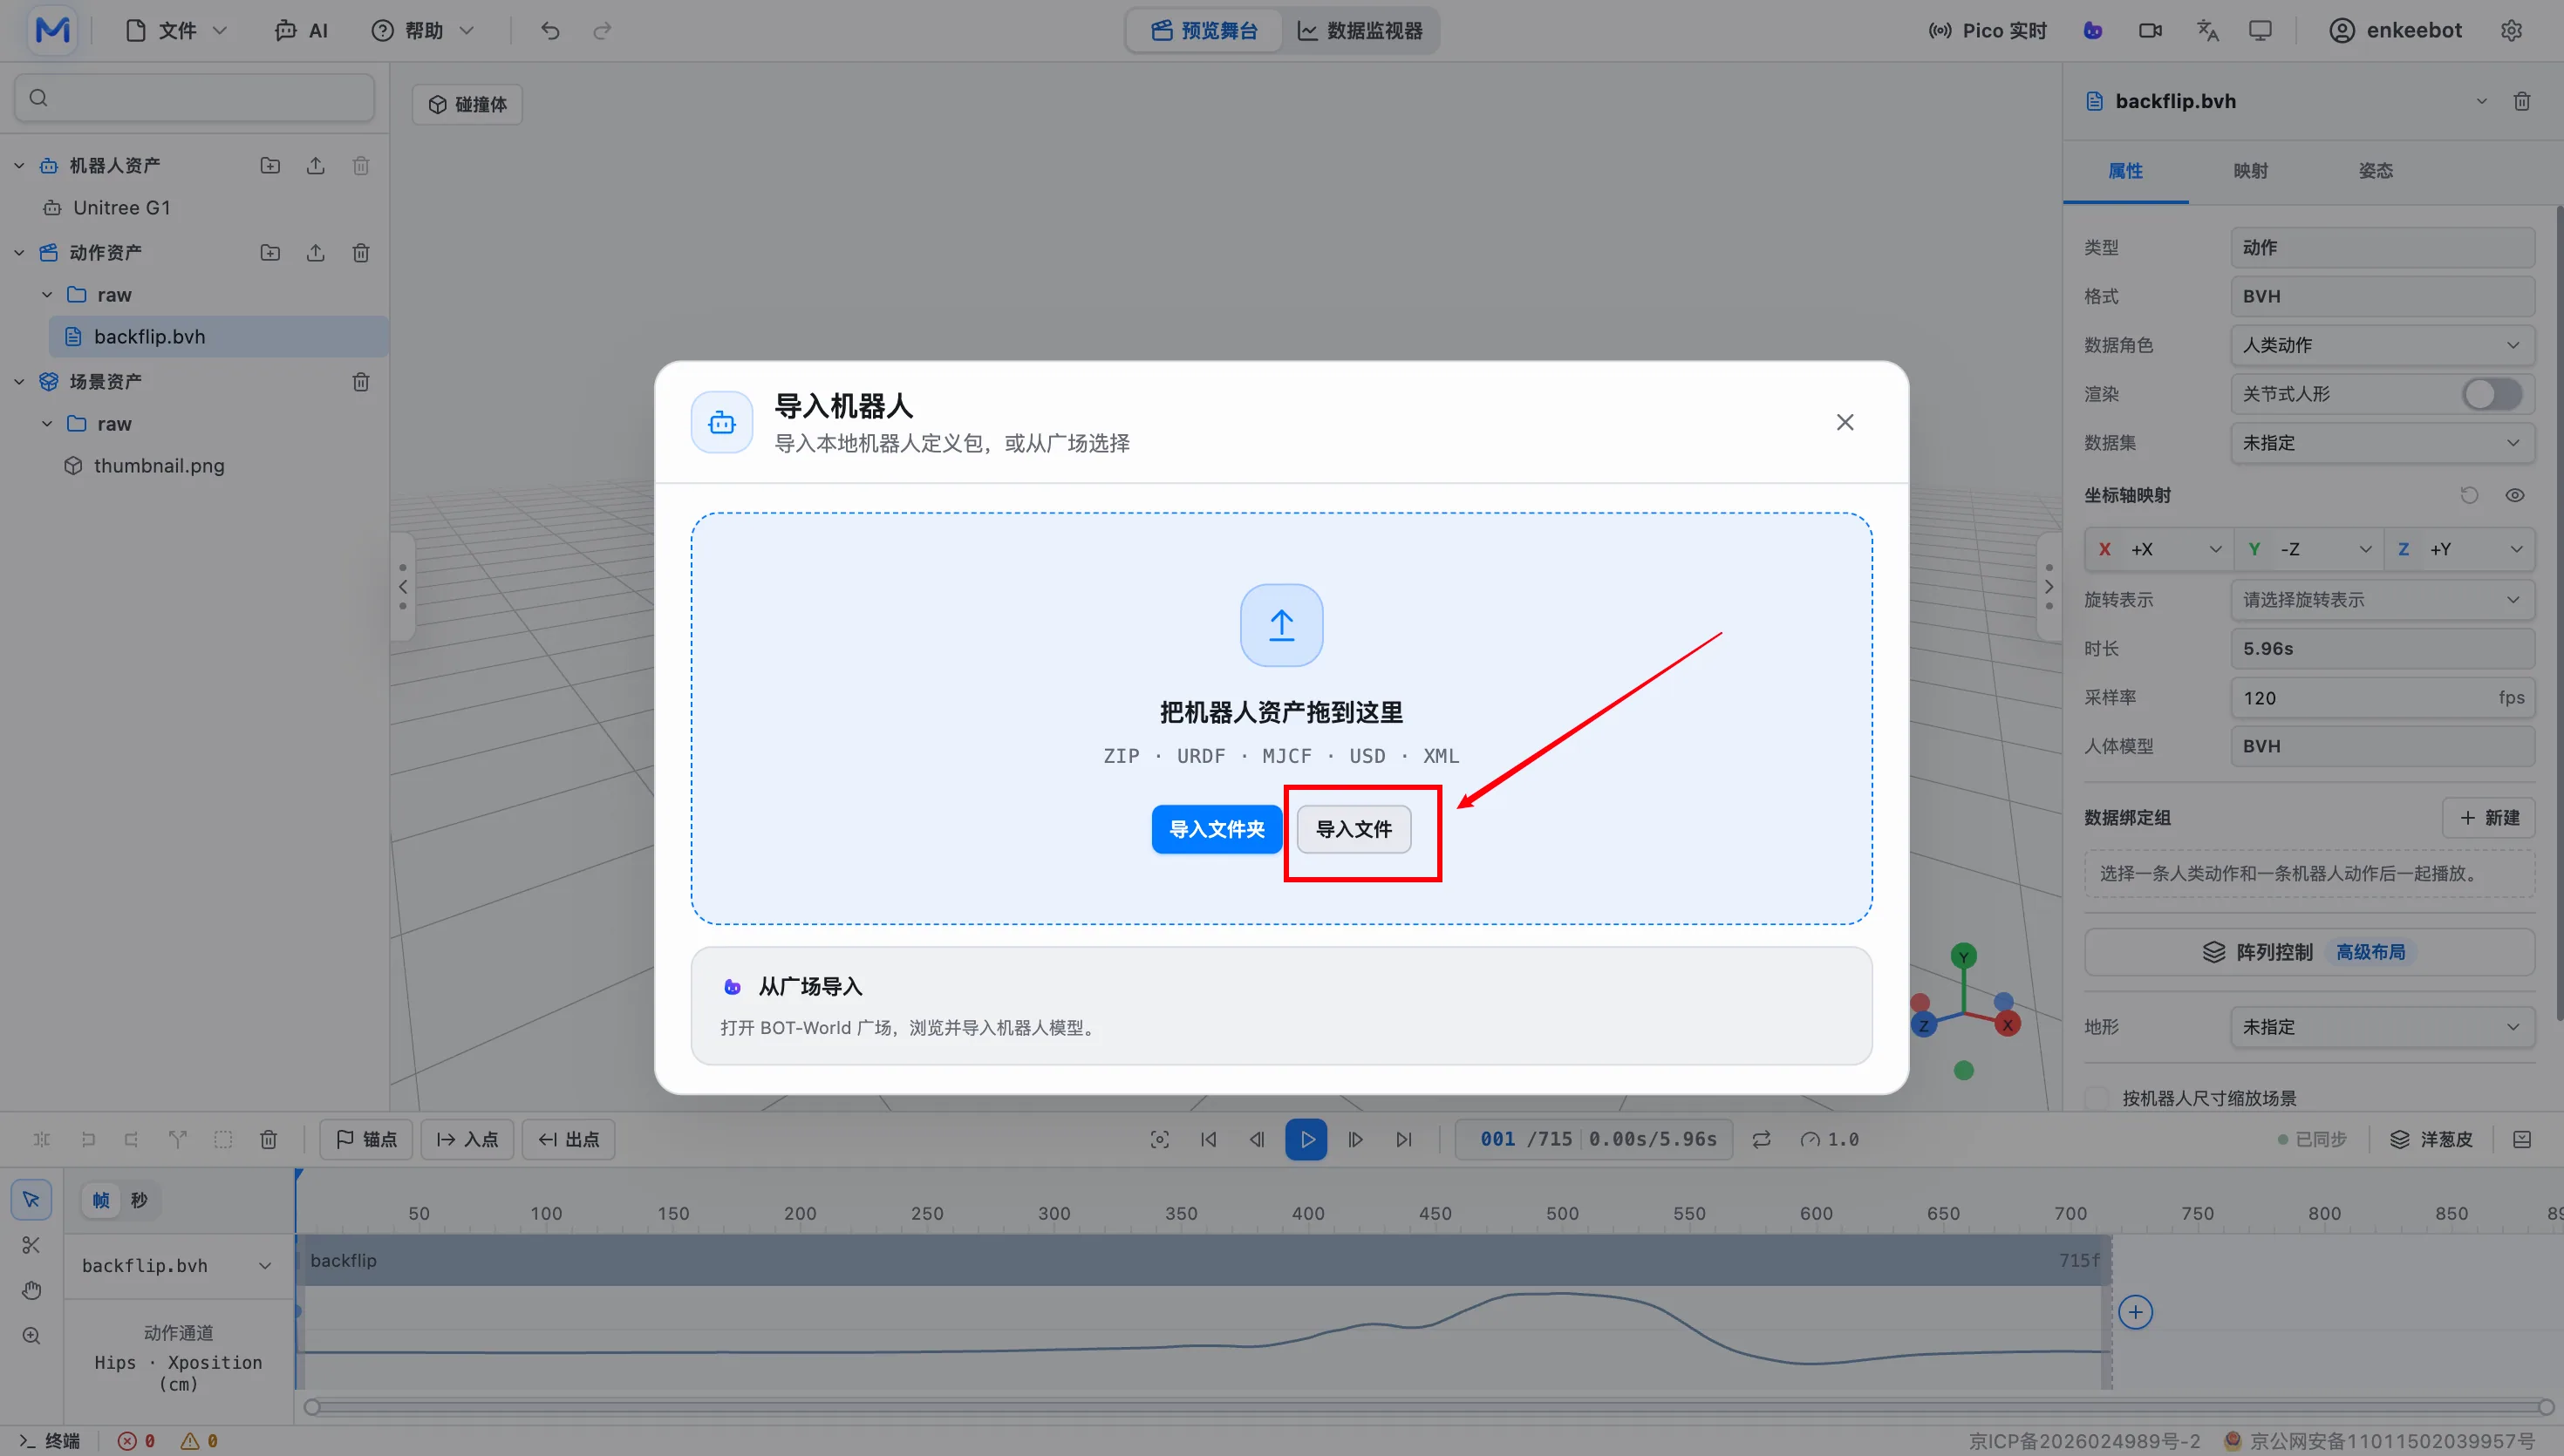
Step 4: Select and import the model file locally.
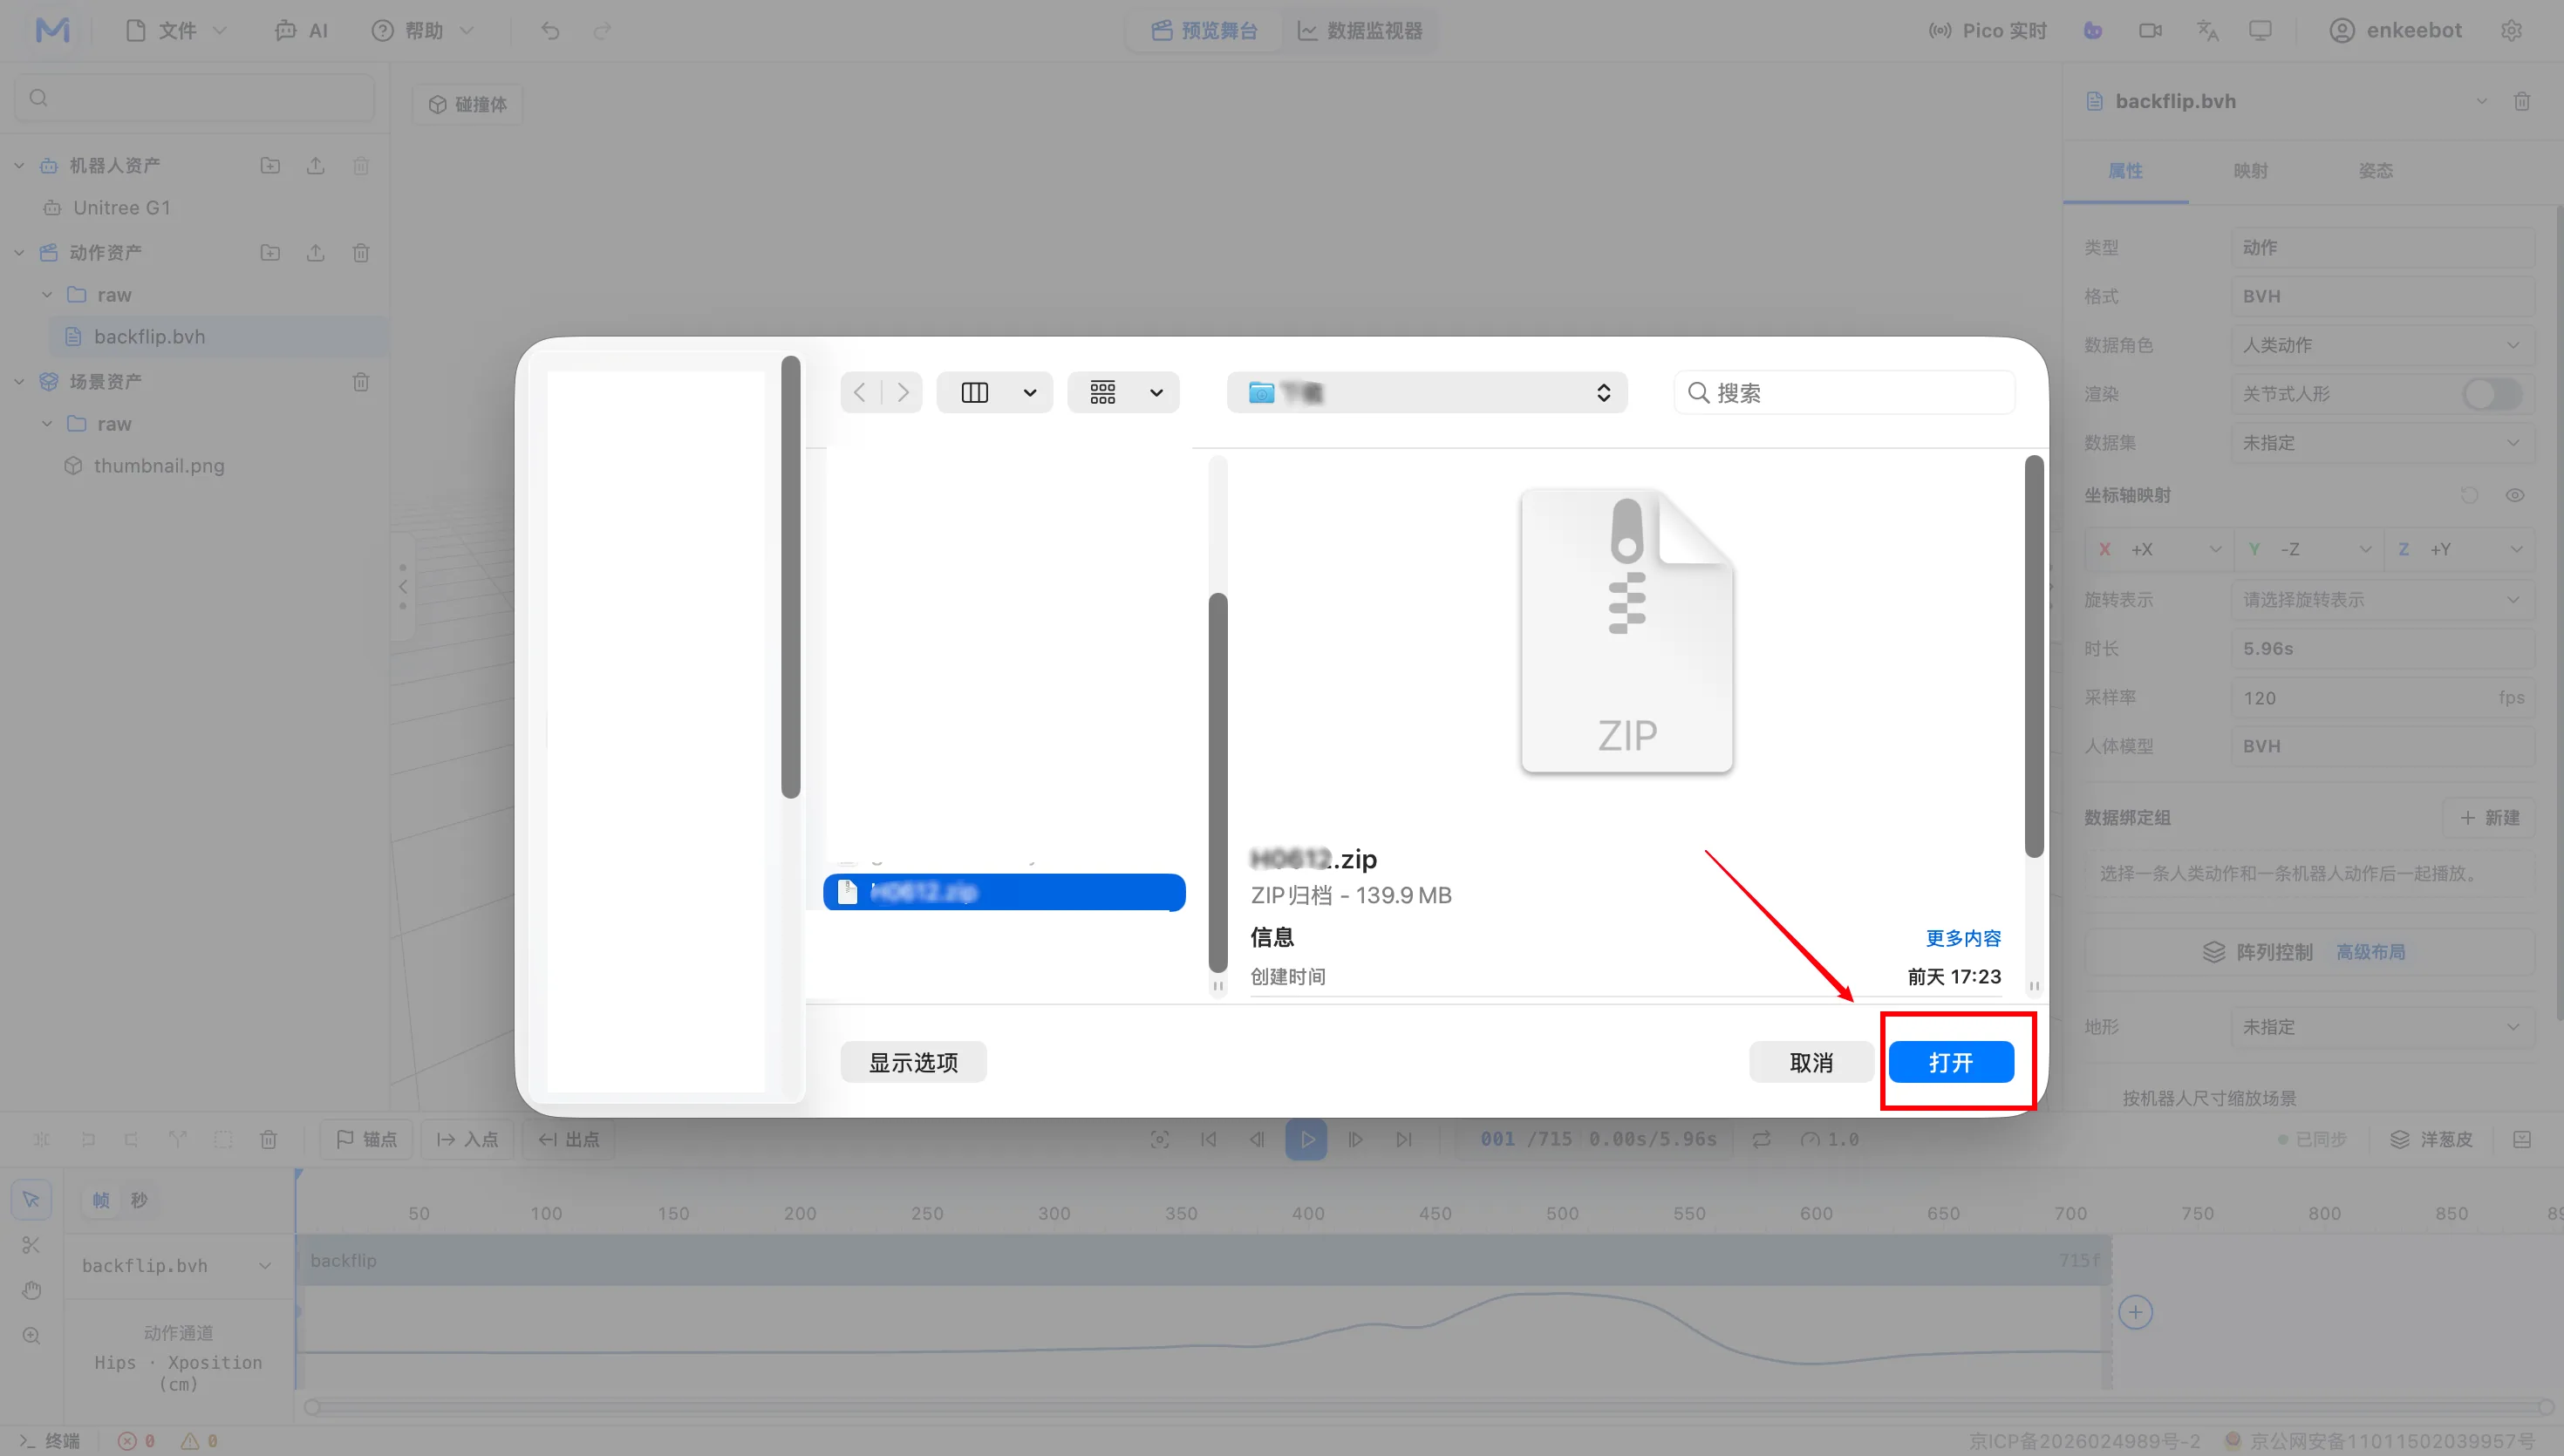
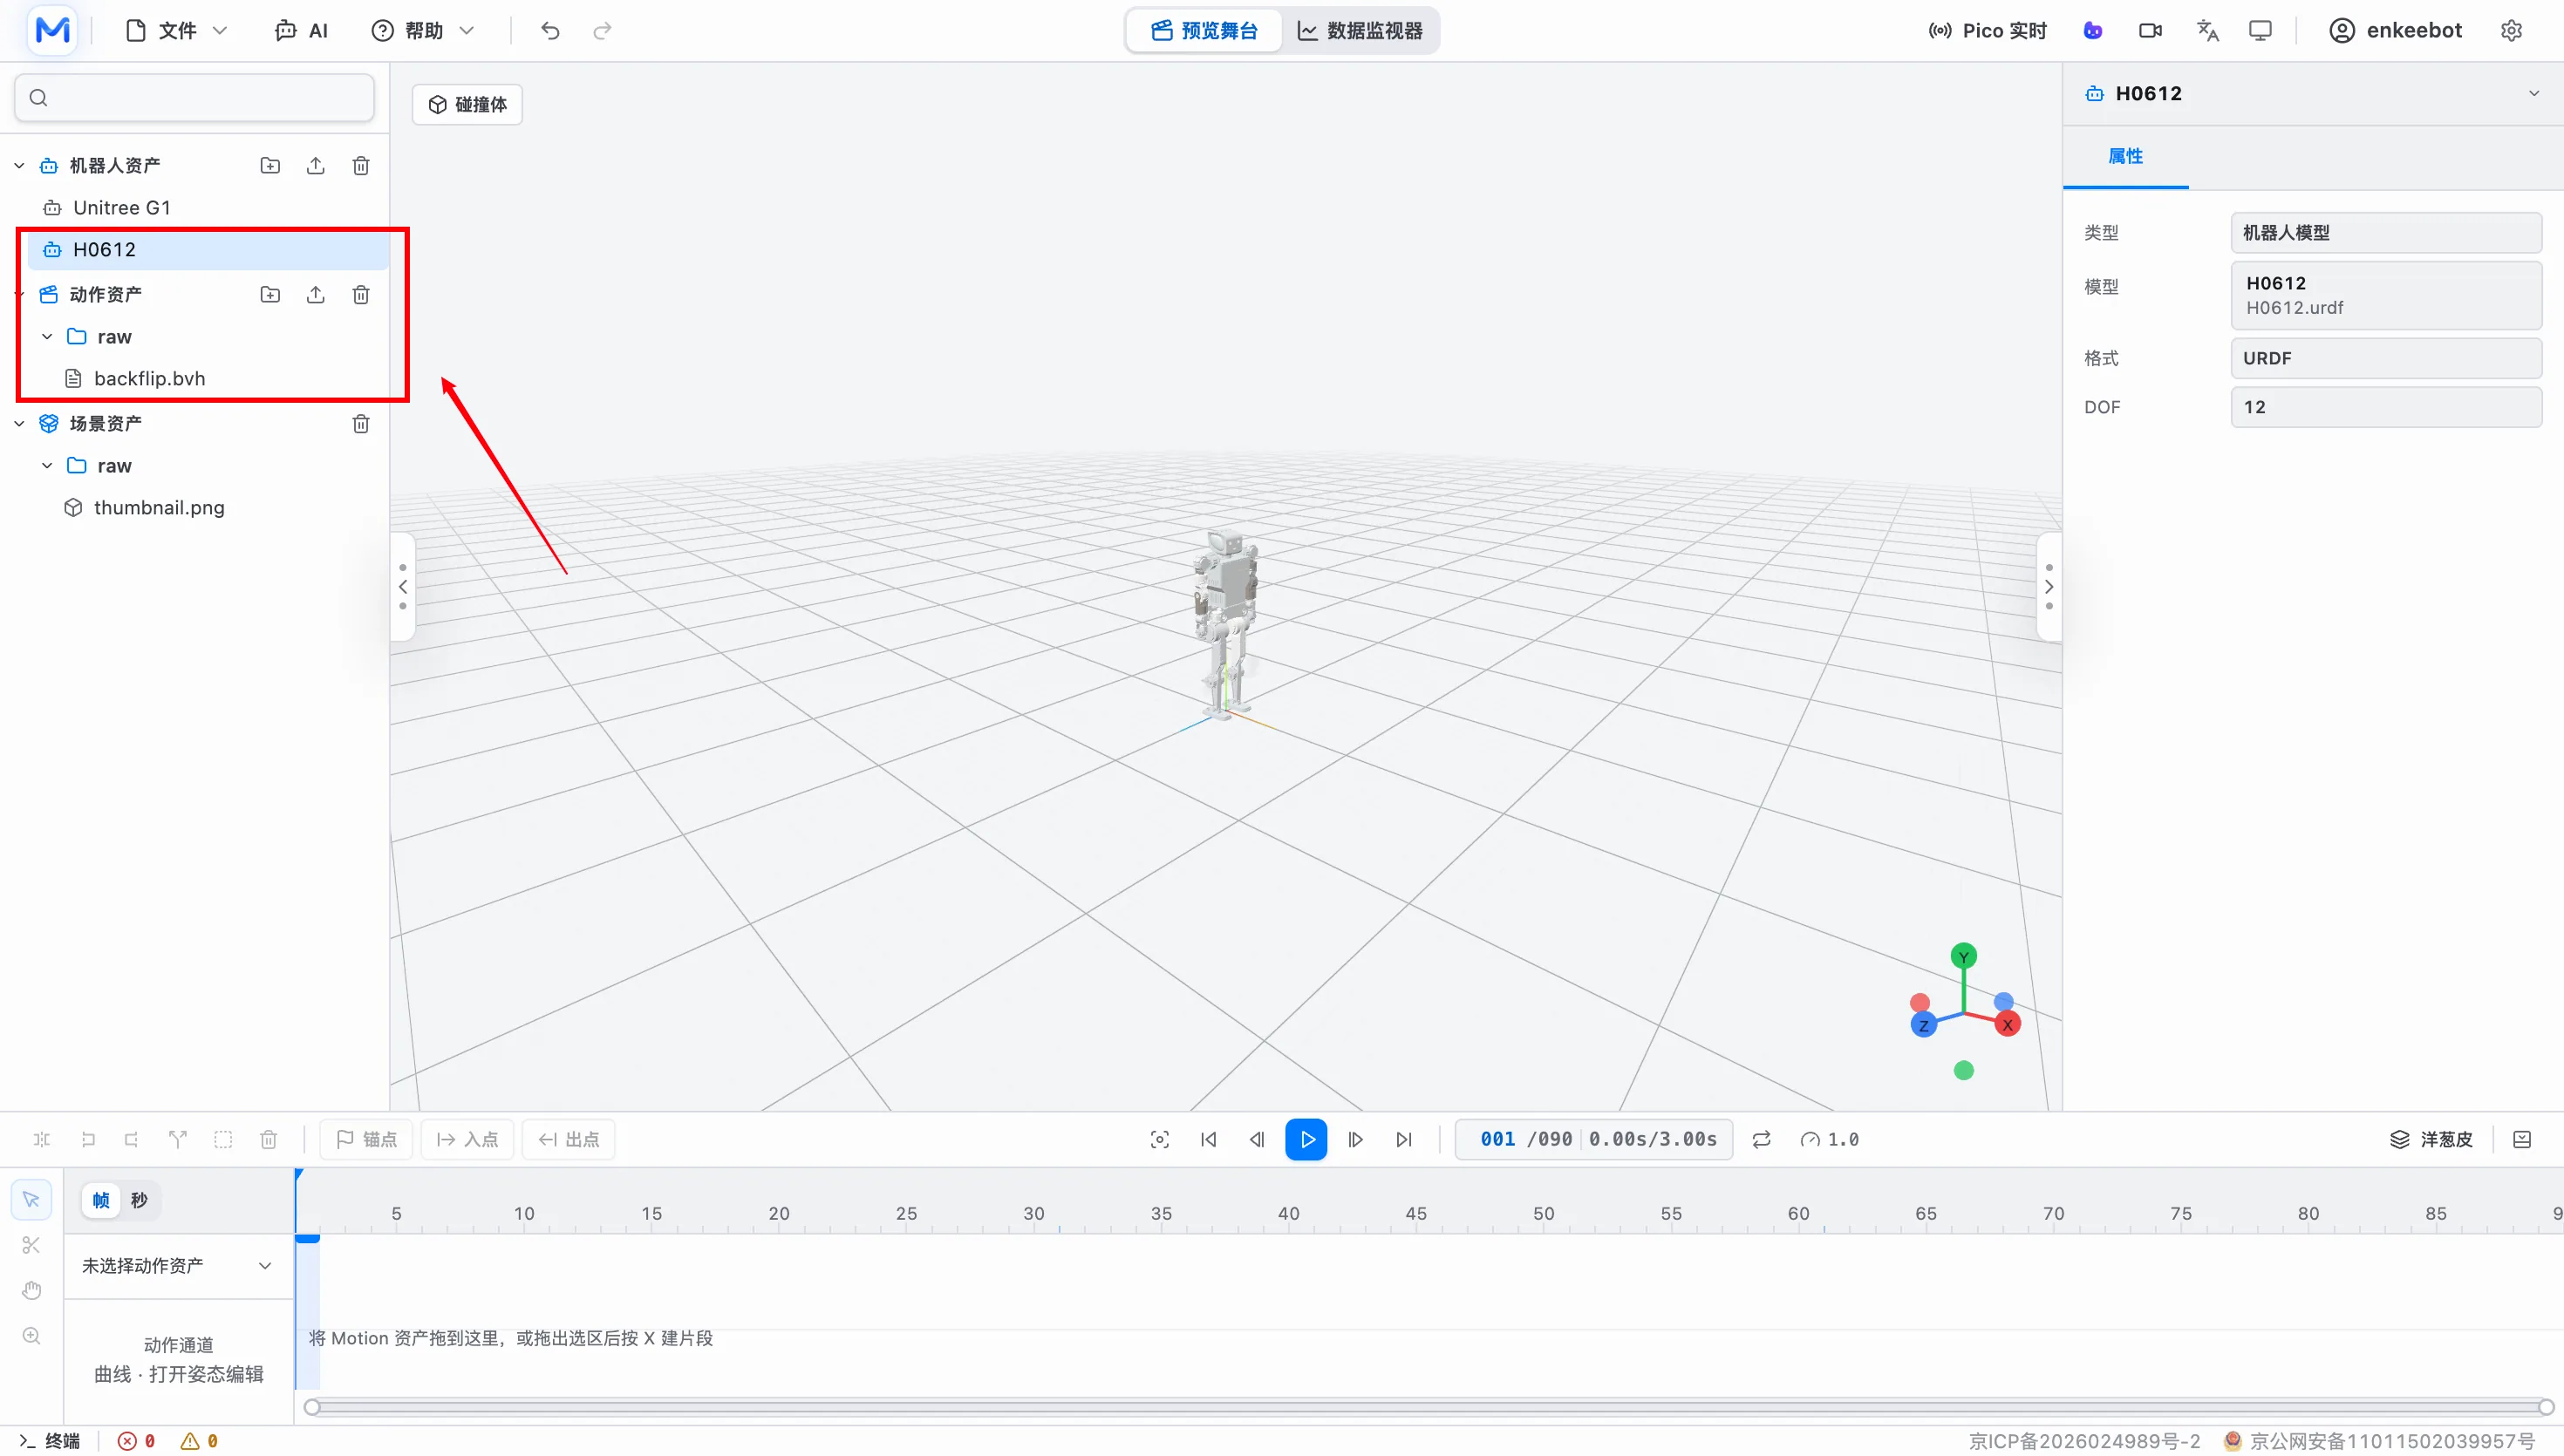
Completion sign: the imported files appear in the asset panel.
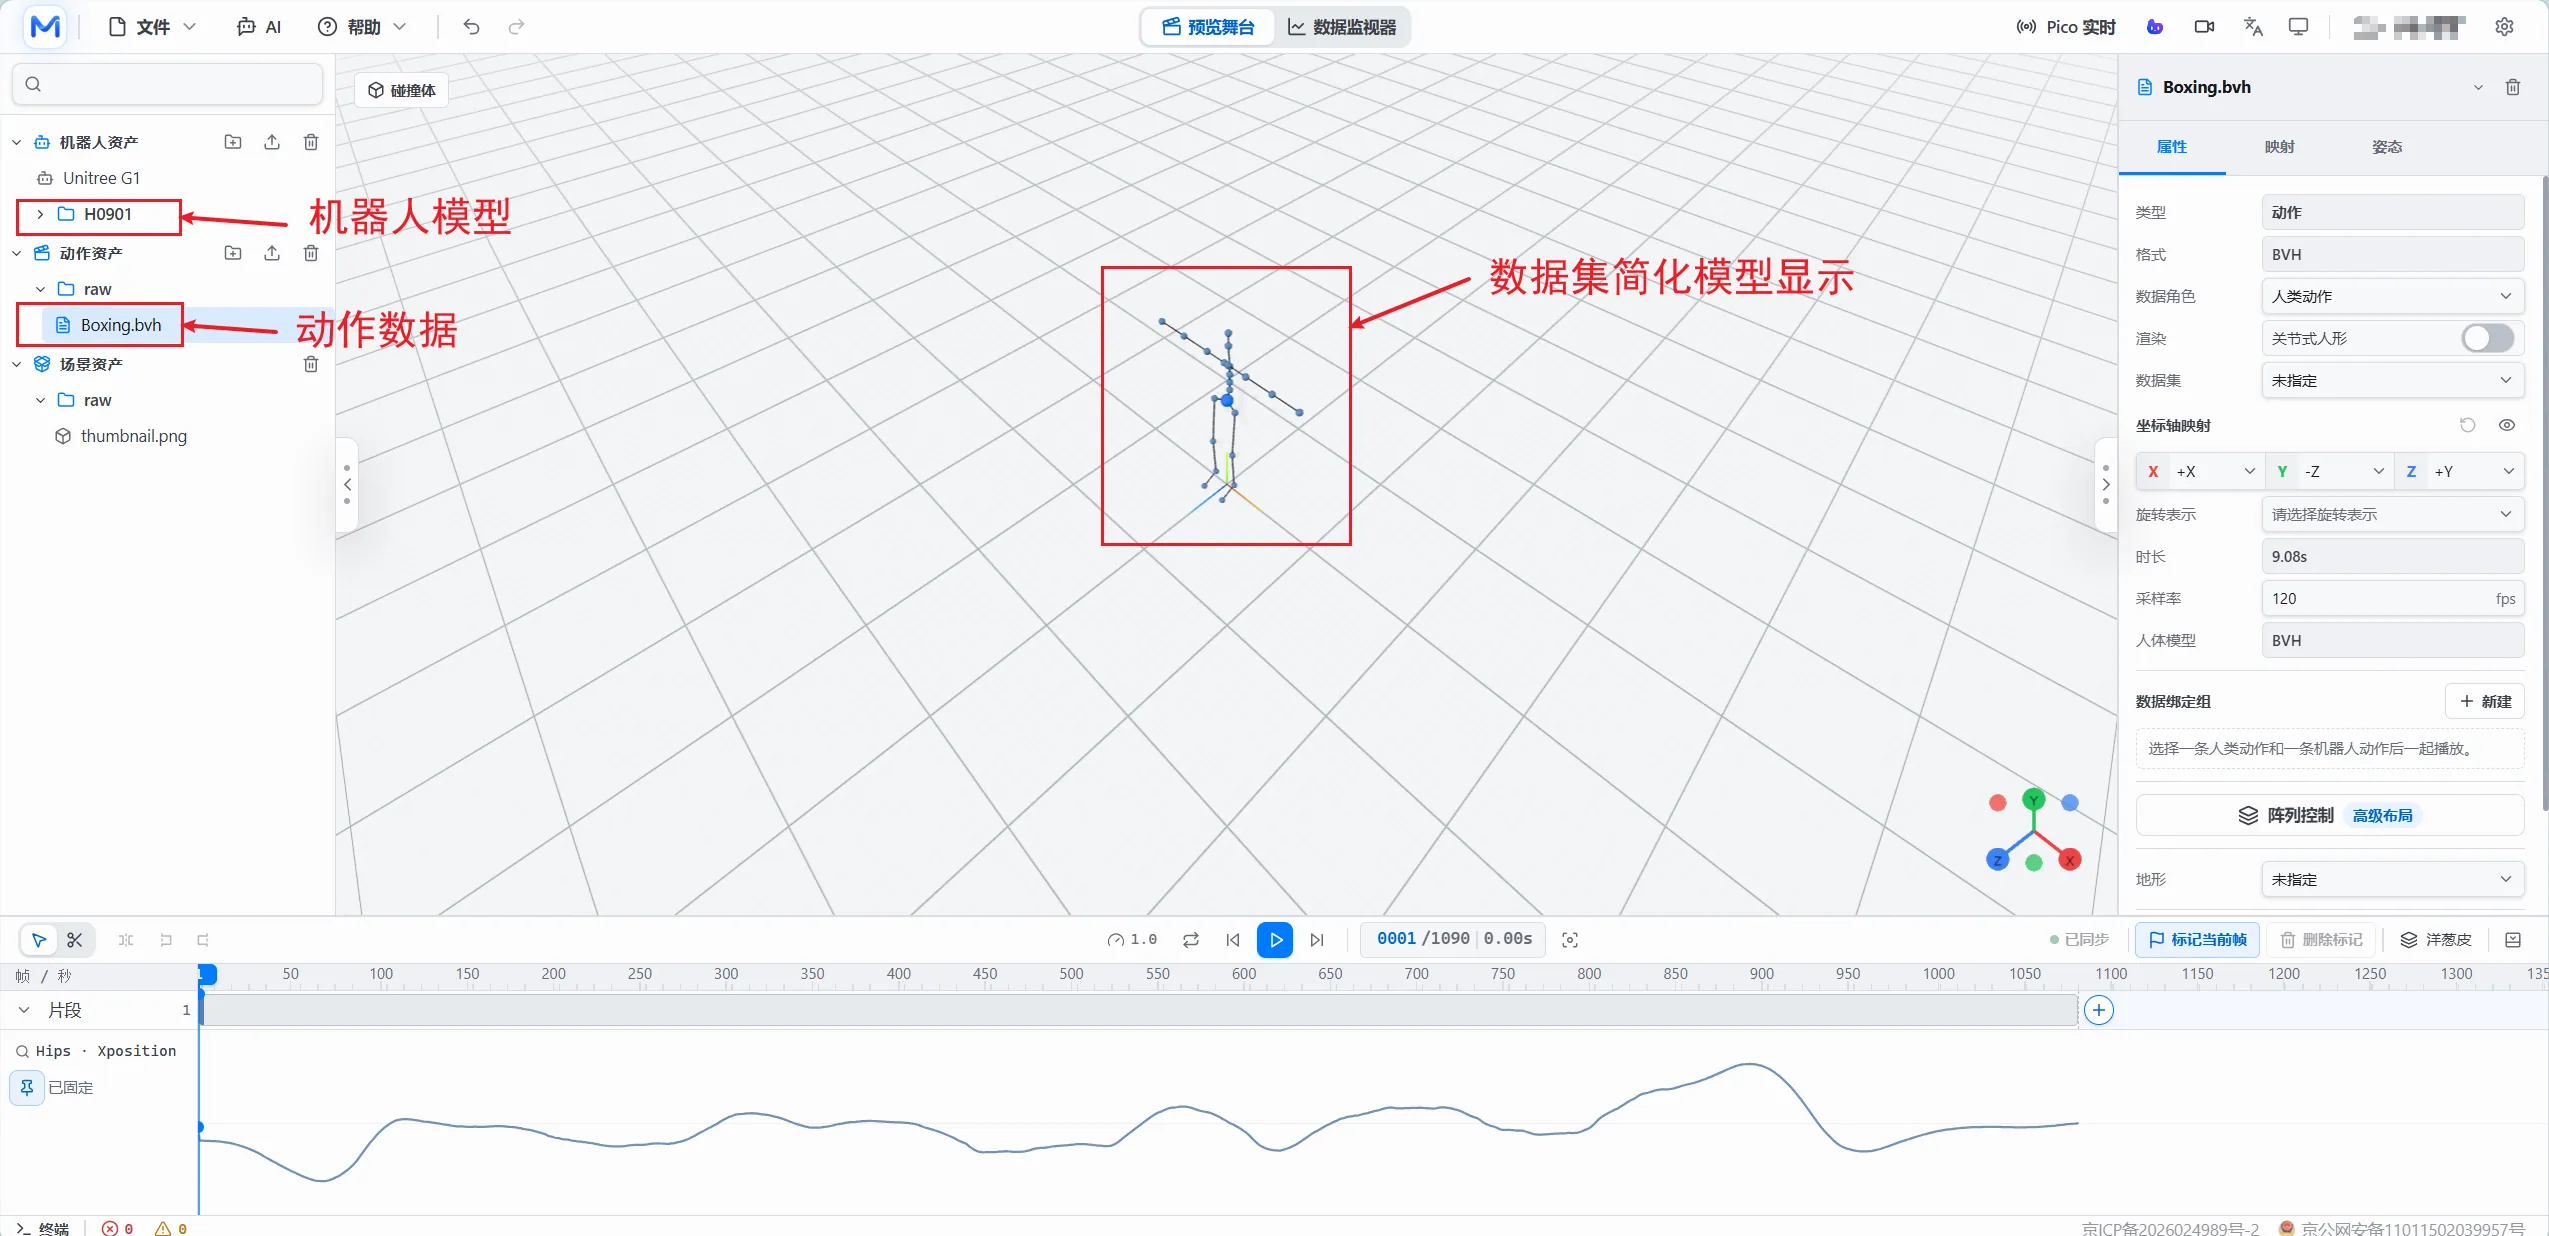
Step 5: Select the motion data in the asset panel. The simplified dataset model appears in the center of the 3D view.
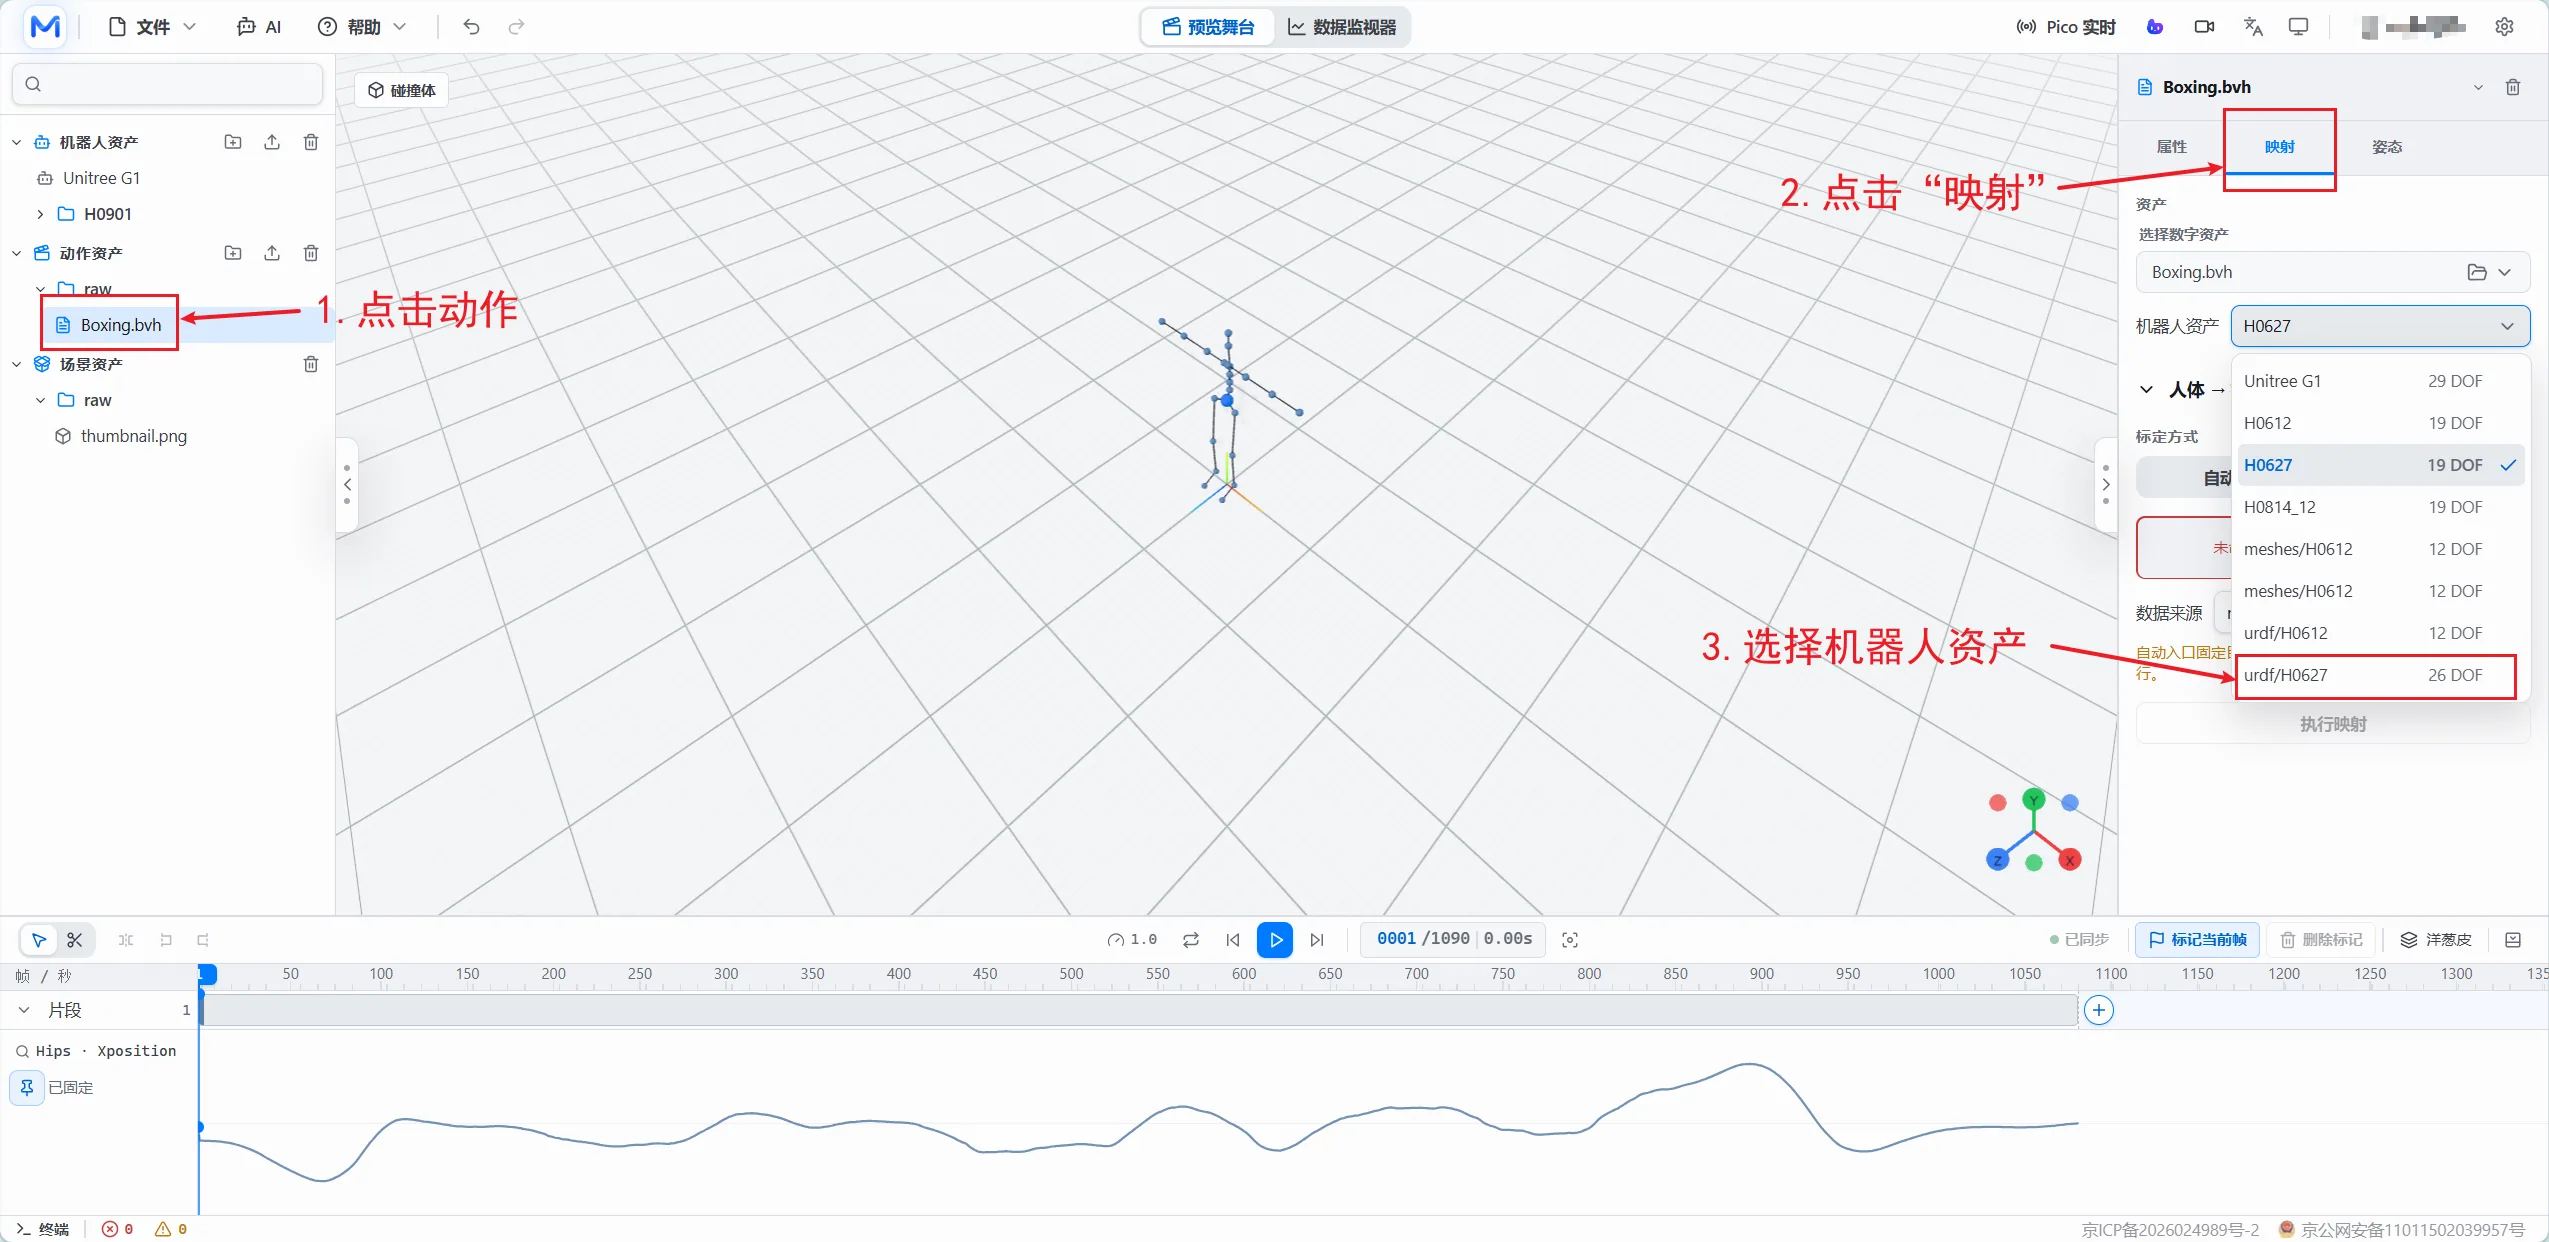
Step 6: After selecting the motion to map, choose Mapping on the right, then select the corresponding URDF or XML from the robot-asset dropdown.
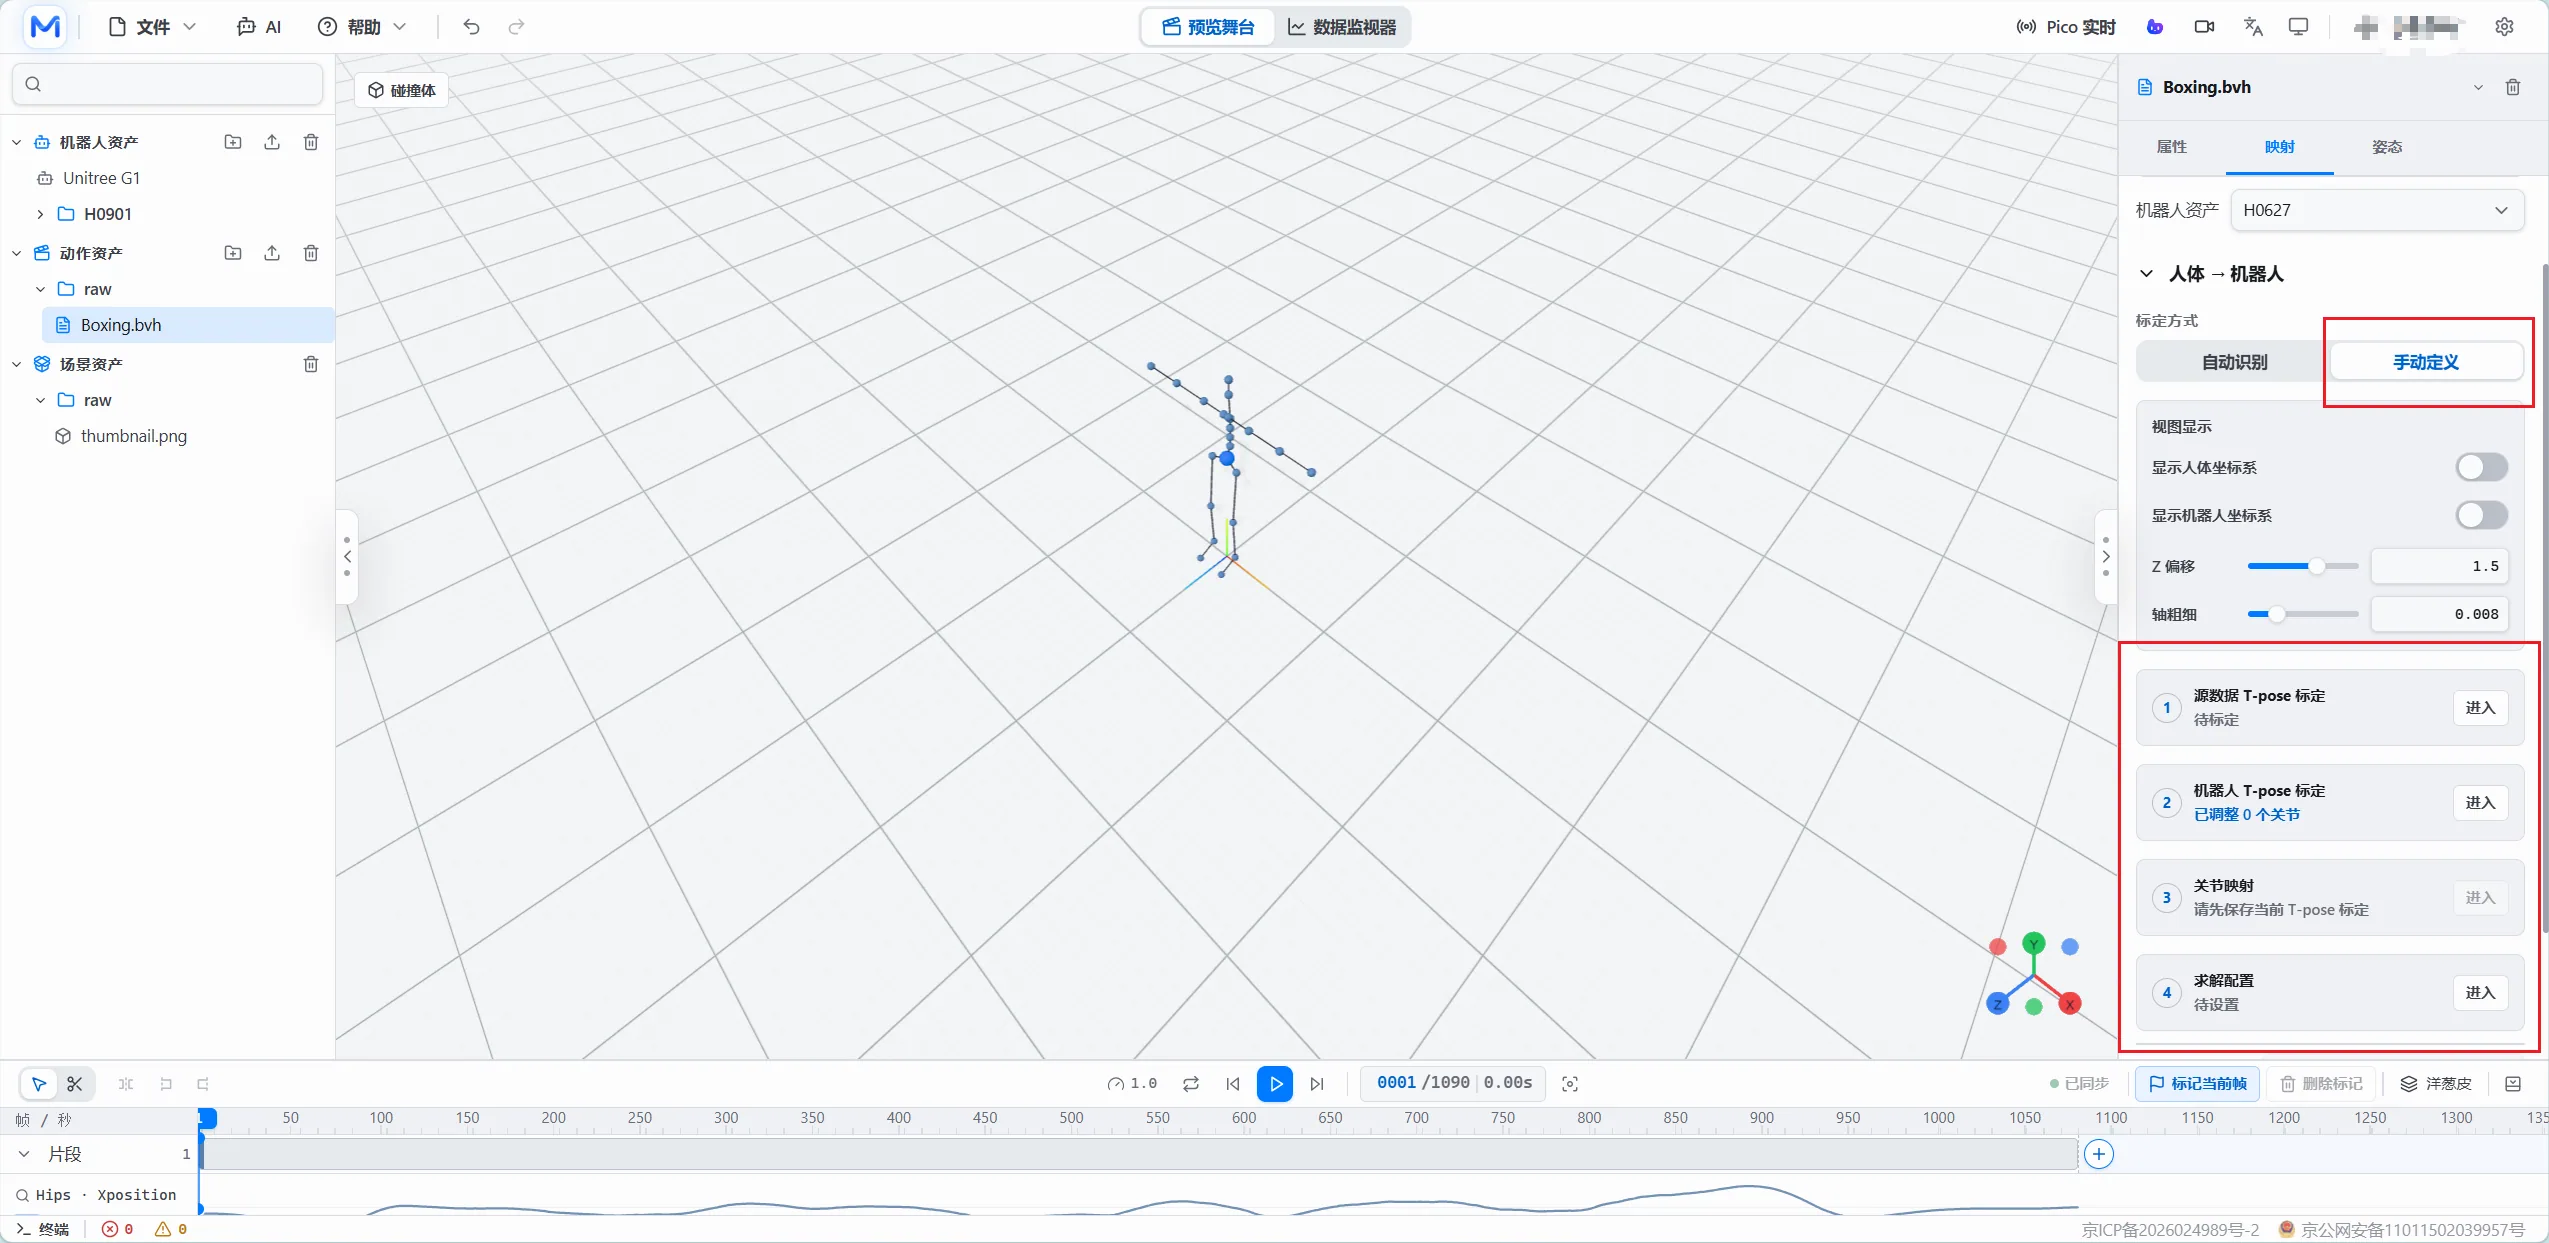
Step 7: Choose Manual Definition to continue with the following settings.
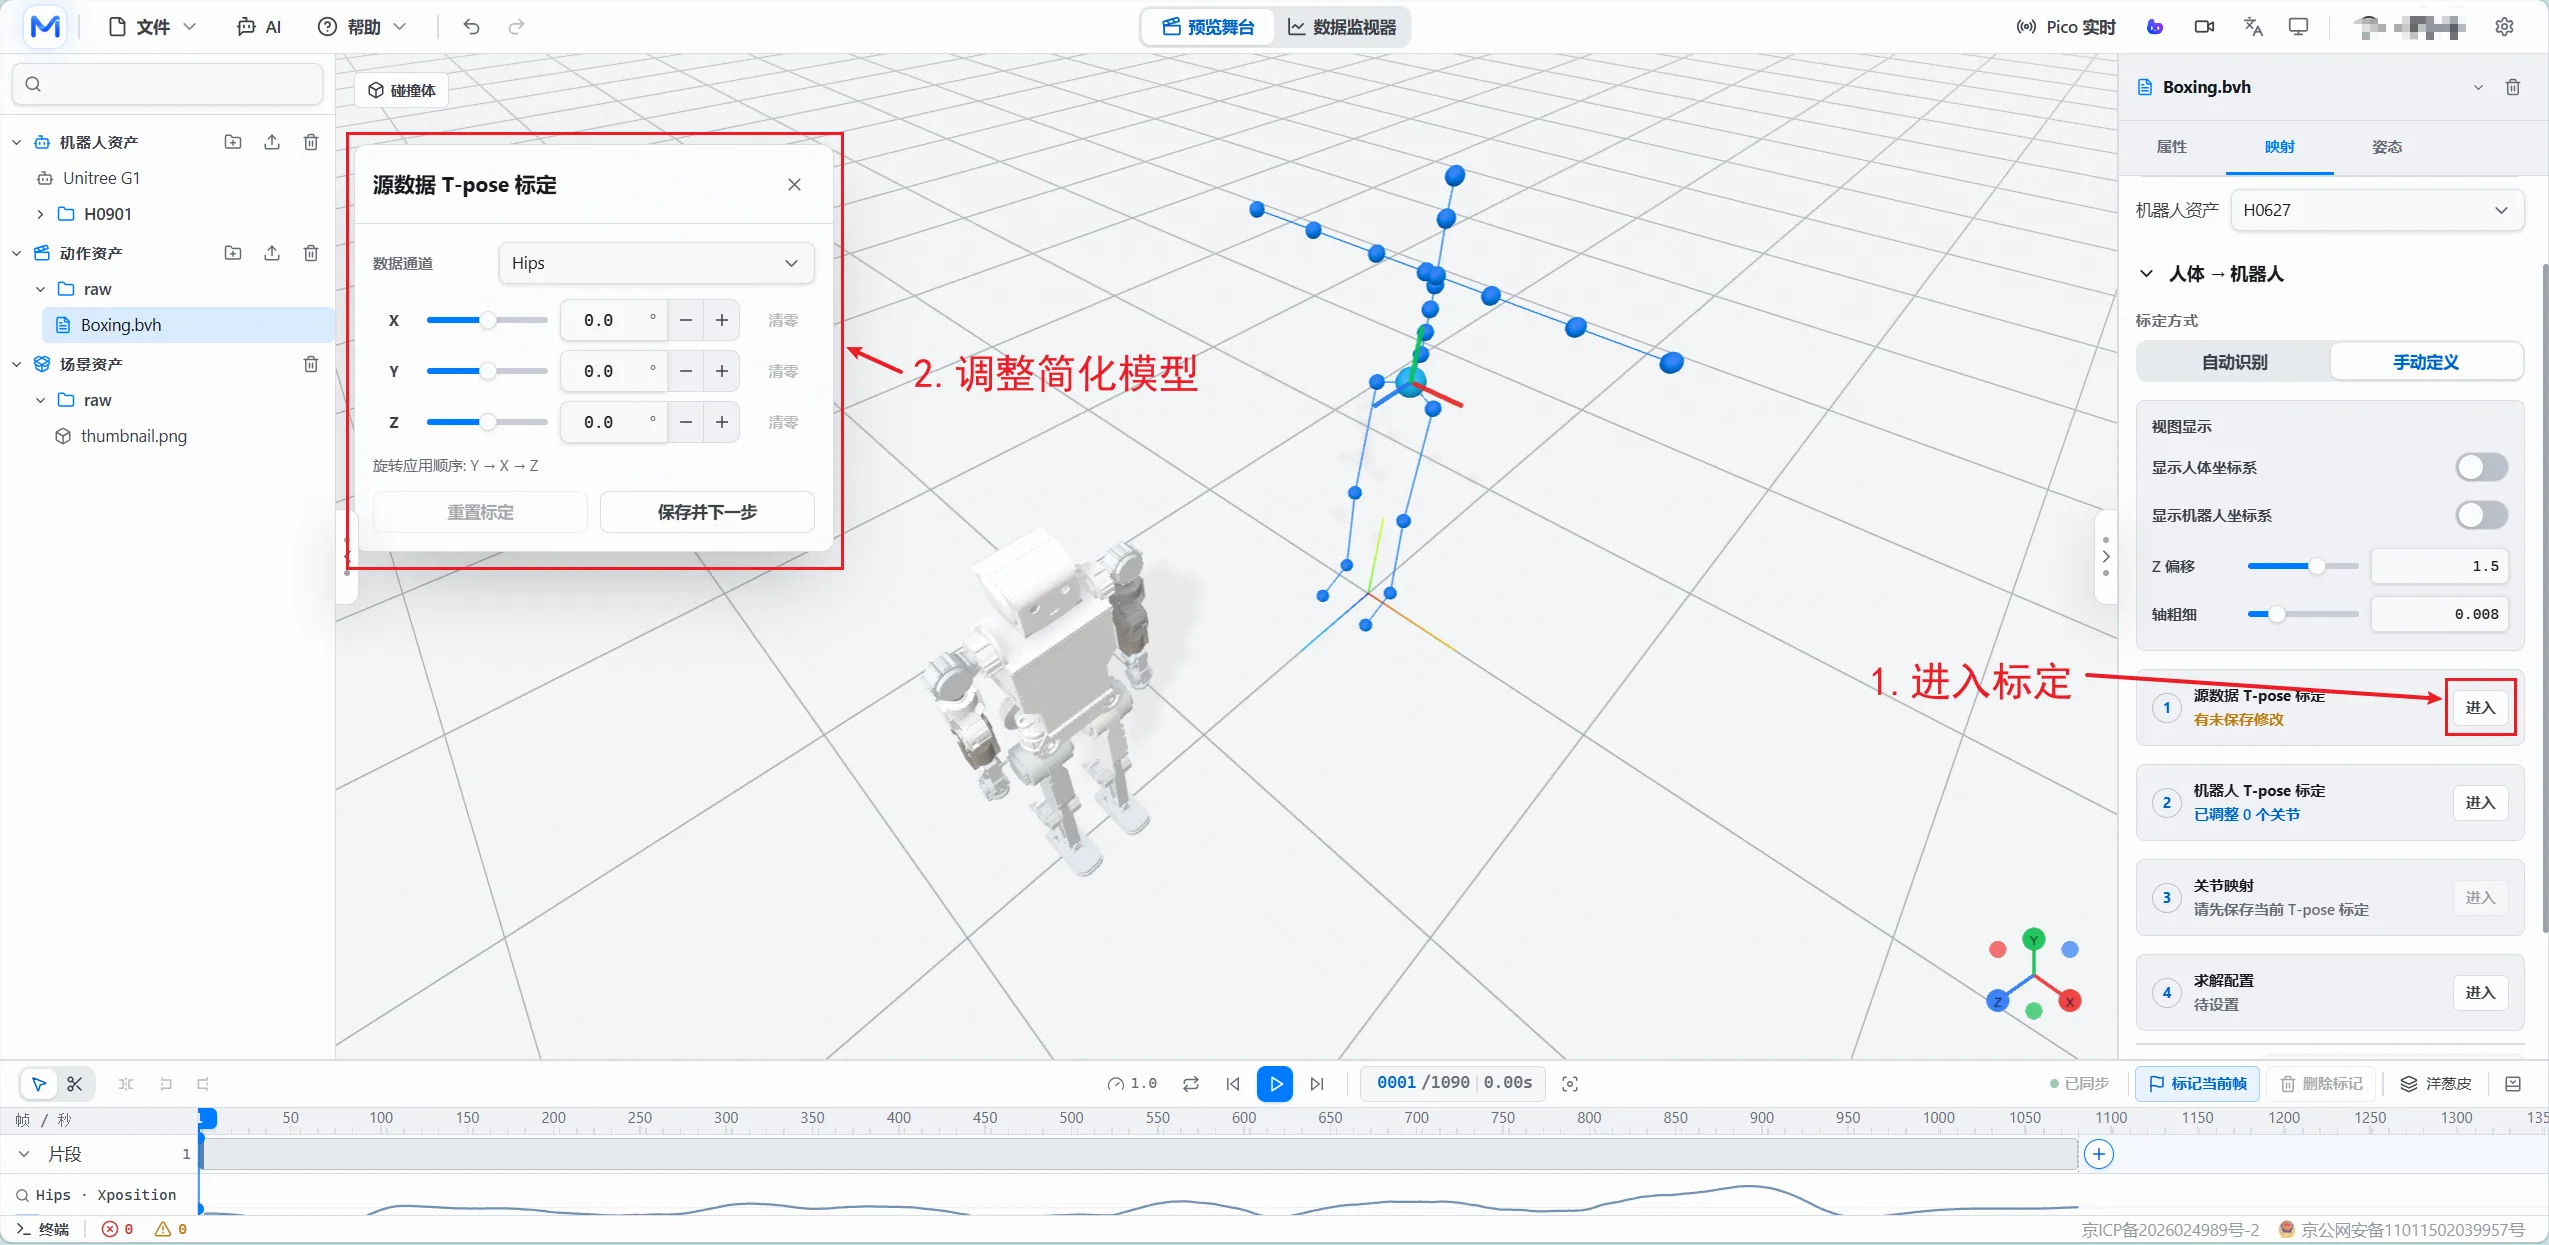
Step 8: Select Source Data T-pose Calibration first. If the robot and dataset model face different directions, adjust the heading, save, and continue.
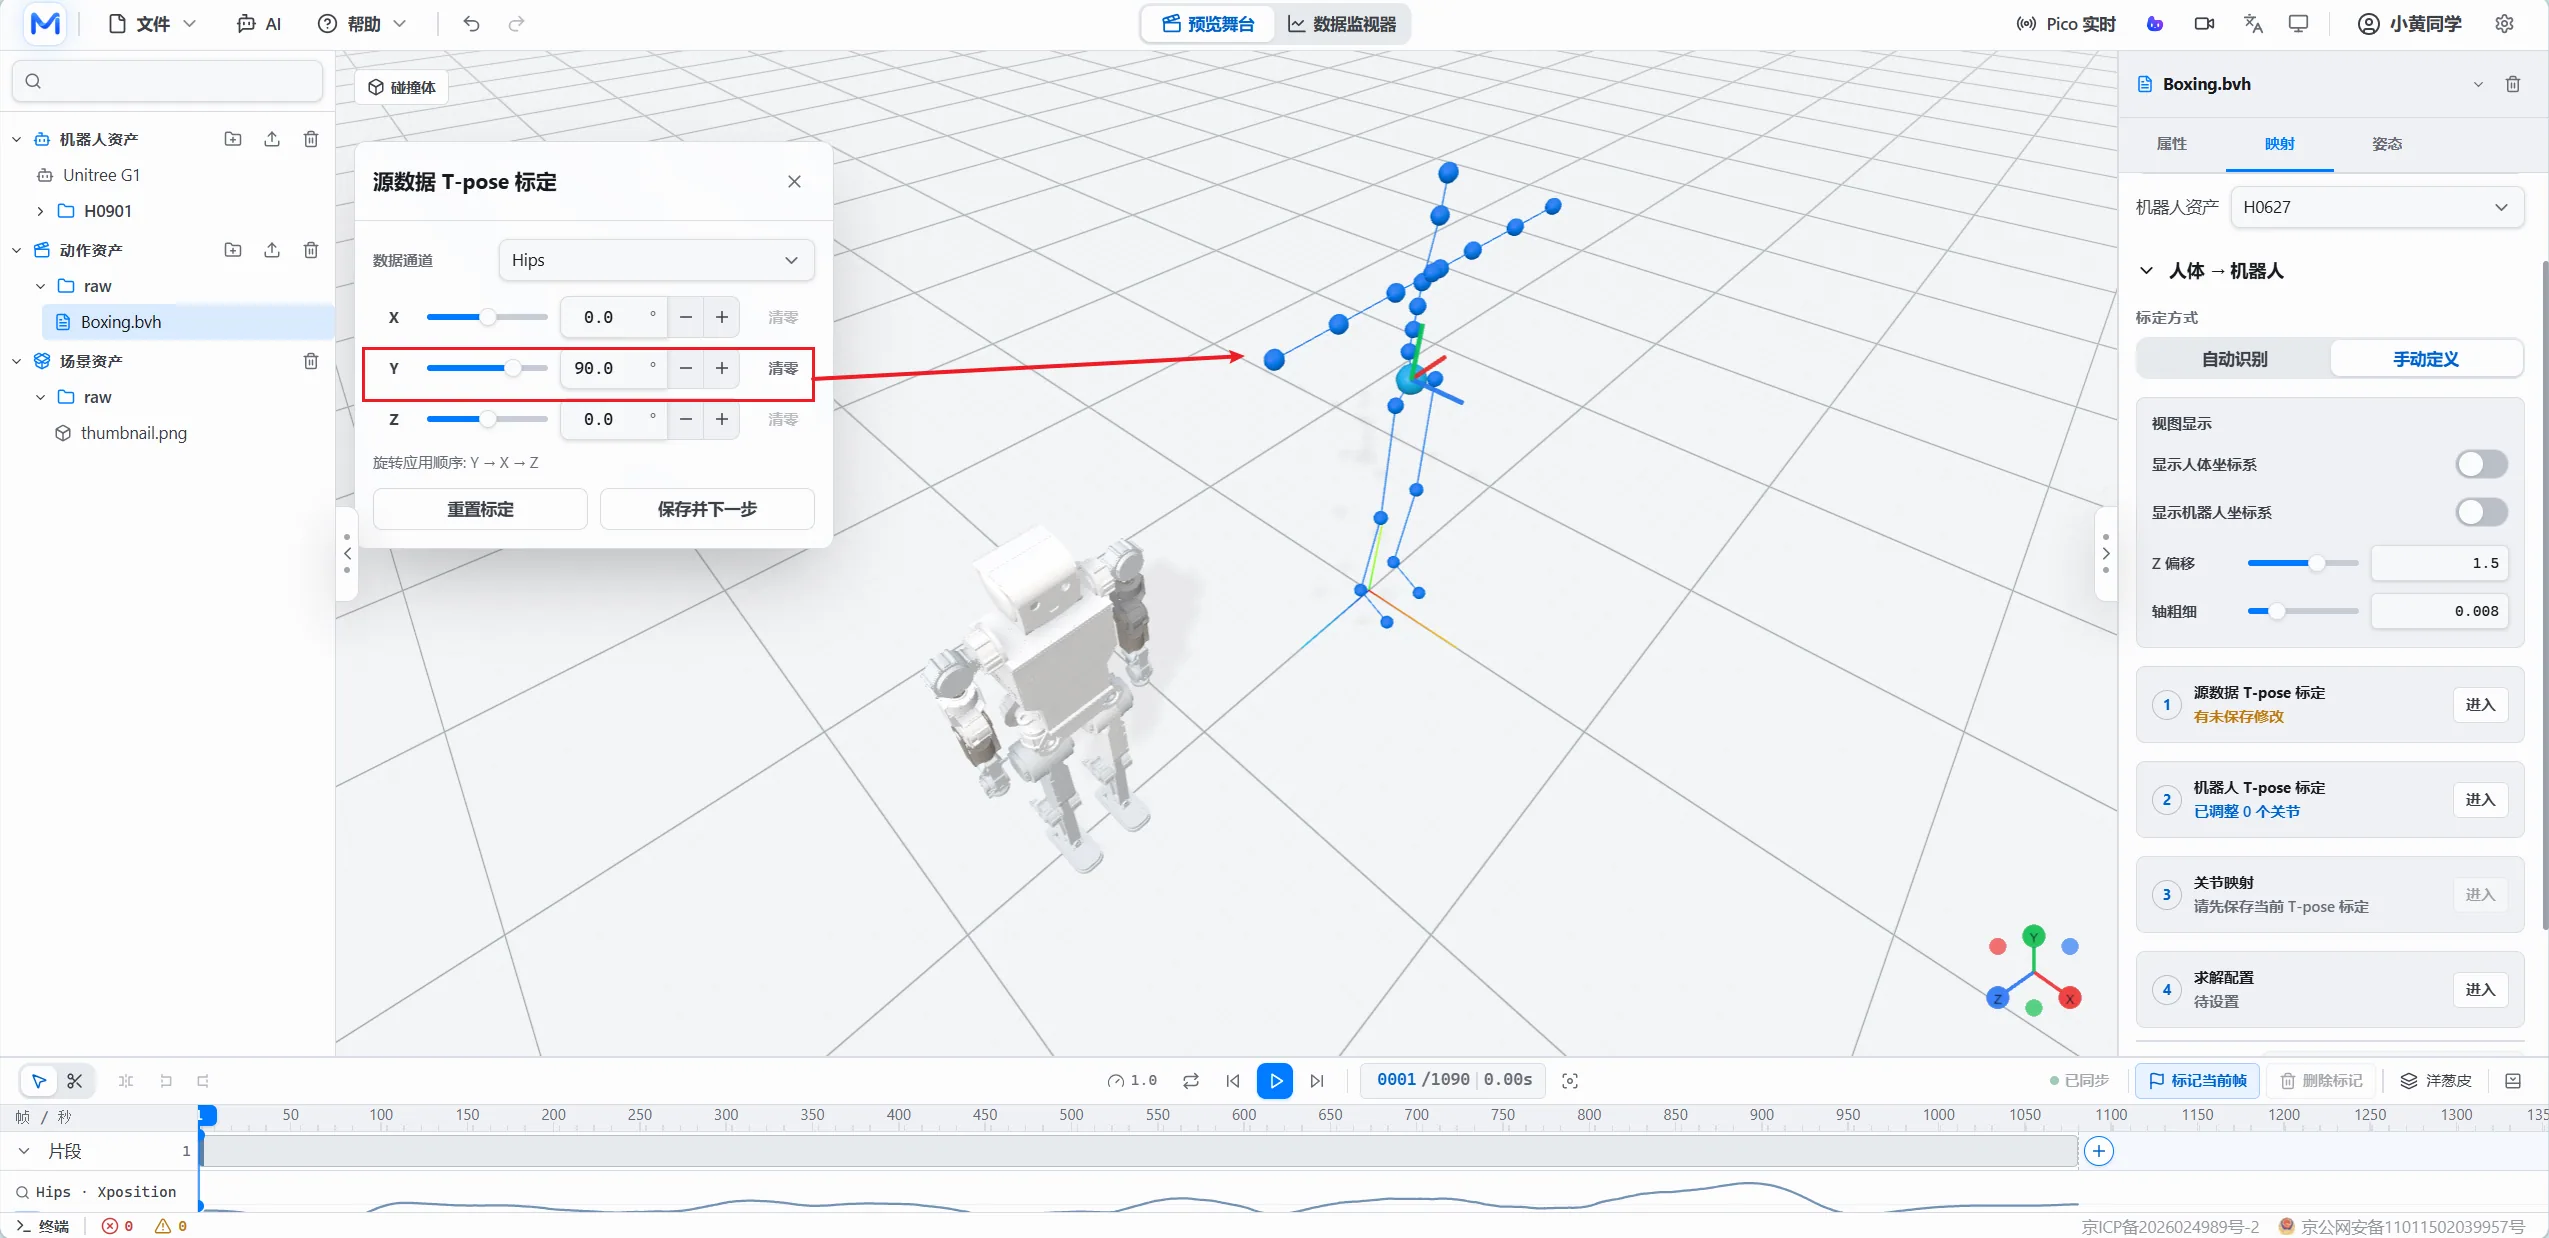
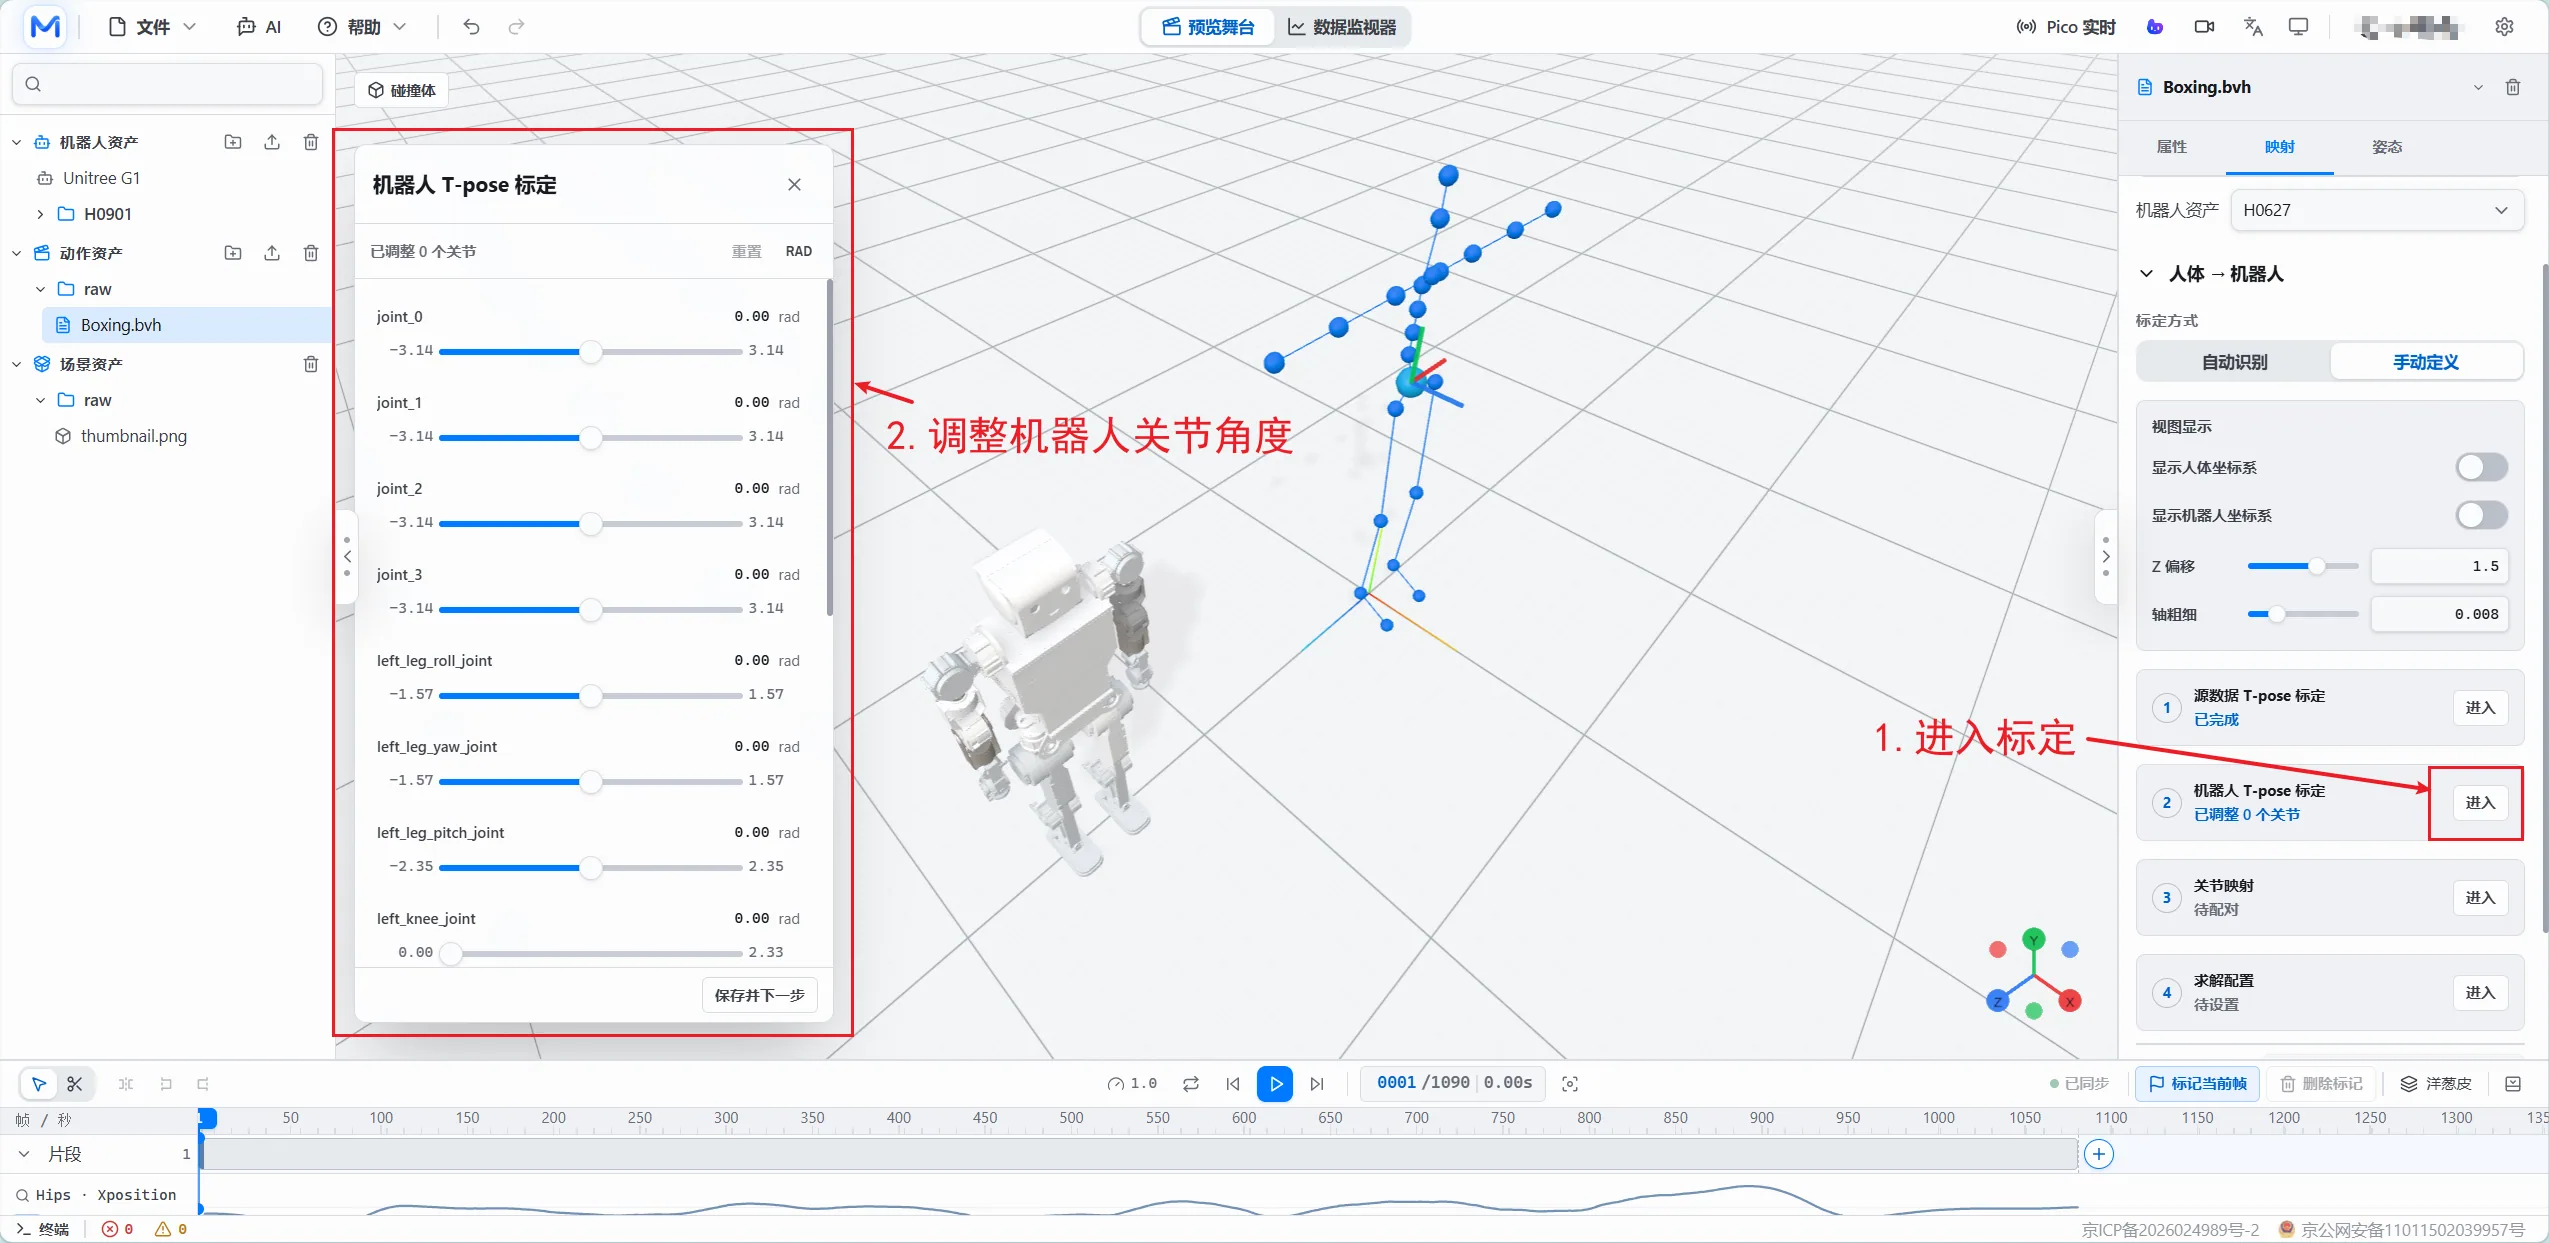
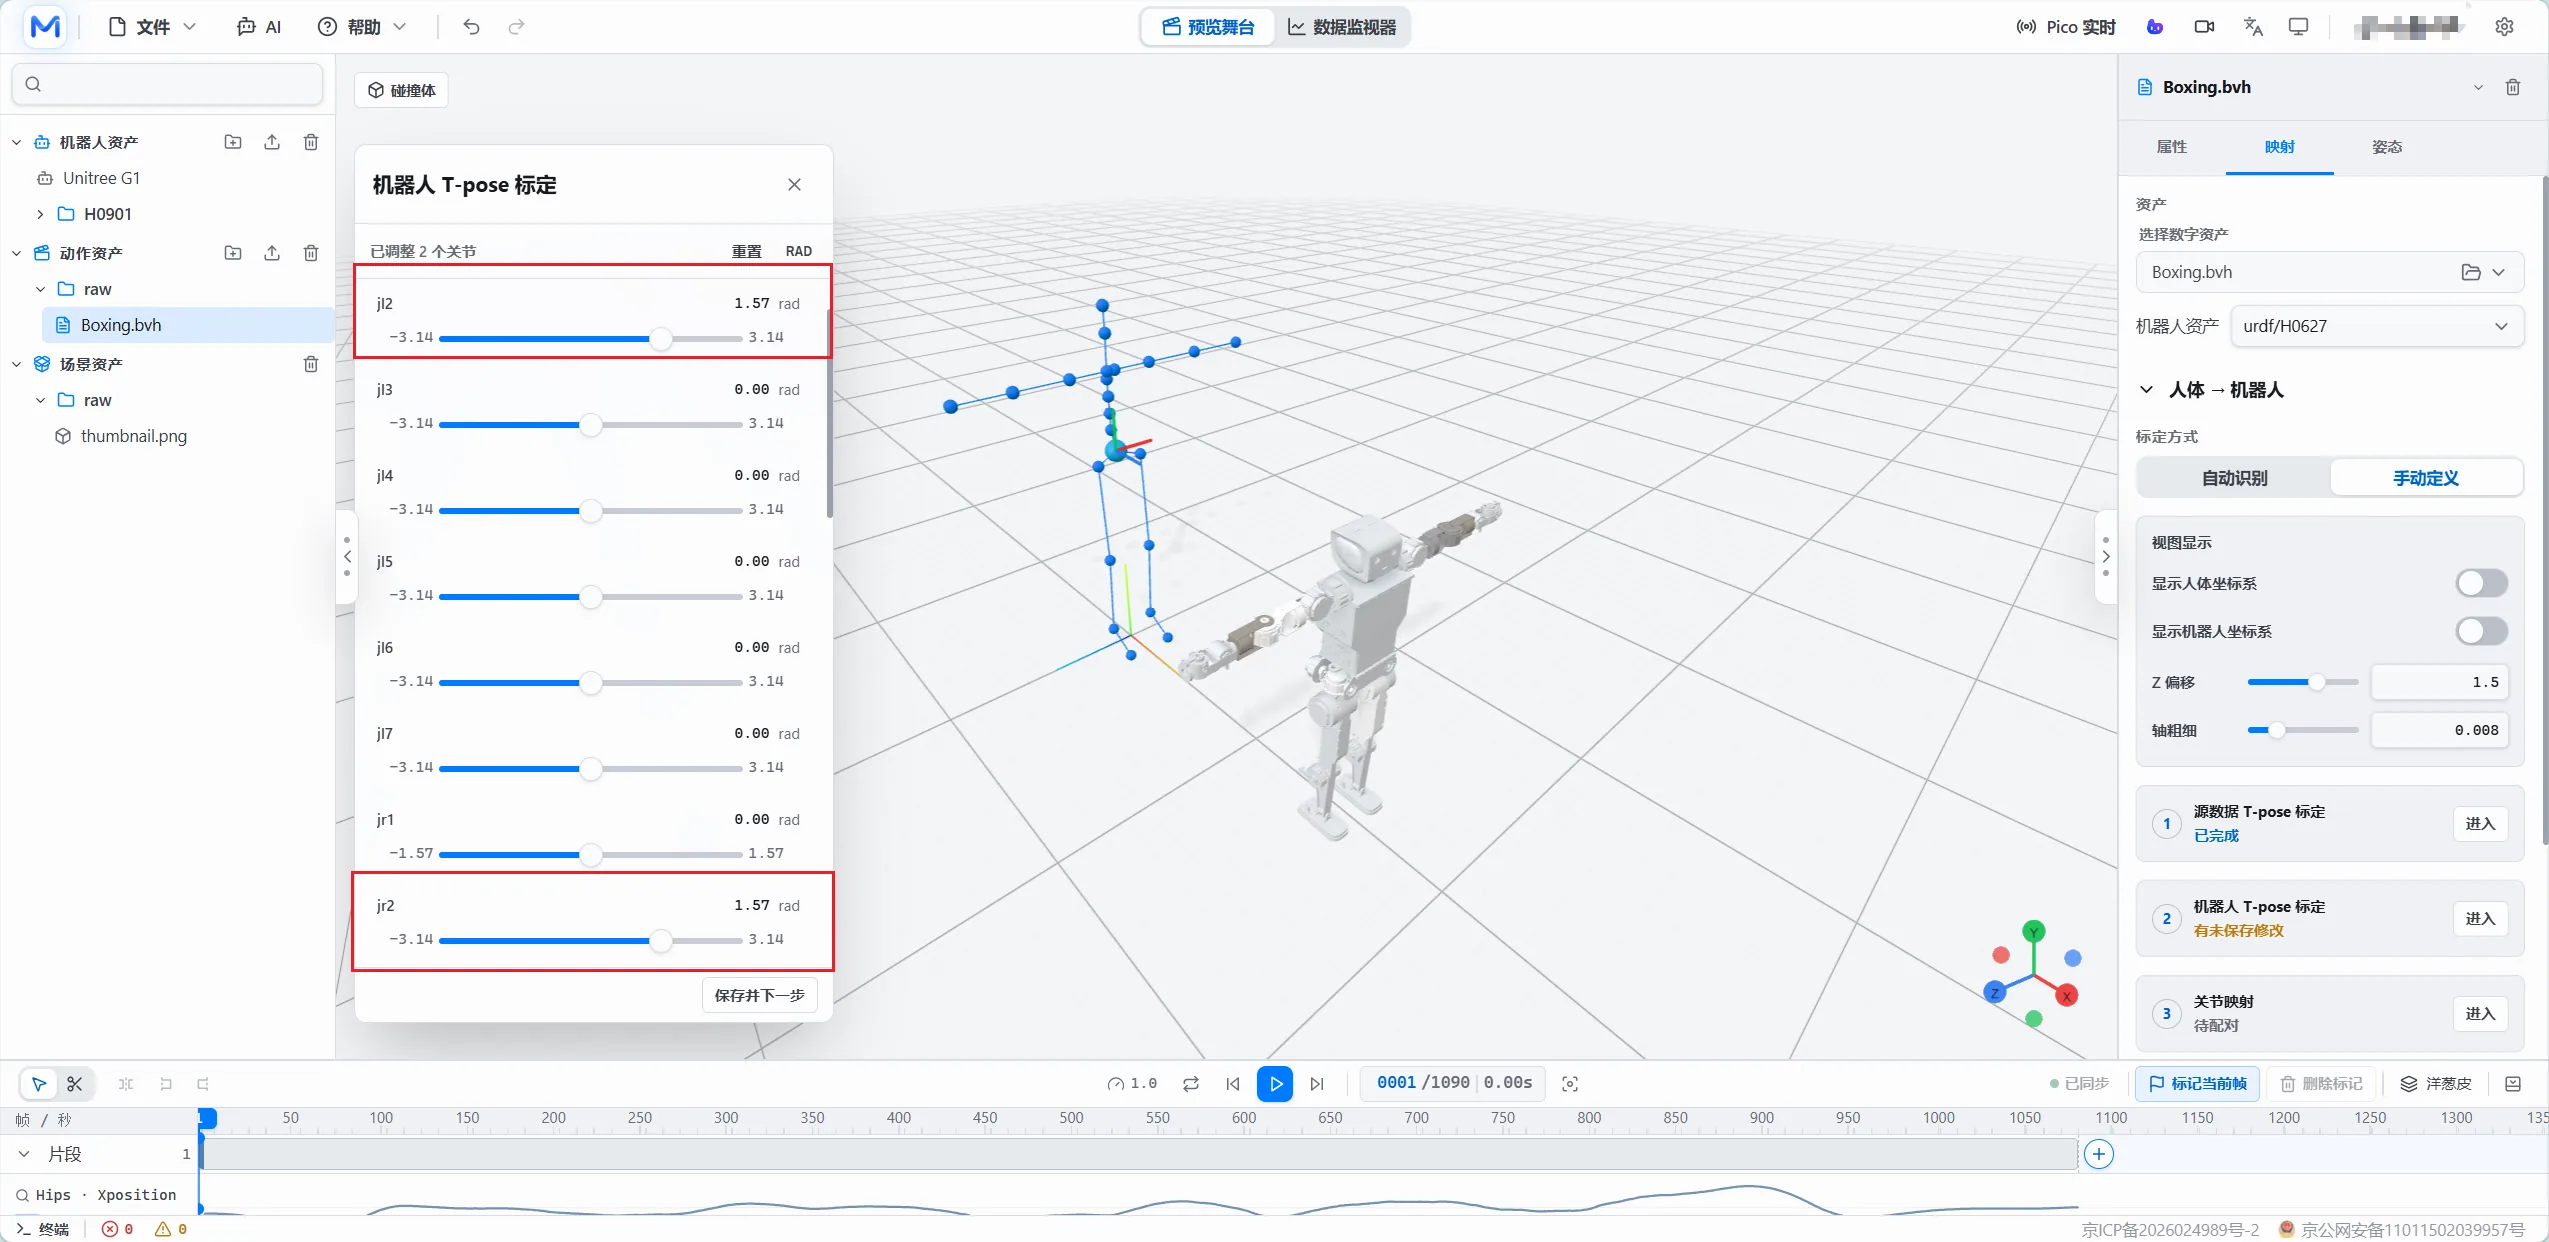
Step 9: In Robot T-pose Calibration, adjust the robot's initial position to match the initial position of the simplified dataset model. Save and continue.
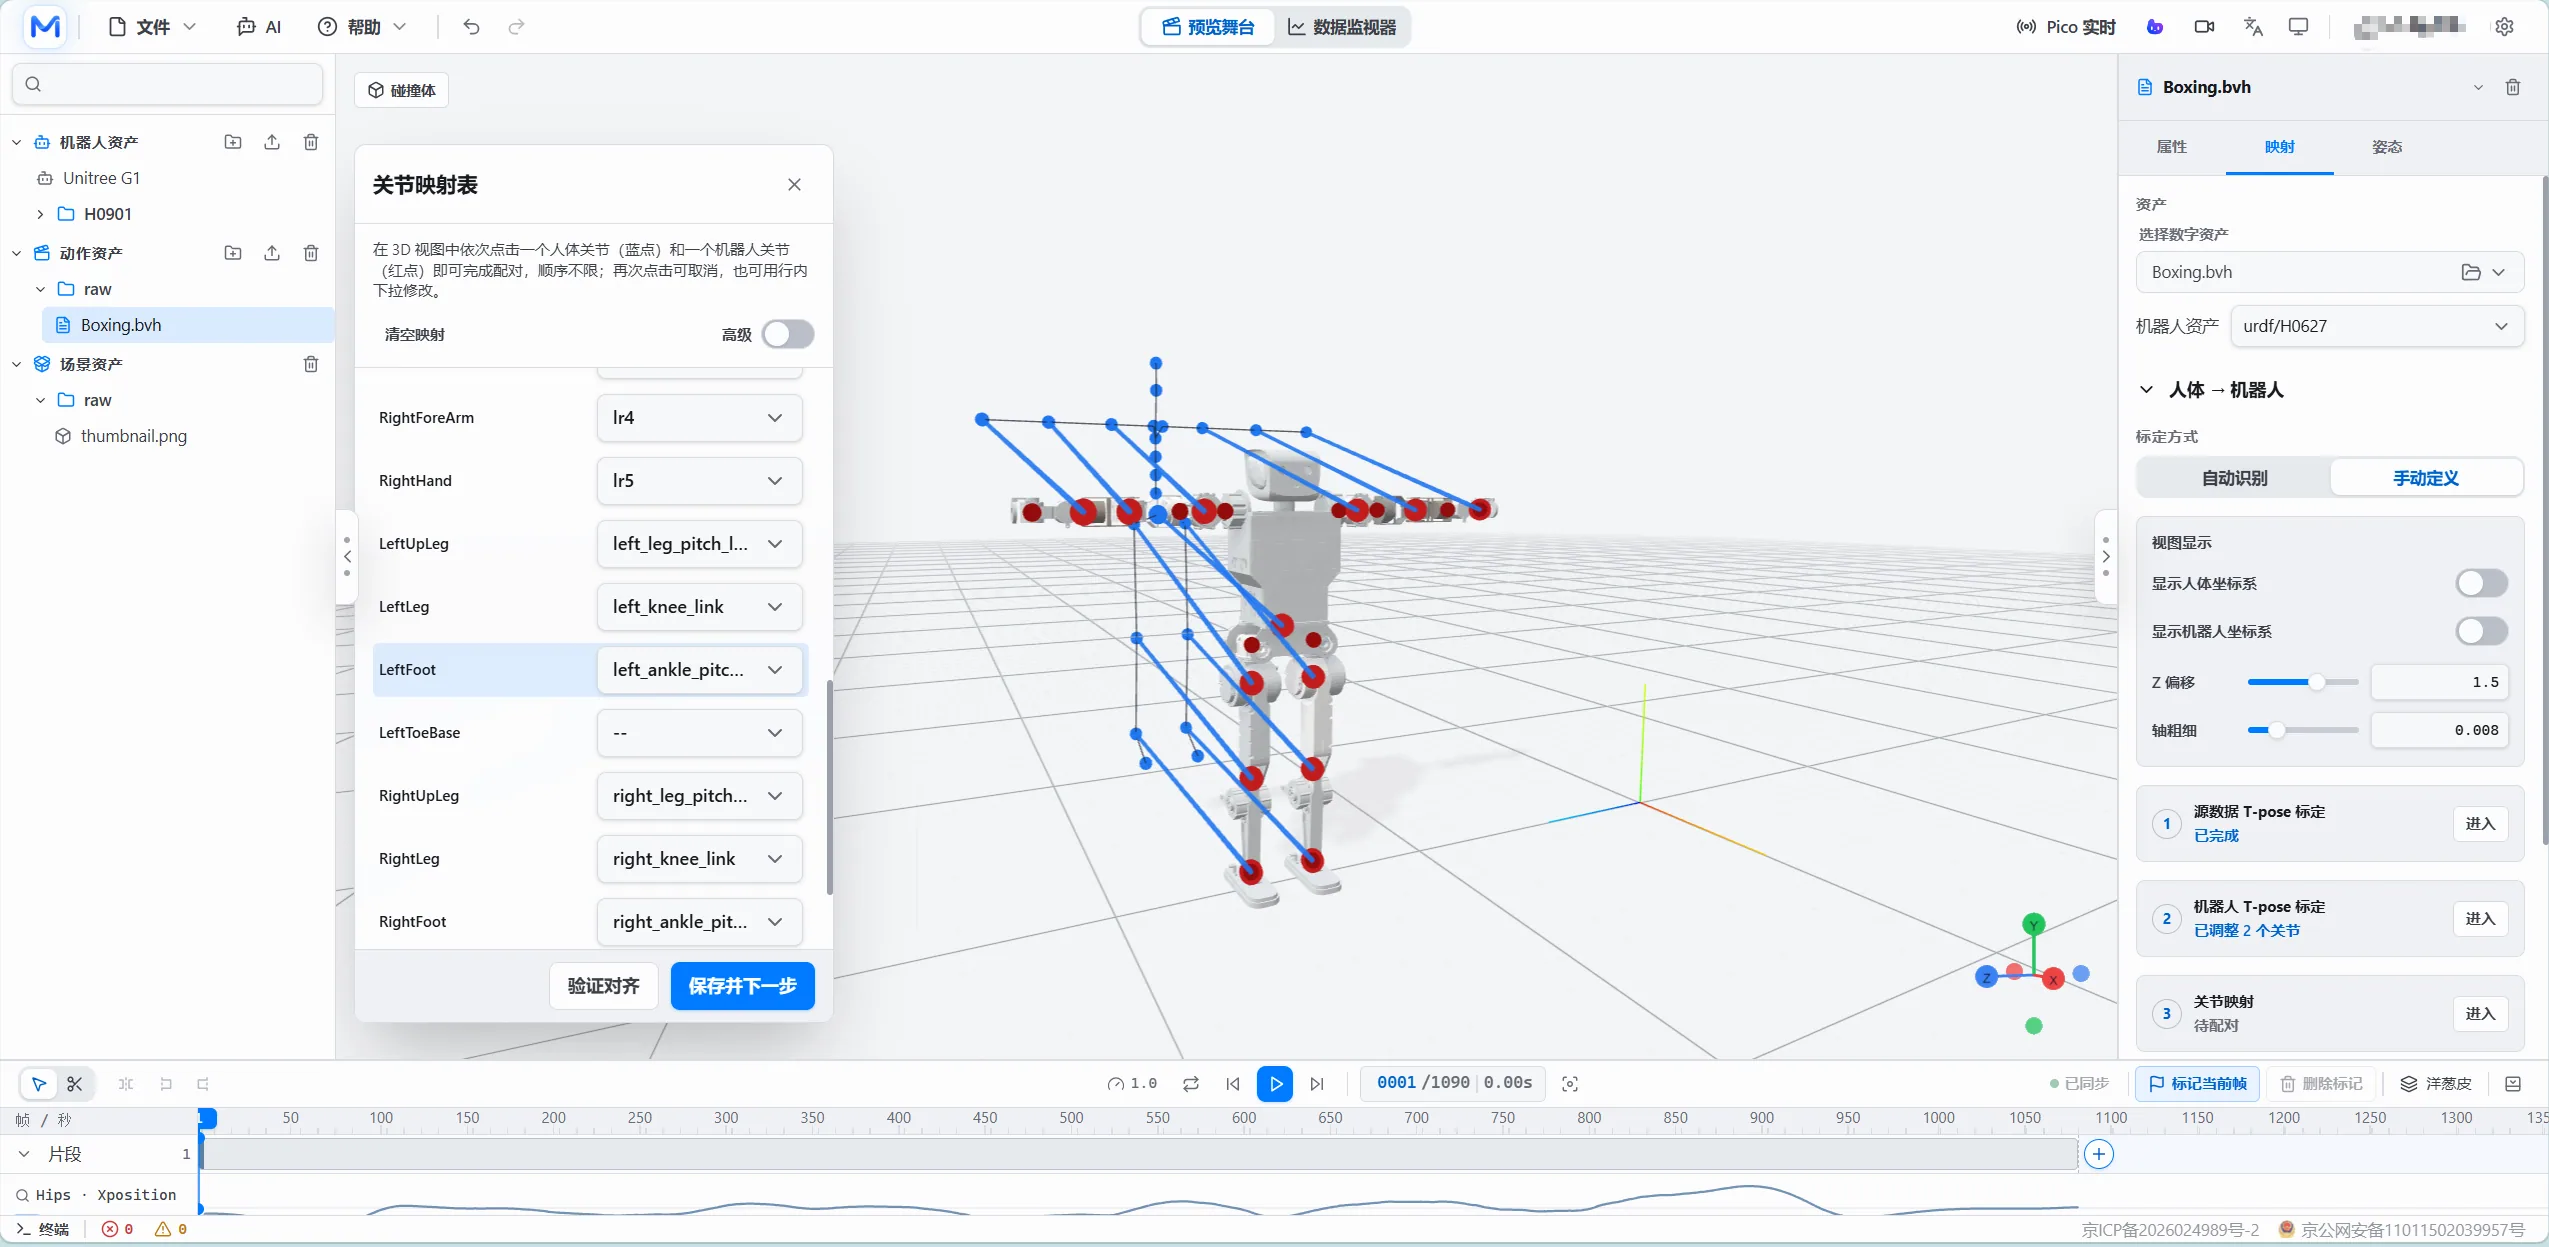
Step 10: In Joint Mapping Table, map robot-model joints to dataset joints. Not every joint must be mapped; use the dropdown options or point selection.
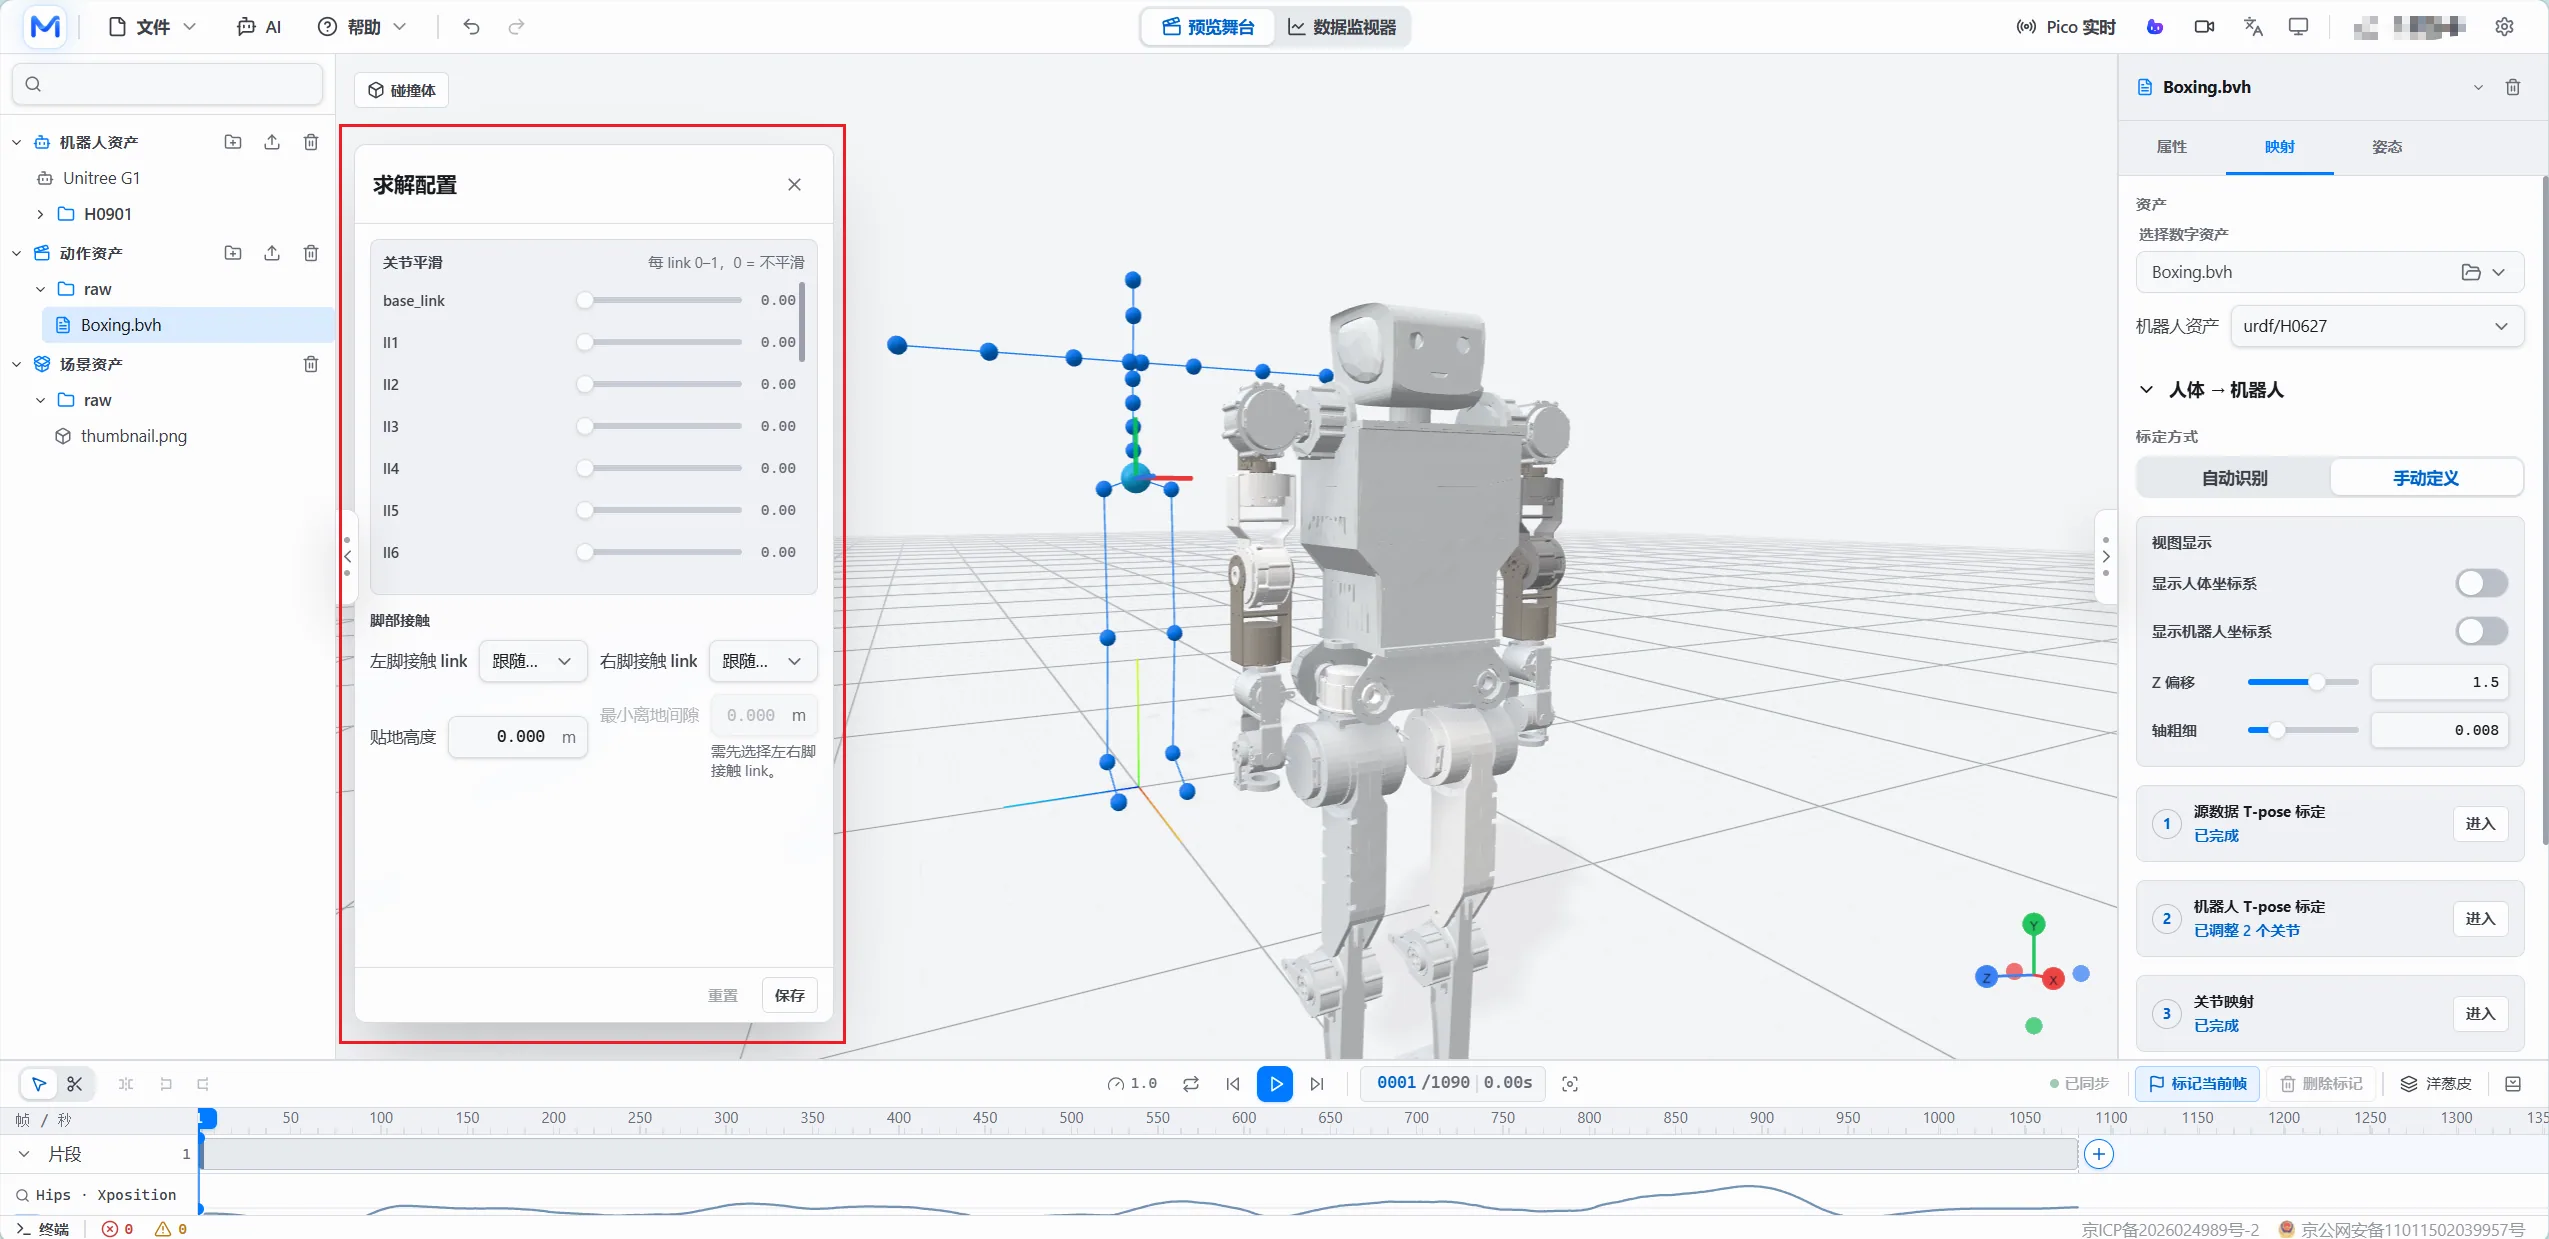
Step 11: In Solver Configuration, set the smoothing level and related settings for each joint, then save.
Step 12: Click Save Configuration and Run Mapping. Mapping is complete when the progress indicator finishes.
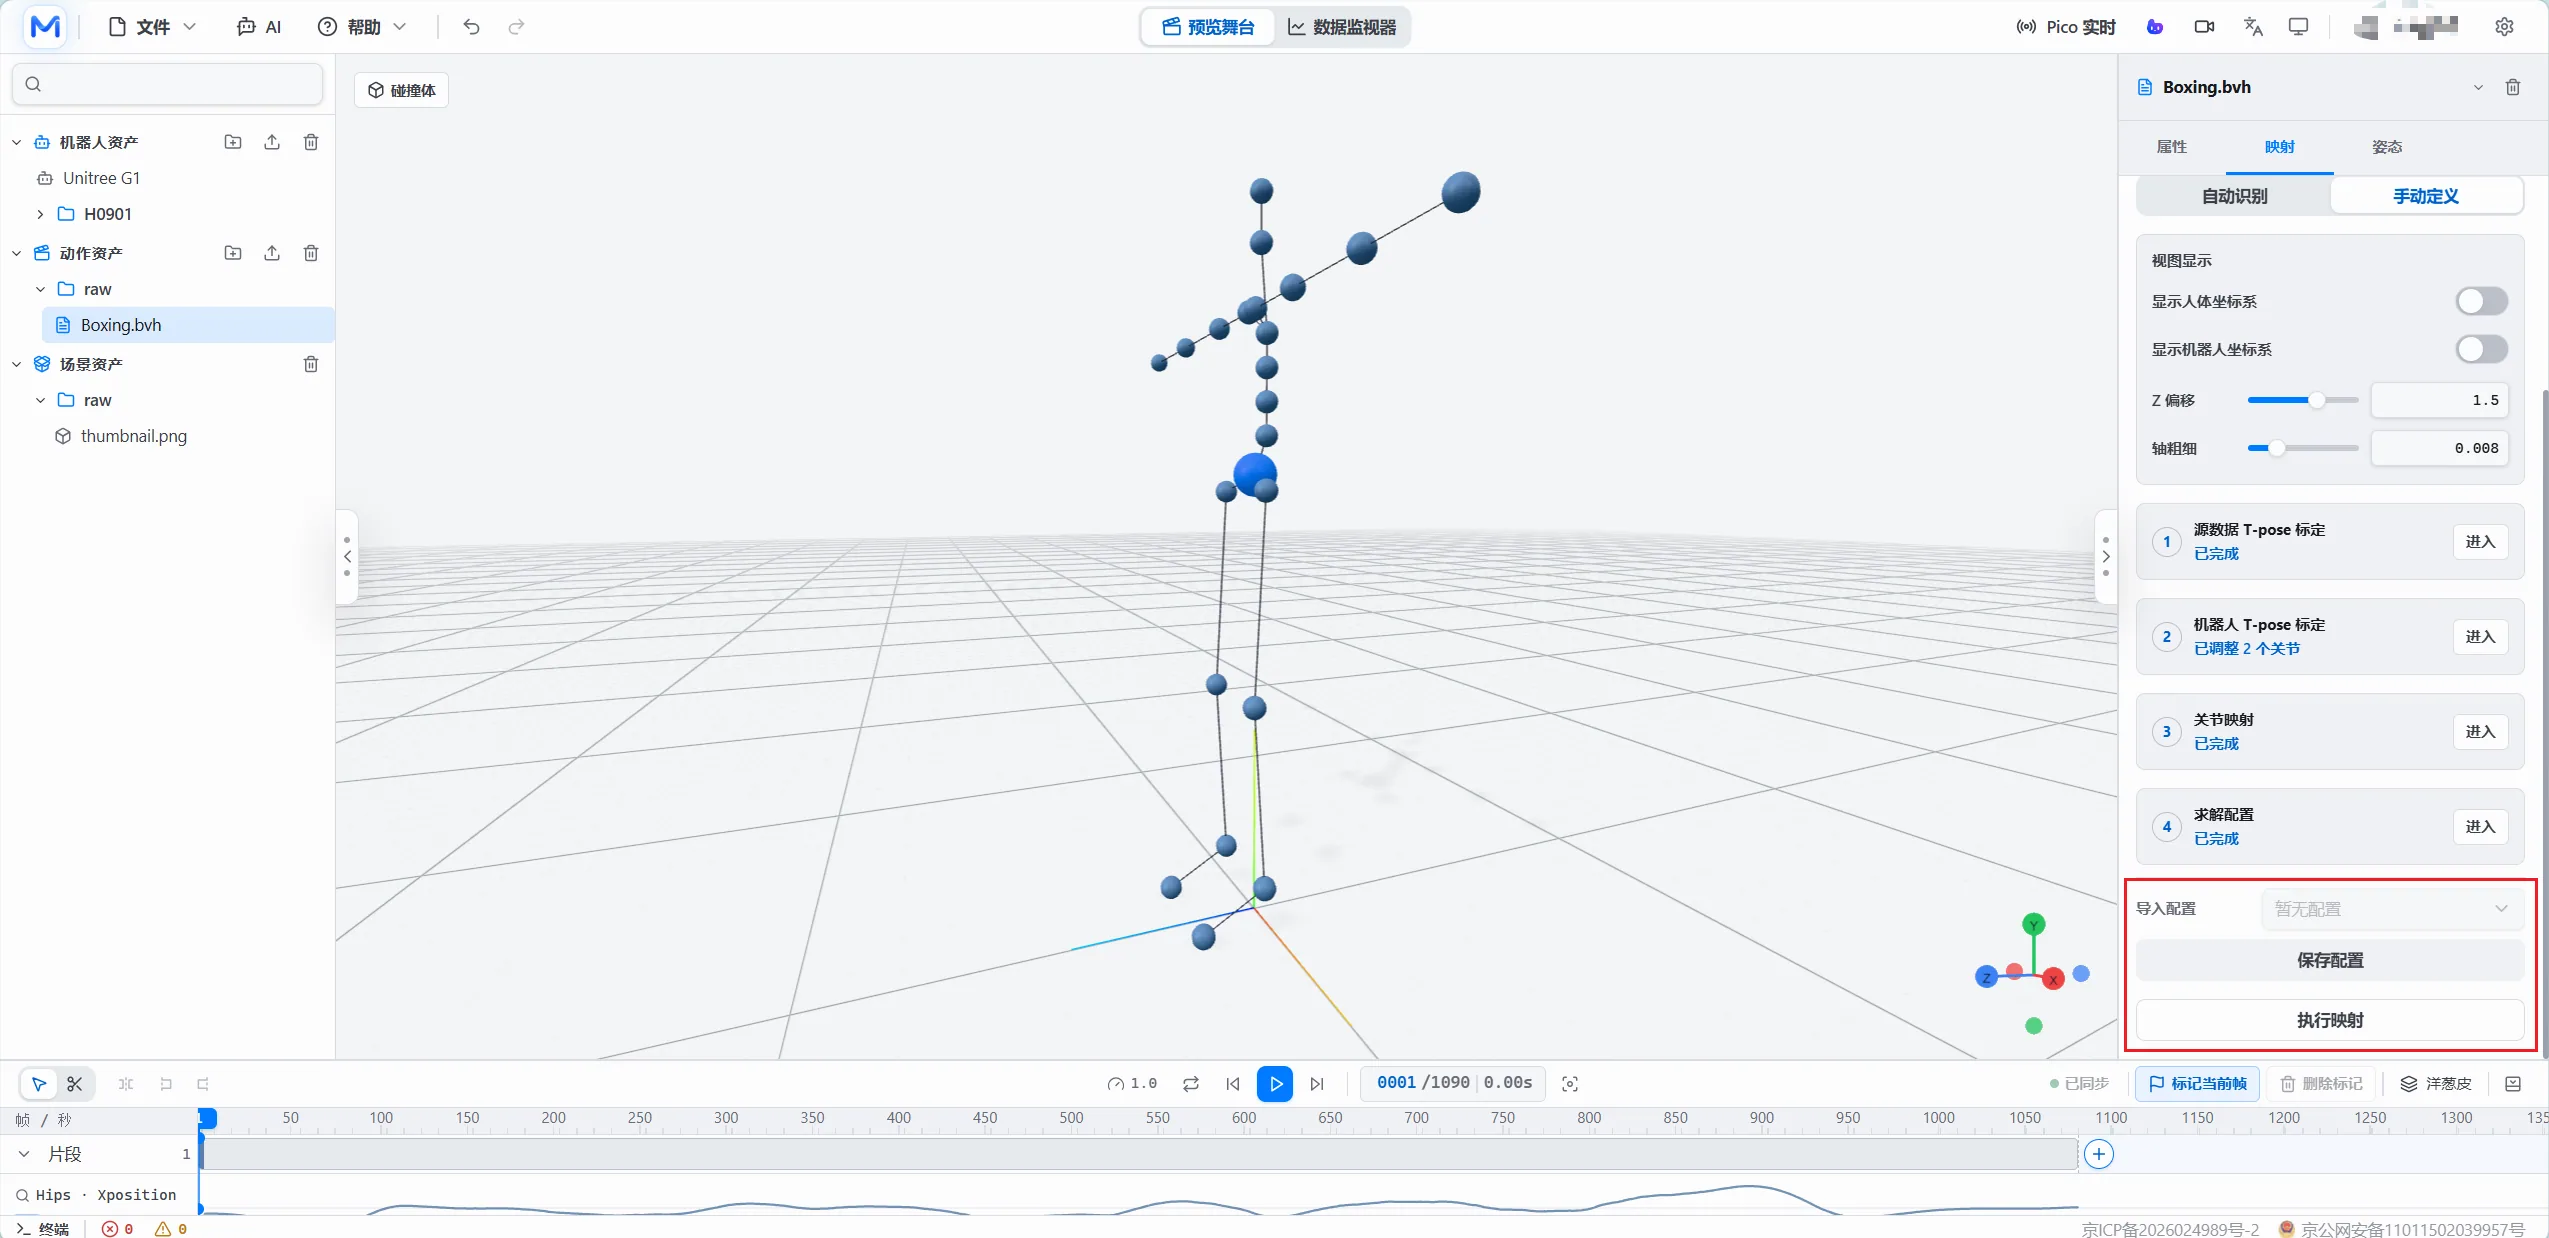
Note: STL files must not exceed 200,000 faces, otherwise mapping will fail.
Step 13: After completion, click Play to review the mapping result and data evaluation content.
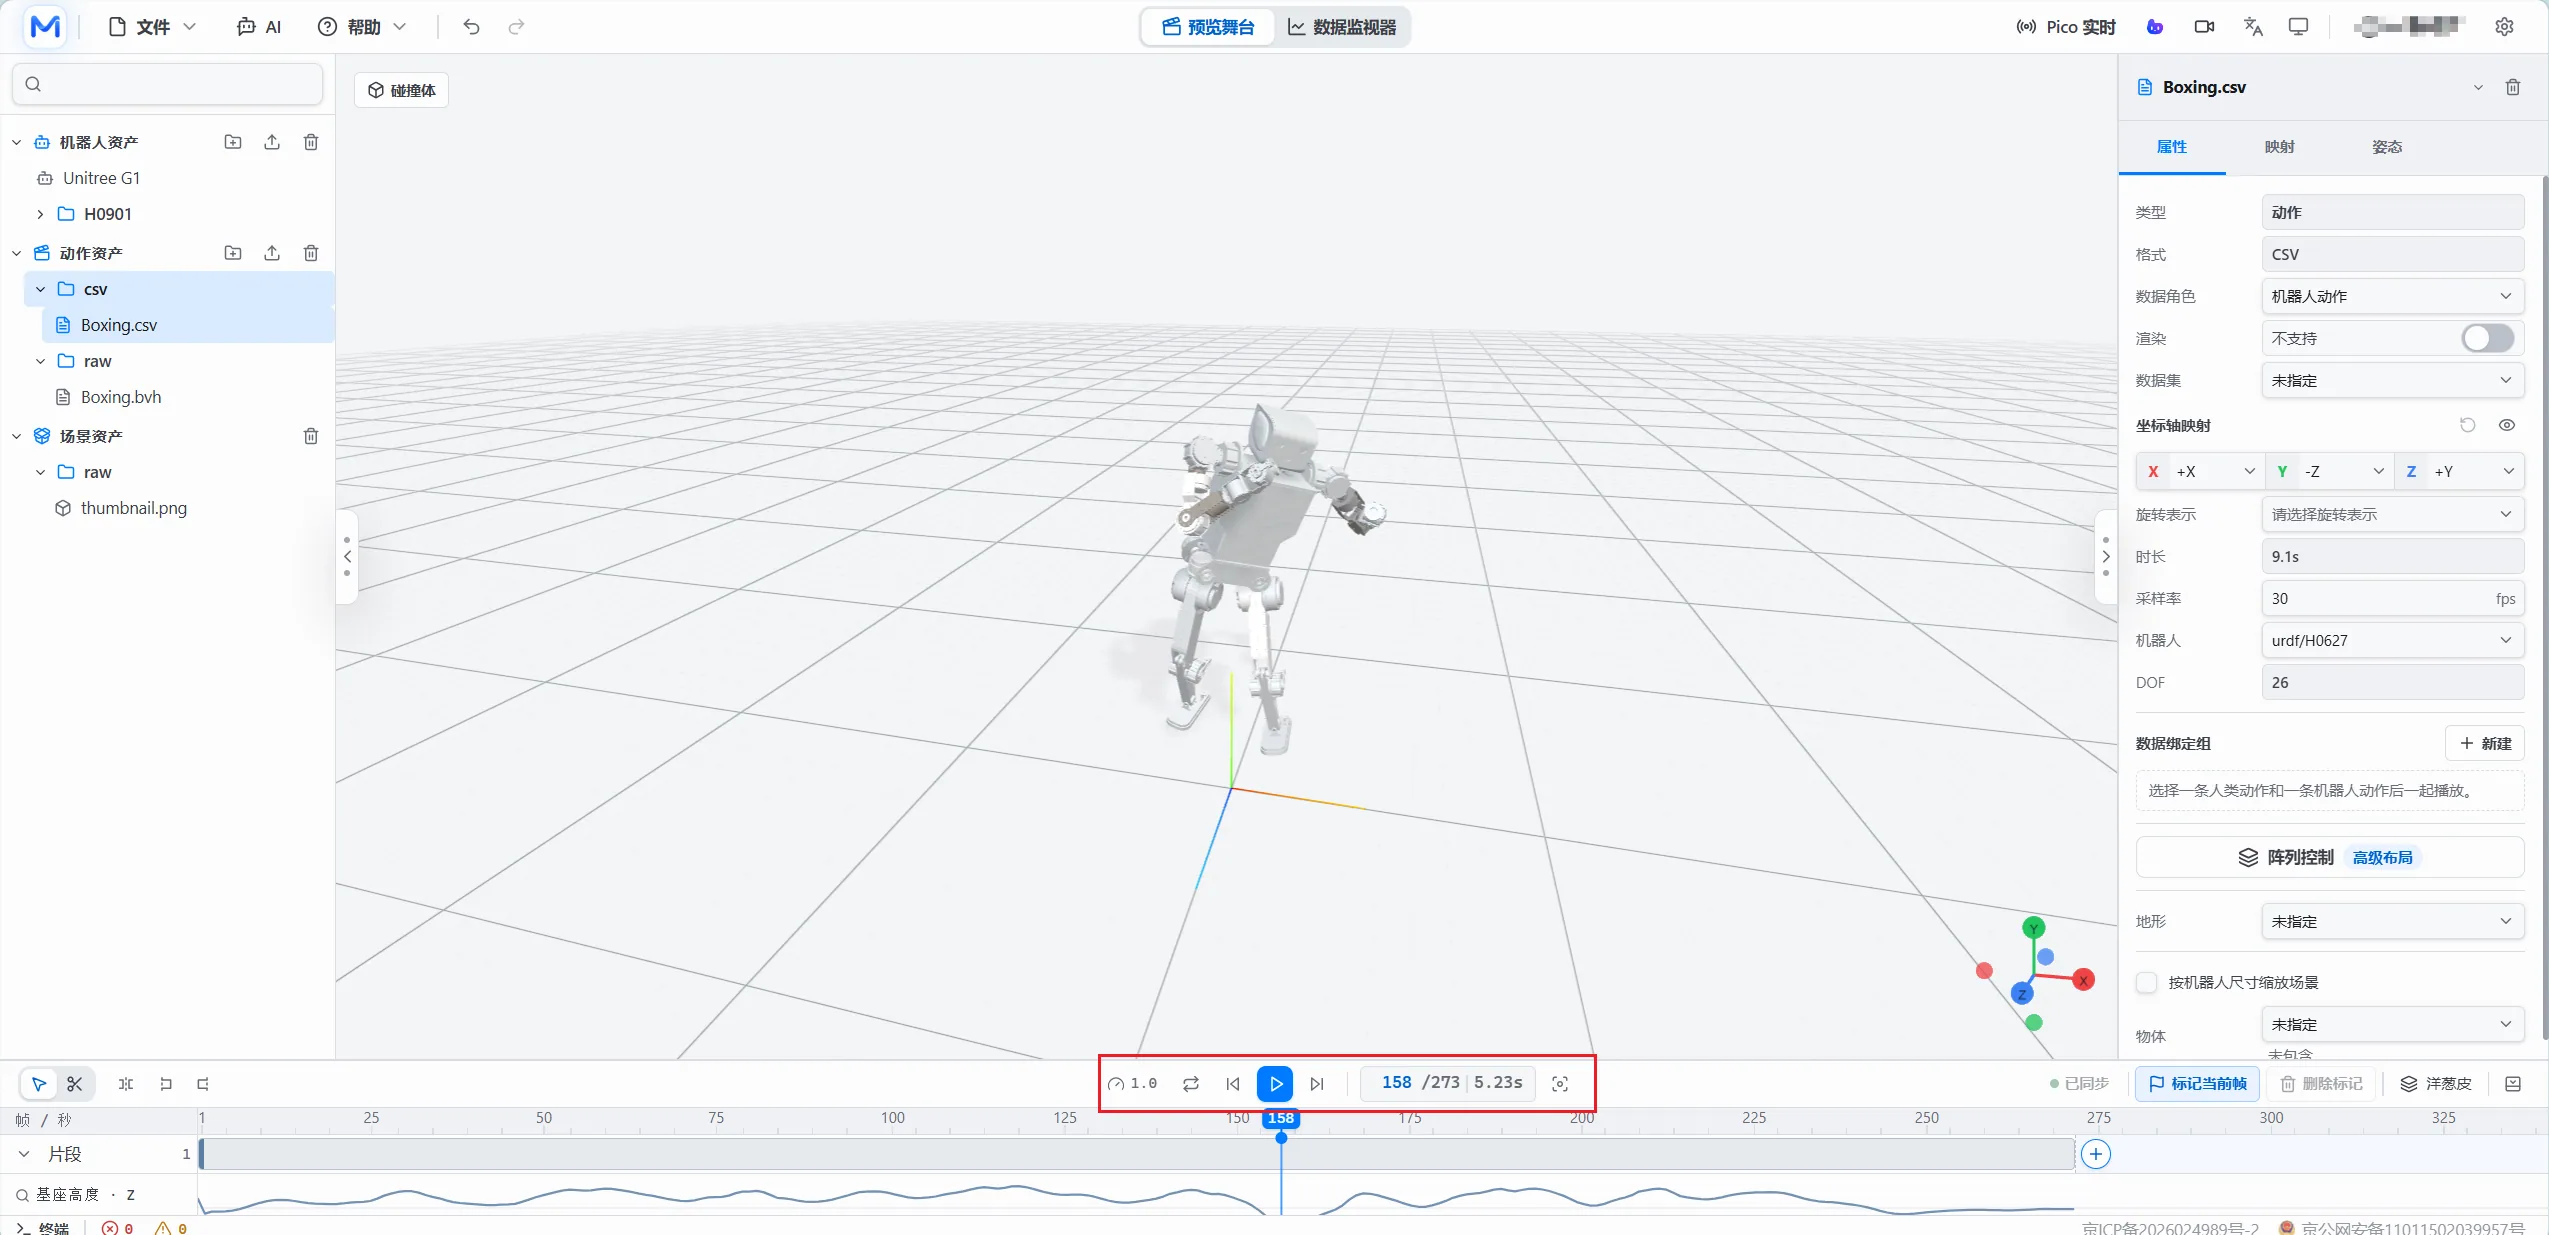
Robot To Robot Under Development
This area is still under development. Robot-to-robot mapping requires a source robot motion and a target robot. Add a robot-pair reference pose when needed, then run the mapping task.
| Setting | Current function |
|---|---|
| Calibration method | Automatic calibration, manual T-pose or reference pose. |
| Source data | BVH, SMPL/SMPL-X, robot trajectory and other recognized imports. |
| Output format | CSV, PKL. |
| Additional options | Collision optimization, online/local retargeting, frame range and mocap device type. |
Timeline And Pose Editing
After generating or importing robot motion, use the timeline to inspect clips and the Pose tab to edit a single frame or local trajectory.
Timeline Editing
The timeline is the main inspection area before and after editing. It supports frame review, clip splitting and curve checks.
- Drag a motion asset to the bottom timeline to create a clip.
- Use playback, first-frame, last-frame, speed and frame-number controls to inspect the motion.
- Drag a selection and press X to split a clip.
- Add frame markers, delete markers, enable onion skin or inspect curve tracks as needed.
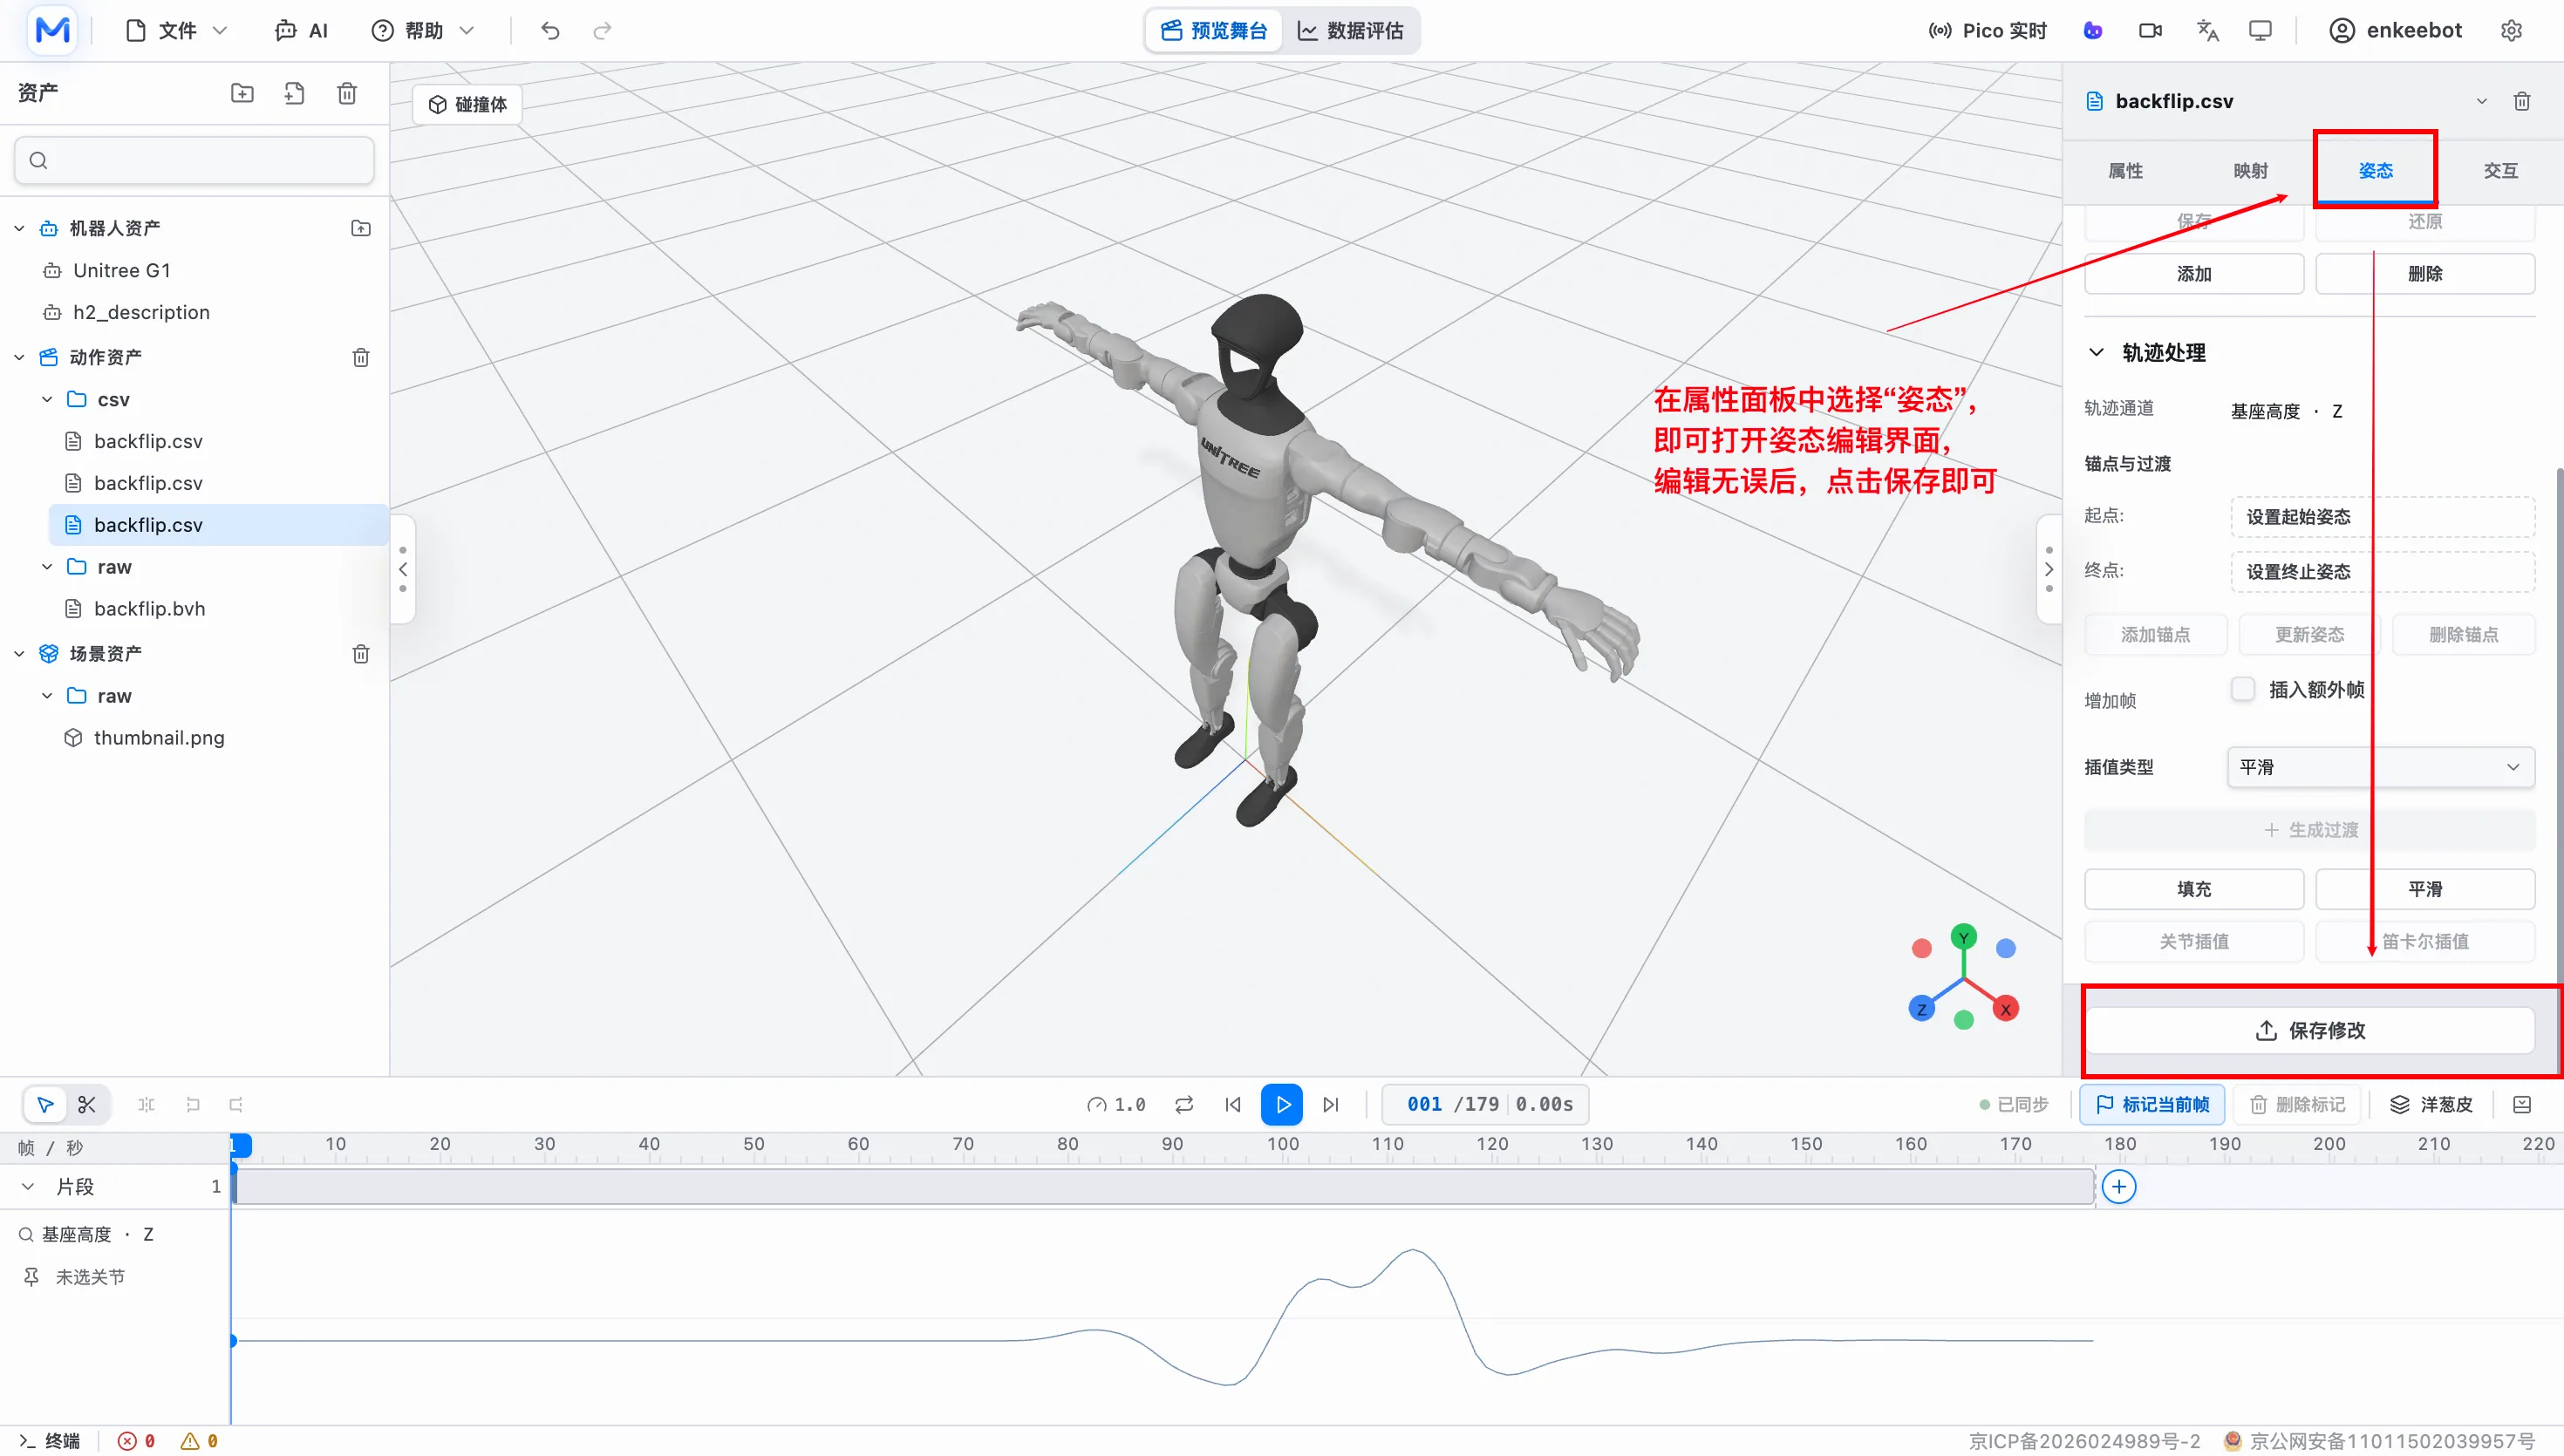
Pose Editing
Pose editing corrects a single frame or local trajectory, which is useful for local issues around arms, legs or root position.
- Select an editable motion asset.
- Open the Pose tab on the right.
- Adjust joints or root pose on the current frame, then submit, restore, insert or delete as needed.
- Use pose anchors, transitions, damping, interpolation and channel operations to adjust the trajectory.
Data Evaluation And Interaction Simulation
After processing a motion, use evaluation or real-time/physics interaction checks as needed. Data Evaluation helps inspect motion quality and key data before export.
Action: click Data Evaluation in the top toolbar.
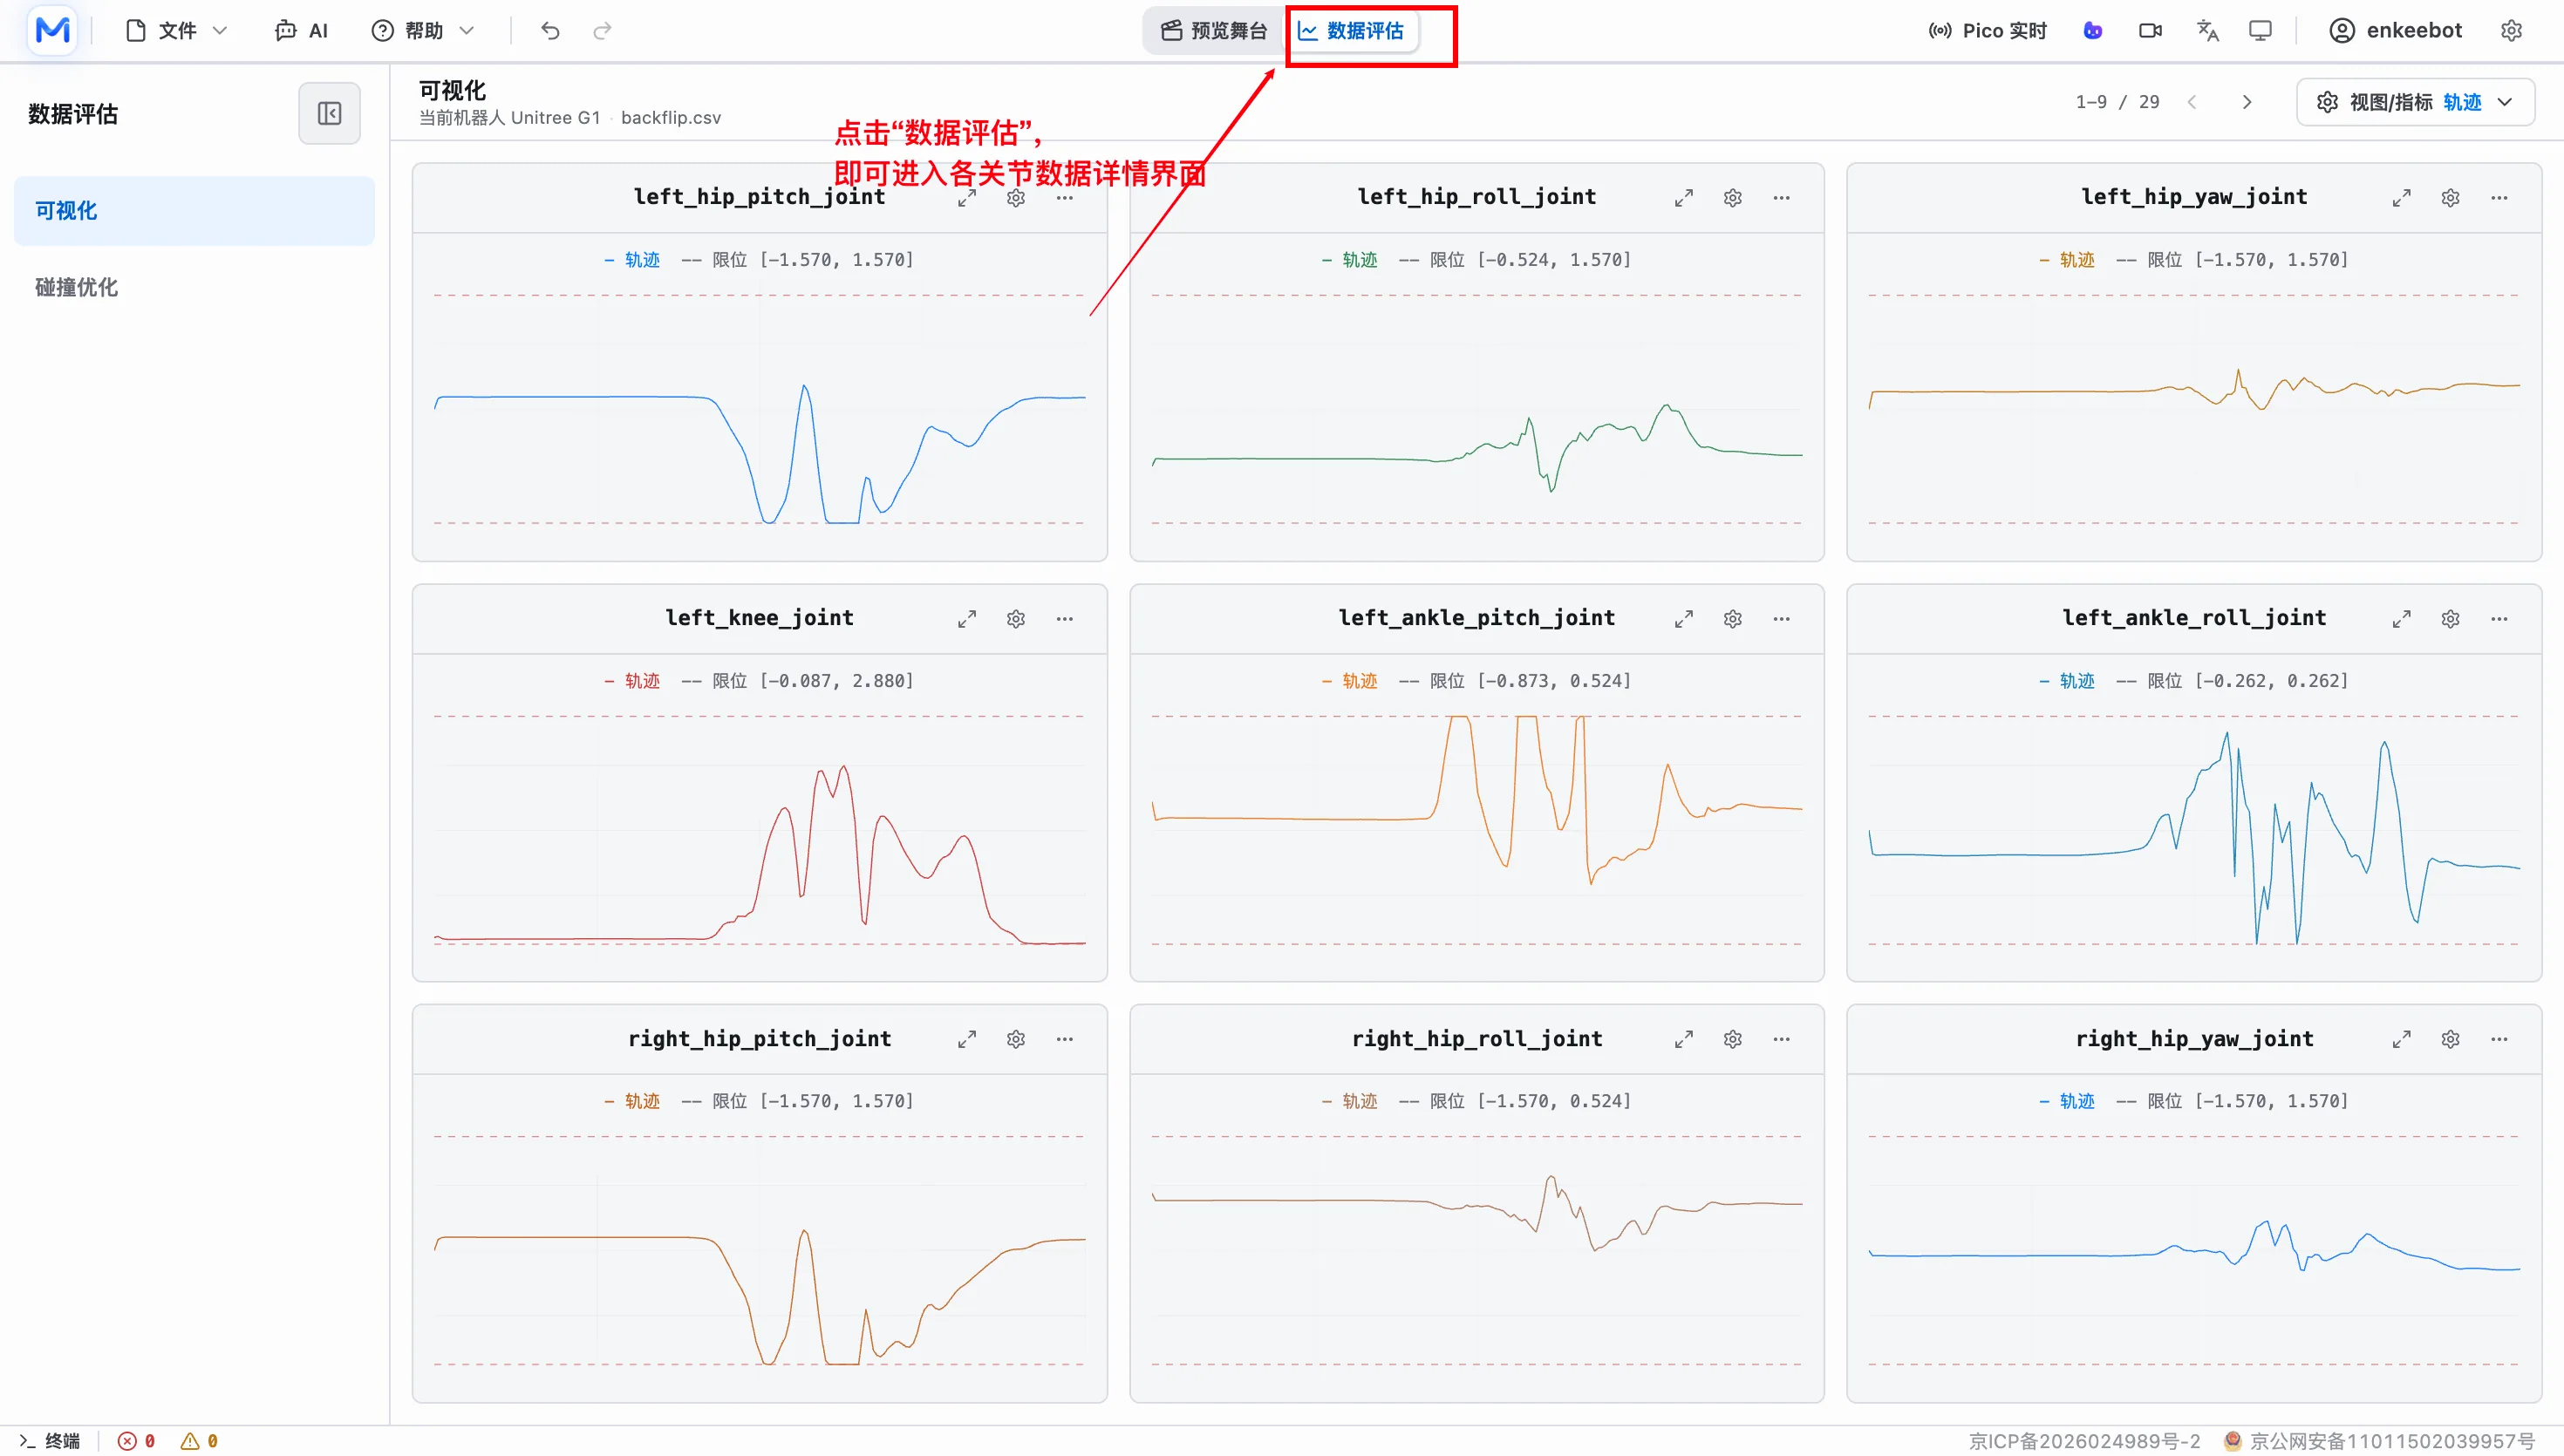
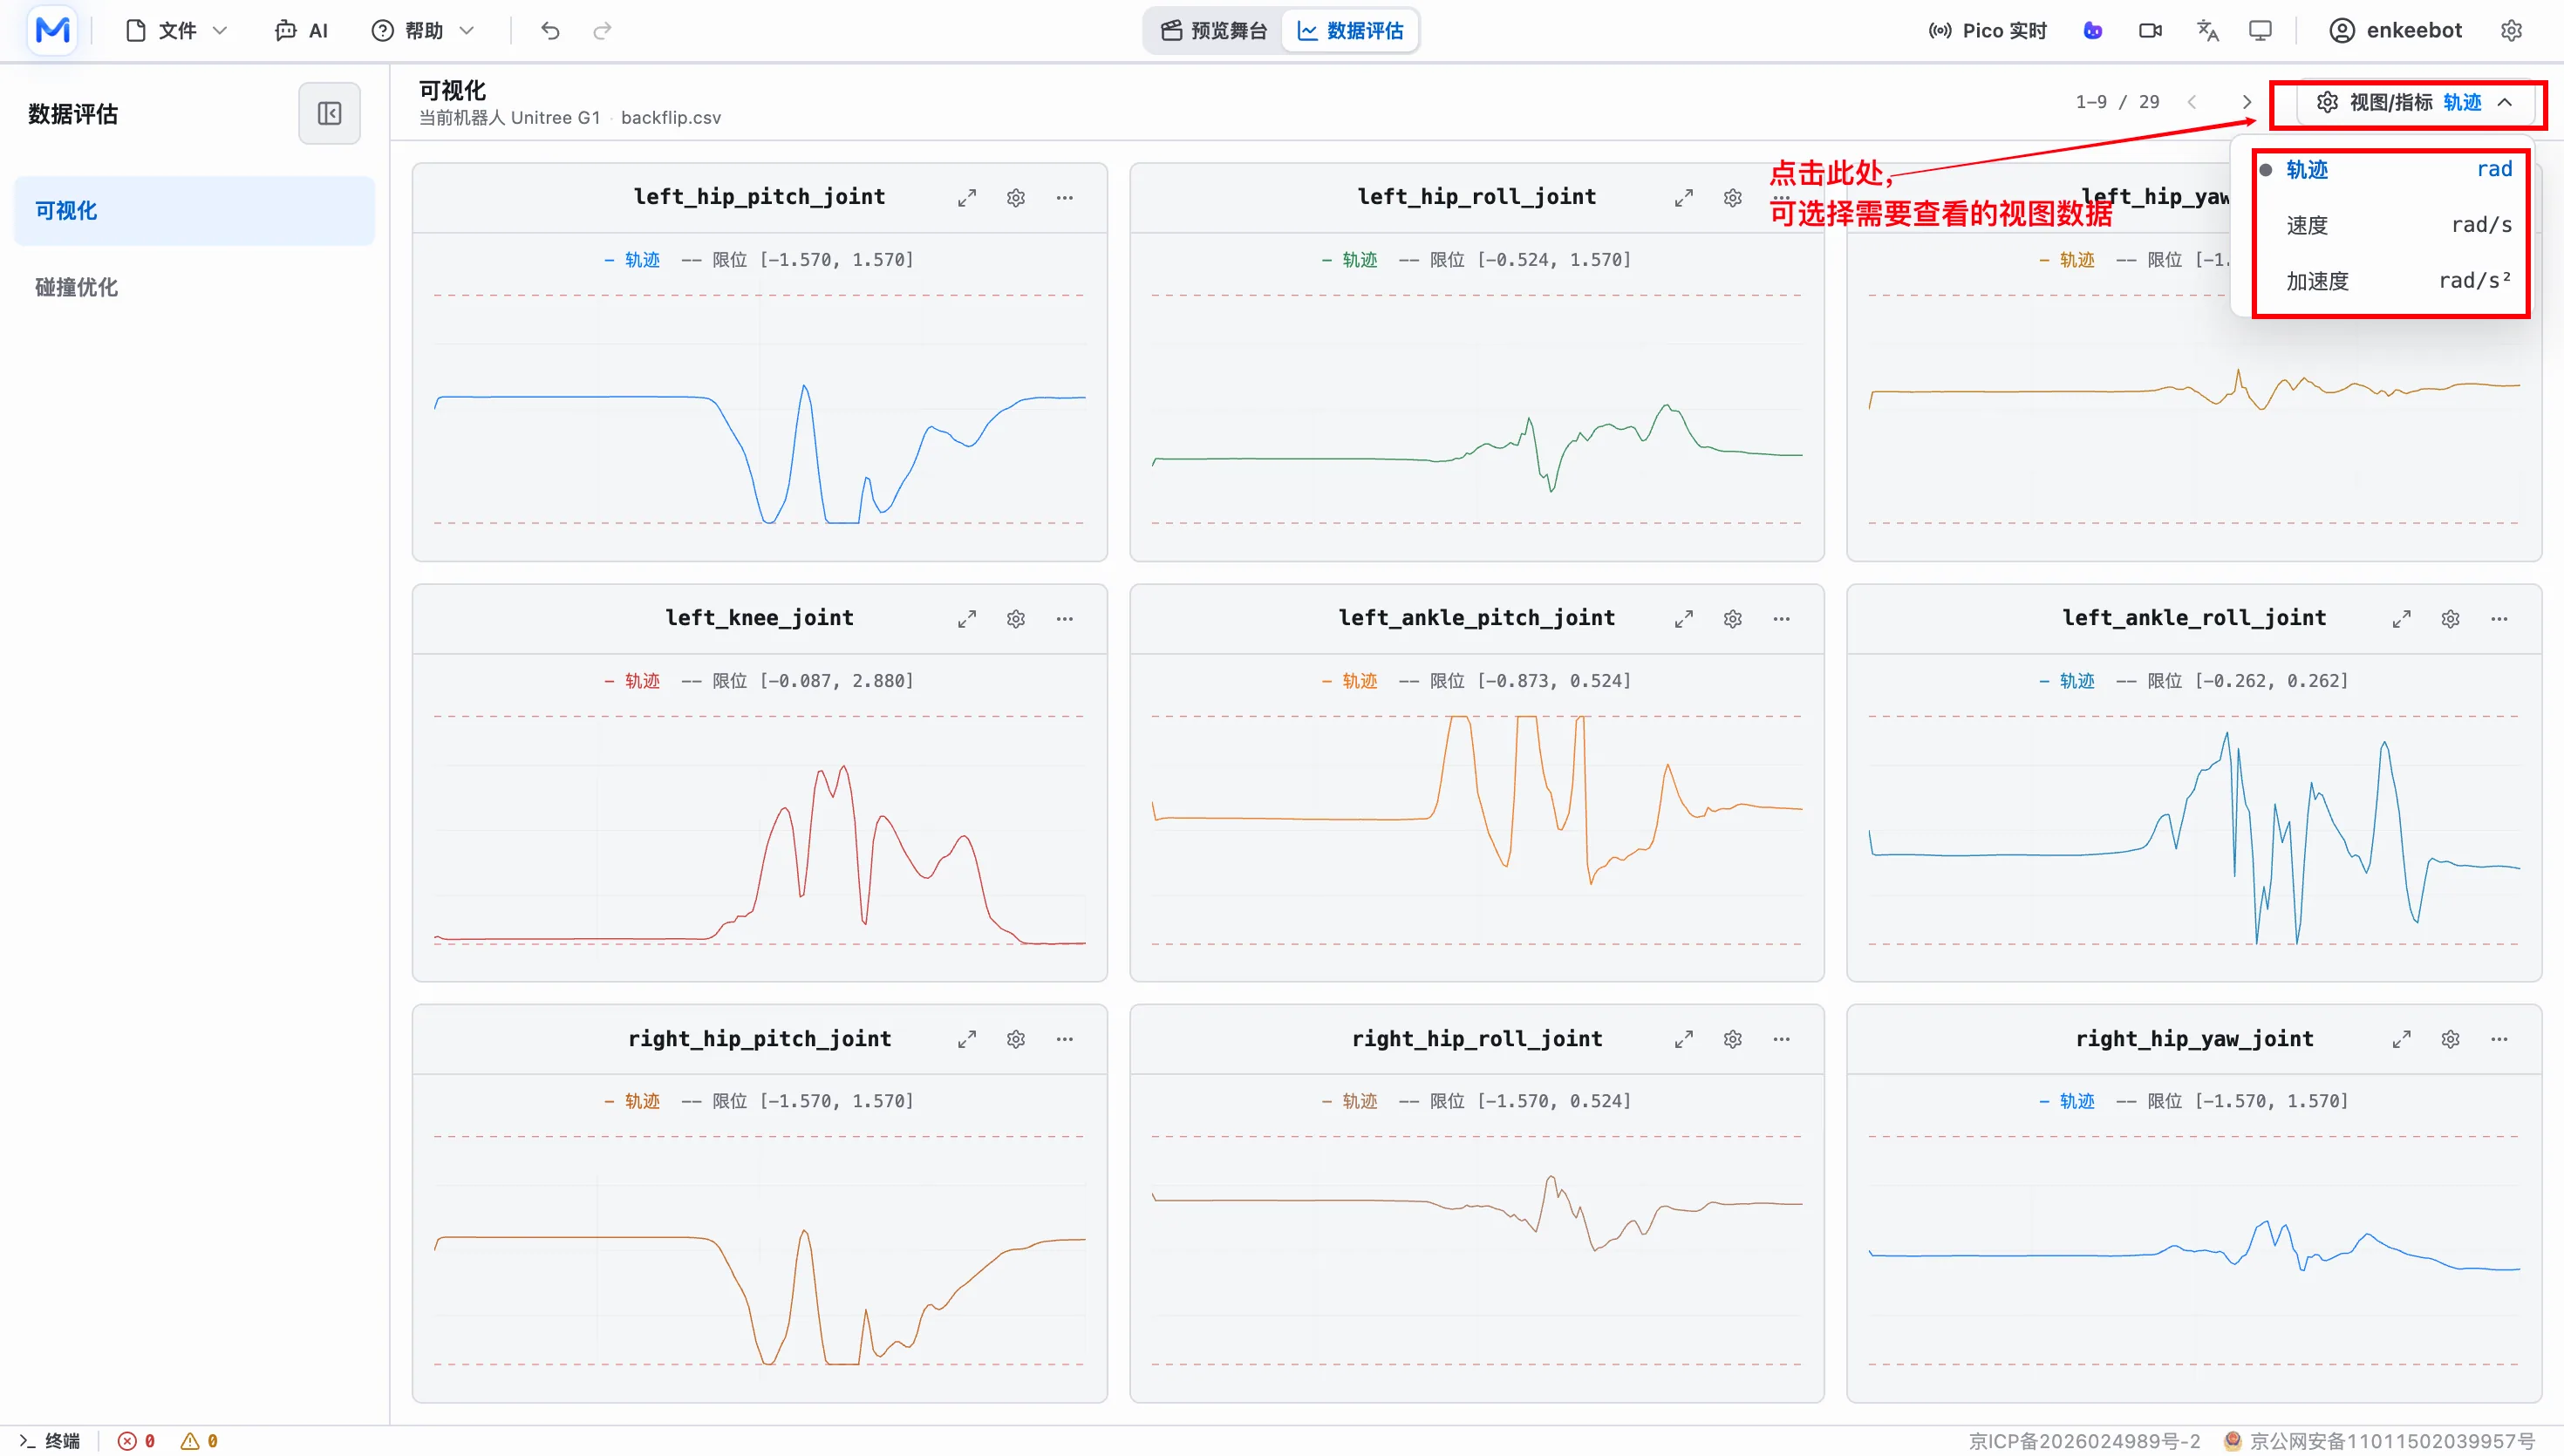
Data Evaluation shows motion-related data and key joint states for checking motion quality, contact relationships and collision issues.
Development mode also includes mapping metrics such as motion fidelity, joint position and velocity limits, foot sliding, ground penetration, acceleration and jerk.
Action: switch the displayed data view.
Motion Recording And Basic Tools
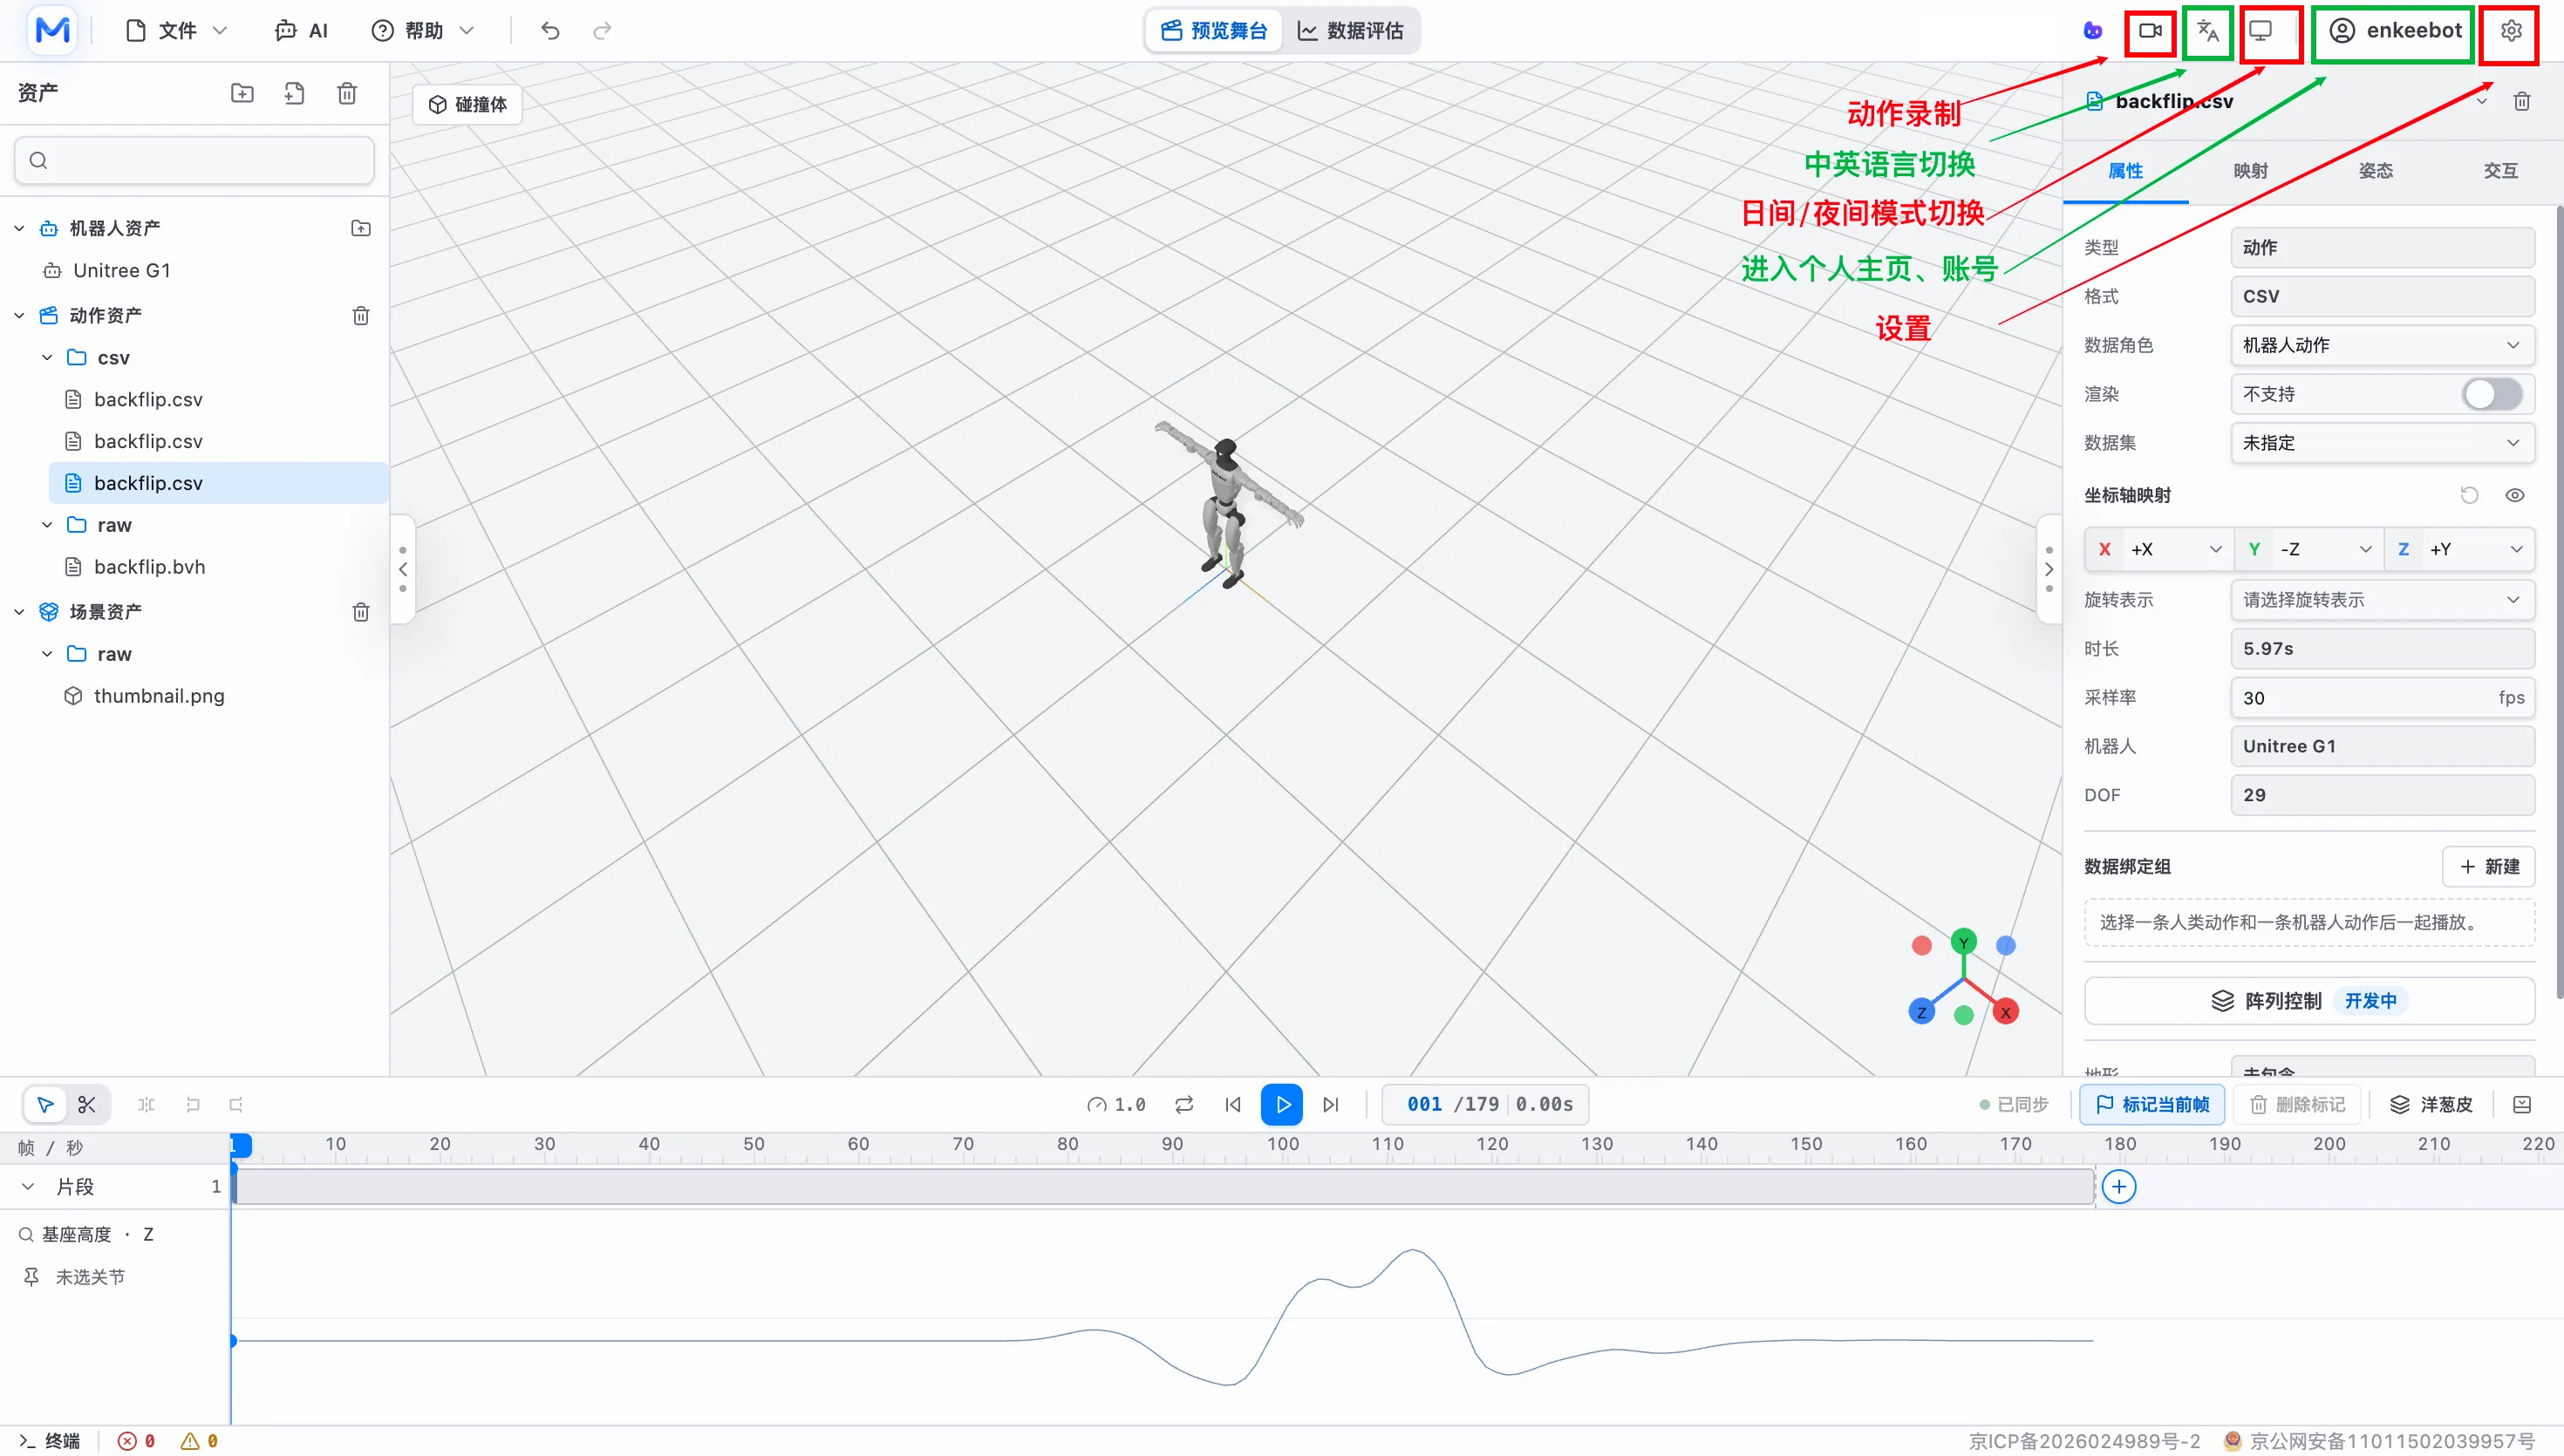
The top toolbar provides motion recording and basic tools that support the data-processing workflow.
- Motion recording: click the recording entry to start or stop recording the preview stage. The video downloads automatically after recording. Output format can be MP4, WebM or automatic according to settings.
- Language switch: switch between Chinese and English interfaces.
- Display tools: change theme or display-related settings.
- Account entry: open the profile page or account-related pages.
- Settings: open global settings.
Exporting And Saving
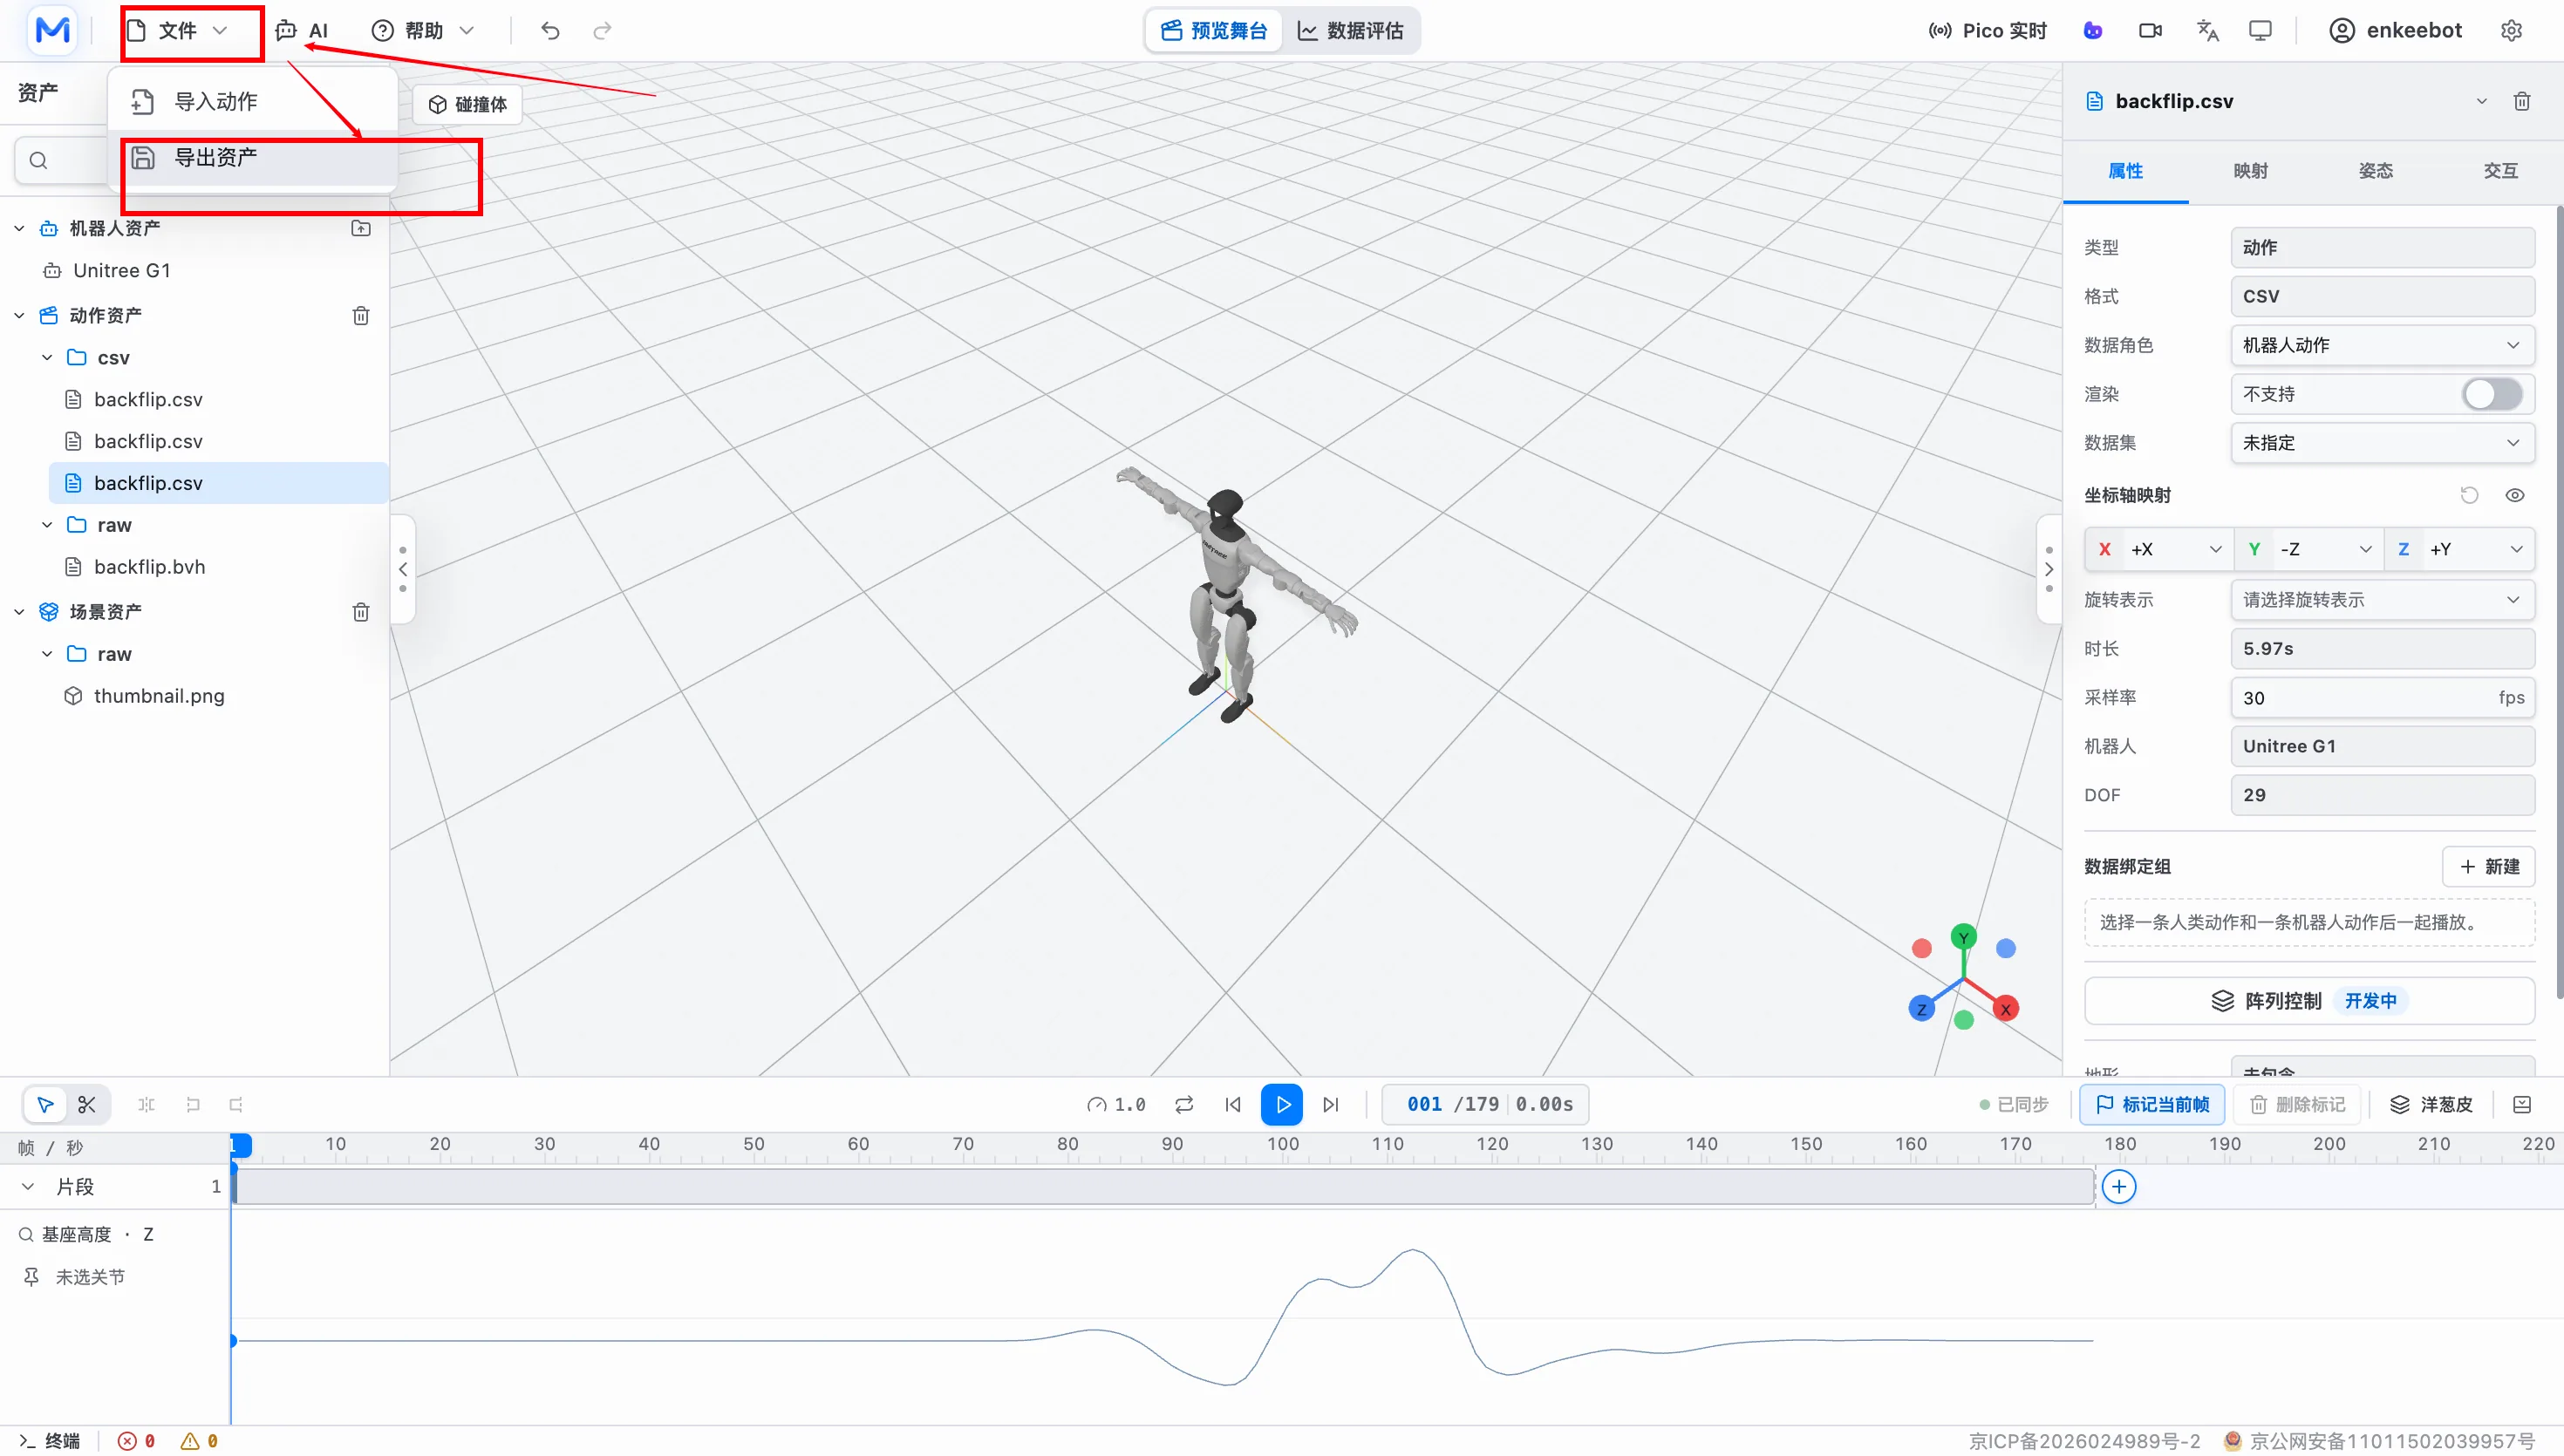
After inspection and editing, export from the top File menu.
Note: online saving is not supported in the current version. Save results locally in time.
Exporting delivers processed motion, model or project resources as a local file, folder or ZIP package. Before exporting, finish preview and evaluation checks.
Open the top File menu and choose asset export.
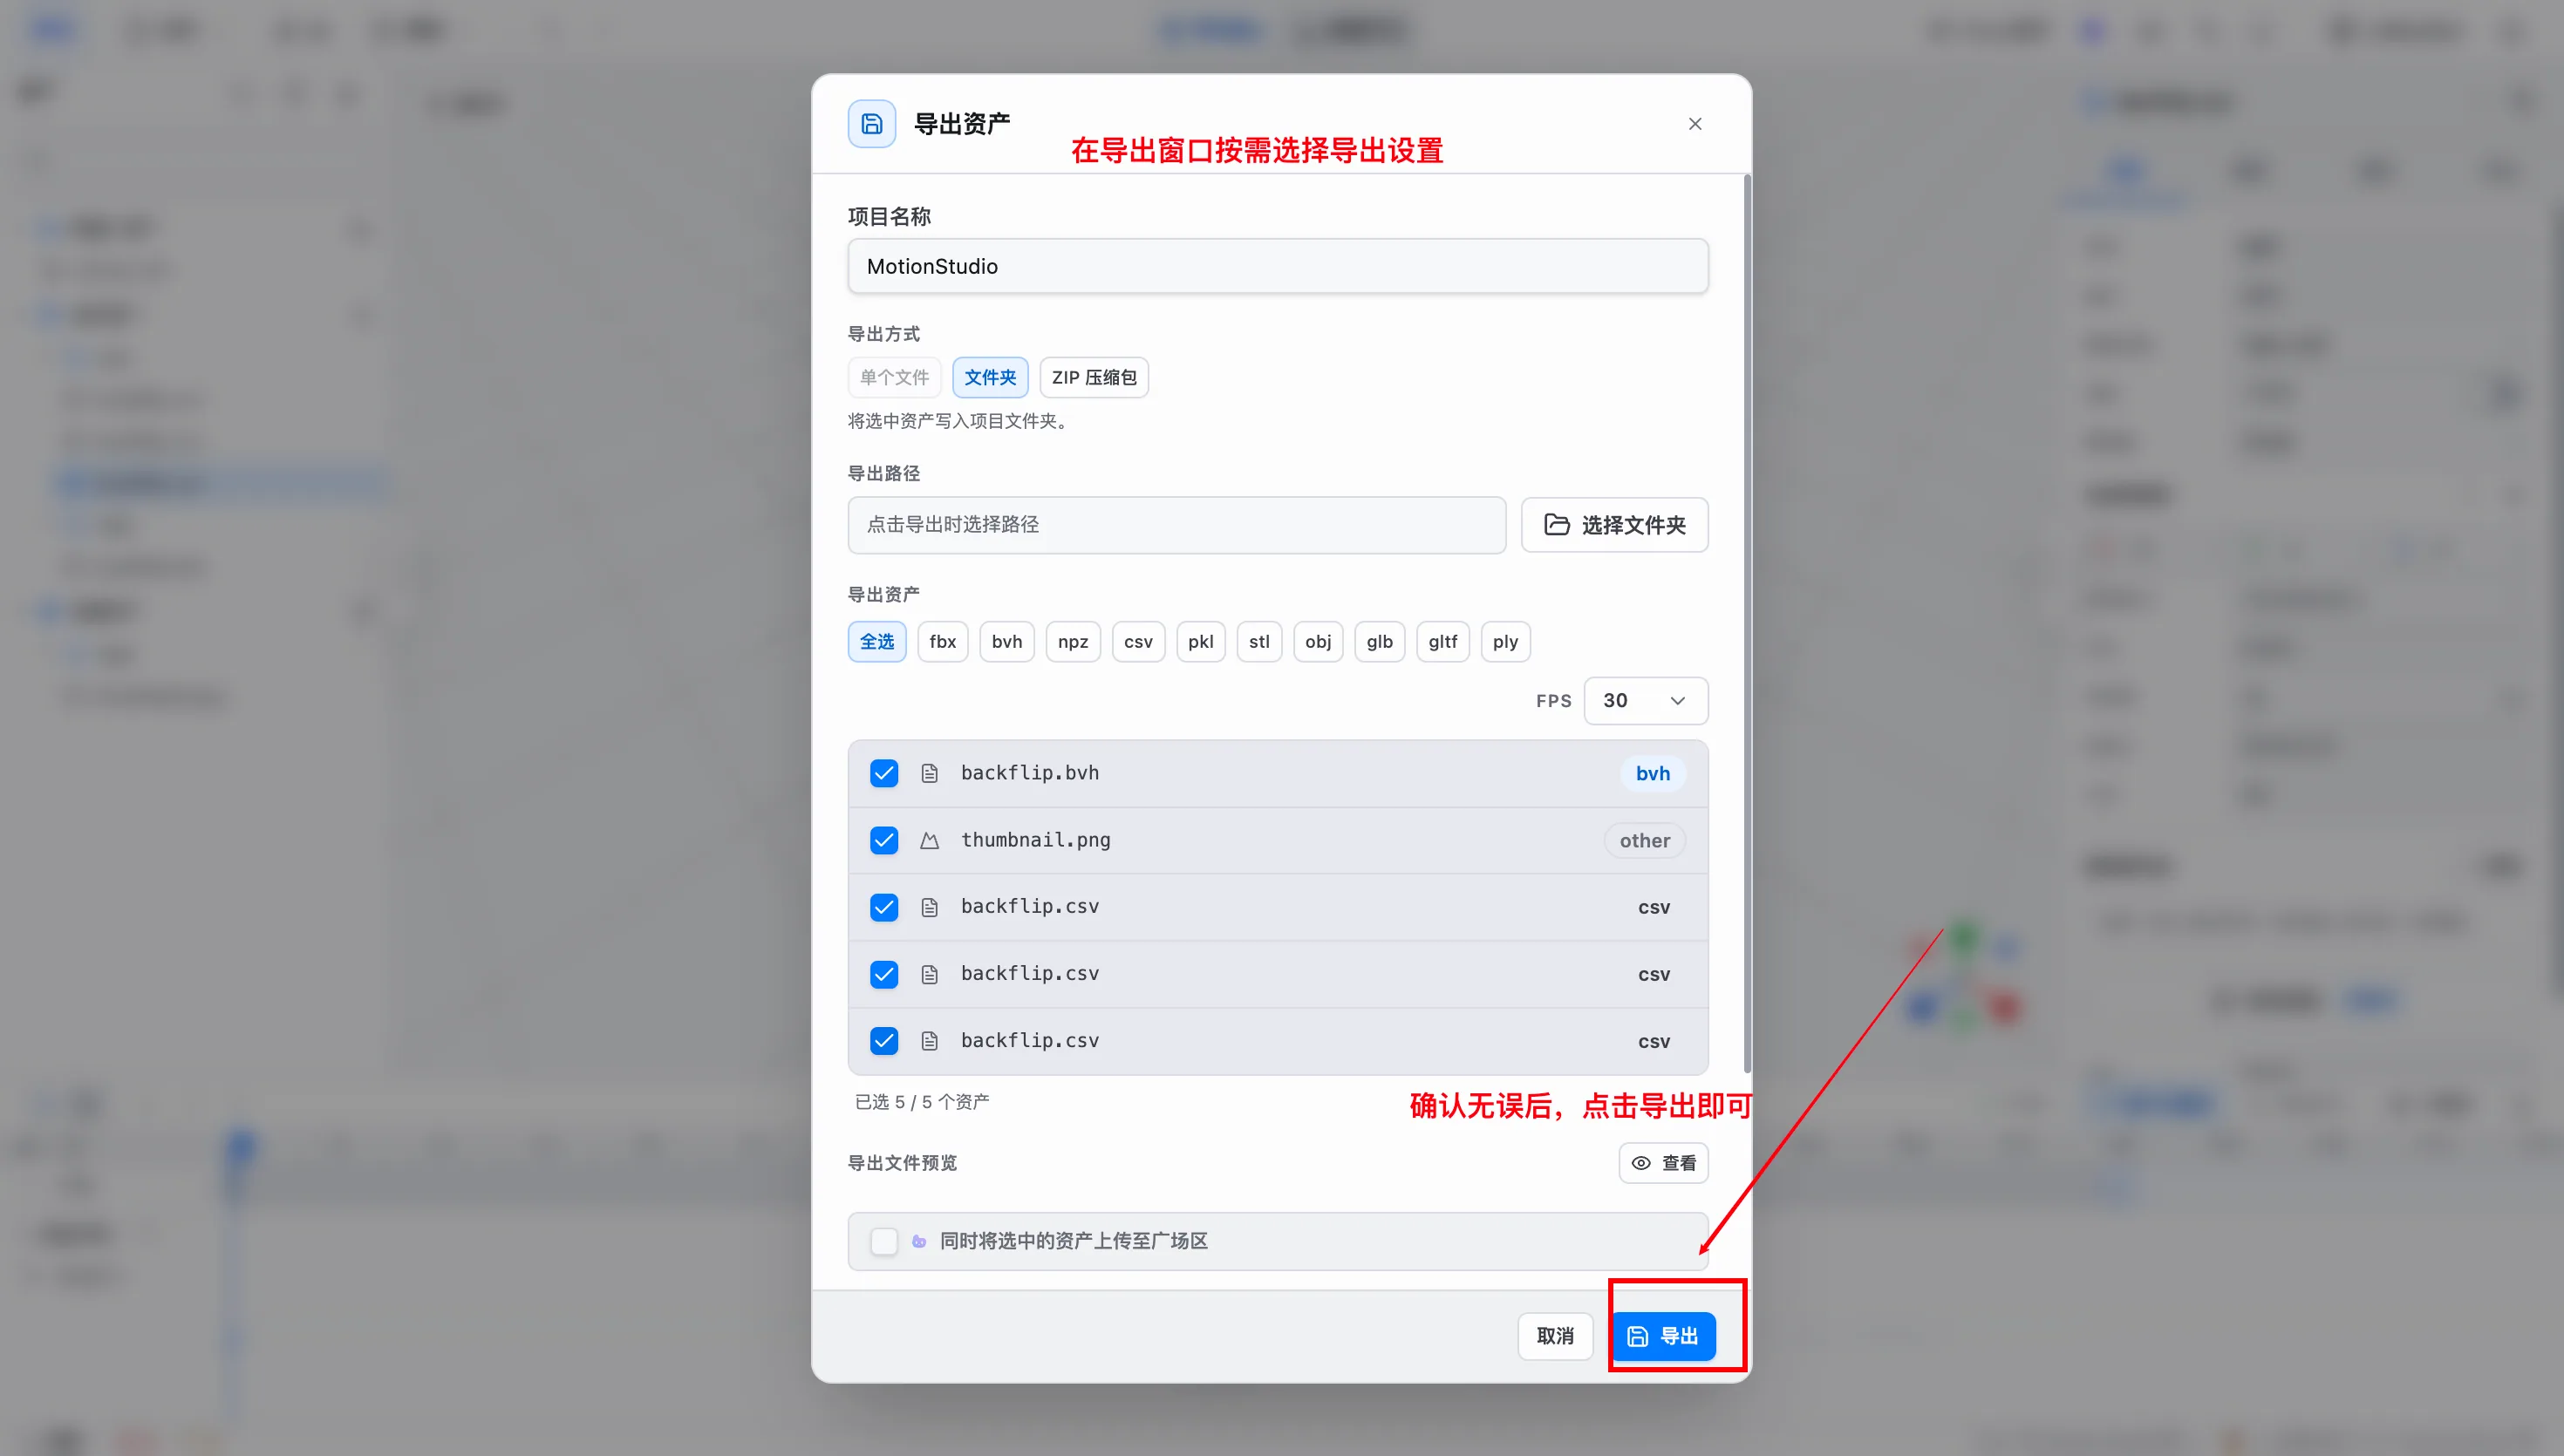
In the export interface, select the required parameter settings and click Export after confirming they are correct.
After export, check that the local file, folder or ZIP package is complete.
| Export item | Current function |
|---|---|
| Export mode | file, directory, zip |
| FPS | 30, 50, 60 or custom |
| Asset filtering | List and choose by exportable format |
| Additional capabilities | Export GIF preview, version notes, optional upload to the gallery |
FAQ
What if imported motion does not display?
First confirm file format and data role, then check whether the motion asset has been placed on the timeline or bound to a robot.
What if CSV motion points in the wrong direction?
Check axis mapping and rotation representation in the right properties panel. For Robot Motion, also confirm whether the root quaternion order is XYZW or WXYZ.
Why does the robot pose look wrong?
Check source-data axes, quaternion order, root node, joint order and target robot DOF first. Re-run T-pose calibration when needed.
Can mapping results overwrite the original motion?
This is not recommended. The current flow works better when the result is saved as a new robot motion asset, making review and comparison easier.
Why are not all data-evaluation metrics visible?
The production interface focuses on visual inspection and collision optimization. Some mapping metrics depend on development mode and backend APIs.
Appendix Data Format Notes
Robot CSV
- Supports CSV files with or without headers.
- Supports the root position (3) + root quaternion (4) + dof_pos data layout.
- The right properties panel can set the data role: Human Motion for source data or Robot Motion for retargeted results. External imports default to source data; the flow does not infer the role from the file name.
- X/Y/Z axes can each be mapped to a global direction: ±X, ±Y or ±Z. Robot Motion can use XYZW or WXYZ root quaternion order; Human Motion uses axis-angle rotation.
- Data role, quaternion order, rotation representation, axis mapping, FPS, robot model,
motionContractId,resourcePackageId,tagsand related settings are saved and restored throughmotion-studio-project.json. - Robot model preview, timeline playback and root translation are supported. Quaternion order is not inferred automatically, so choose it manually when the dataset has no metadata.
Human SMPL-X NPZ
- Supports the split-pose layout: root_orient + pose_body + trans.
- Reads frame rate from mocap_frame_rate, mocap_framerate, framerate or fps.
- Reads gender and betas.
- Supports SMPL-X skeleton preview, timeline playback and root trajectory.
- Keeps the full root pose and preserves the character's heading relative to movement direction.
- Does not currently apply dmpls soft-tissue dynamics.