
URDF Studio scene workspace
This page covers the URDF Studio scene workspace for arranging robots, environment assets, and terrain, and adjusting object poses and terrain parameters. See the product overview to compare and switch workspaces. To edit a robot's links, joints, geometry, collision bodies, and physical parameters, follow the Model workspace.
Save the current project locally before creating a new scene, opening another project, refreshing, or closing the page. Assistant task history and the Completed files panel do not replace a project backup.
Enter the Scene Workspace
- Open URDF Studio, click the workspace mode at the upper left, and choose Scene.
- Locate Scene objects and Asset library on the left, the 3D view in the center, and Properties on the right. With no object selected, Properties shows the scene name, ground, and environment settings.
- Search the asset library and click Add on a card. The object appears in the scene tree and the 3D view.
- Select the object in the scene tree. Use Move, Rotate, or Position and rotation in Properties to adjust its pose. Positions use meters; rotations can use degrees, radians, or quaternions.
- Click Frame entire scene and check the placement for overlap, floating objects, or penetration into the ground.
The screenshot shows an added and selected Pyramid stairs terrain. The scene tree contains one object and the inspector shows its terrain parameters.
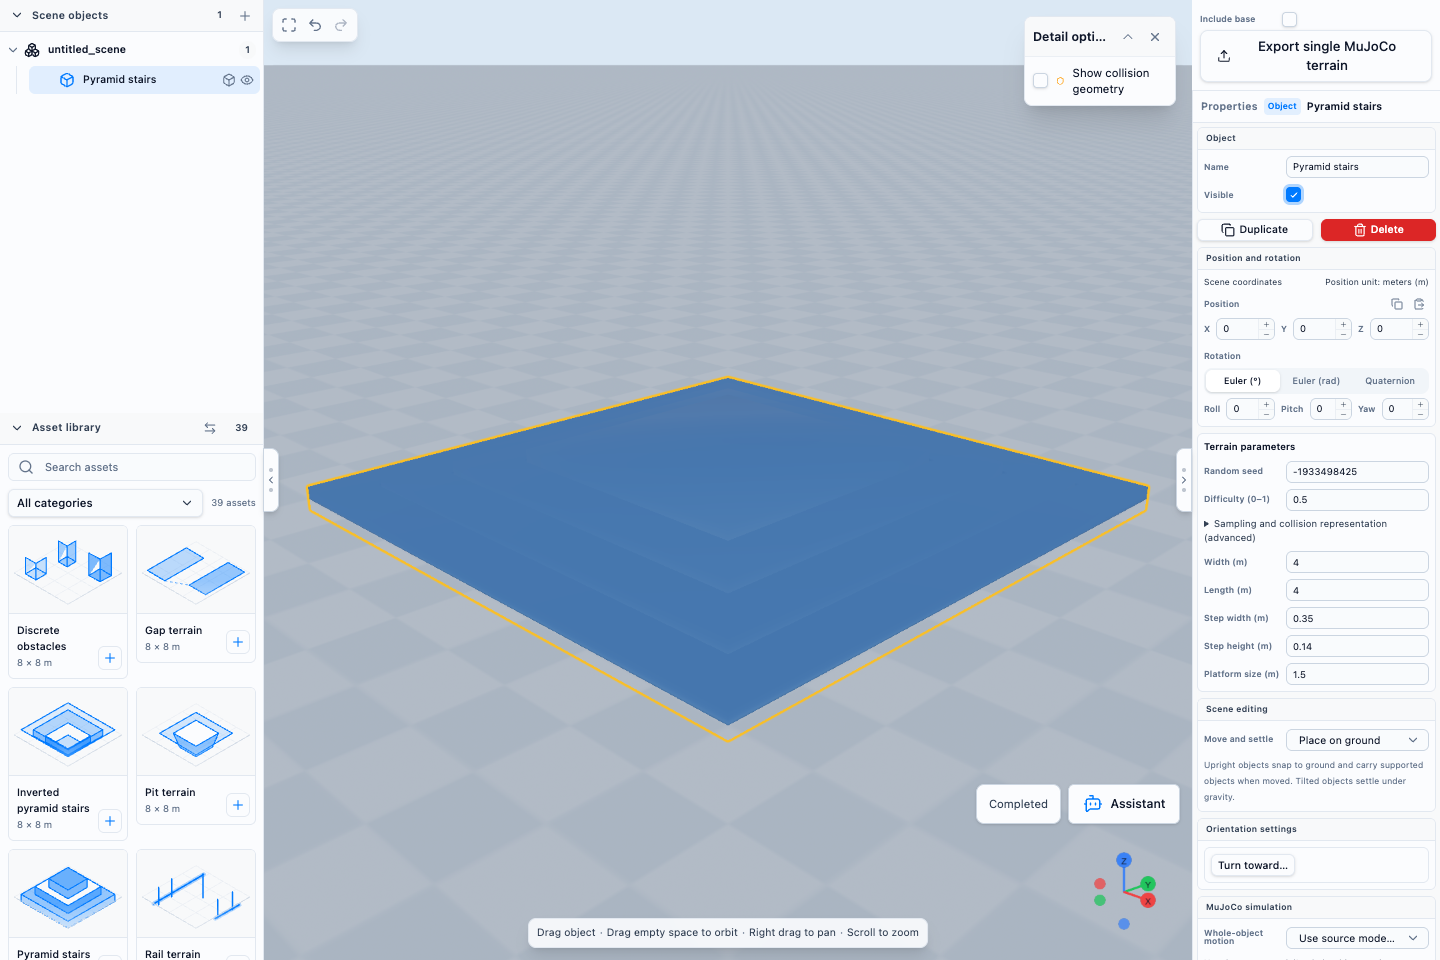
Use the scene tree to manage objects. Edit a robot's internal structure in the model workspace. Editor locking, visibility, and simulation motion settings serve different purposes.
Add and Adjust Terrain
Built-in templates provide stairs, gaps, pits, stepping stones, and other test environments. This example uses Pyramid stairs.
- Search the Asset library for Pyramid stairs and click Add.
- Select the terrain in Scene objects and find Terrain parameters in the right inspector.
- Set Width (m) and Length (m) to
4. After leaving the input, the 3D view updates to a 4 × 4 meter terrain. This example uses a step width of0.35meters, step height of0.14meters, and platform size of1.5meters. - Review Random seed and Difficulty (0–1). To reuse the terrain, retain the template and parameter values and save the scene project; a preview image alone is insufficient.
- Enable Show collision geometry in Detail Options and inspect the support surfaces and boundaries from several angles. Expand Sampling and collision representation (advanced) when you need to change sampling density or collision representation.
- Select the scene root to check ground settings. Automatic ground provides support for features such as stairs. For gaps and pits, inspect the local openings.
Done when: the terrain exists in the scene tree, its updated shape is visible, and both width and length read 4 meters, as shown above.
Available parameters and their meaning depend on the template. Denser sampling increases geometry data. A terrain that renders or exports successfully has not necessarily been validated for robot traversal. Test contact, stability, and traversal with the actual robot in the target simulator.
Use the AI Scene Assistant
The assistant can explain the current scene, find assets, create terrain, or modify existing objects. Sign in before using it. Available assets depend on your account permissions and resource availability.
- Click Assistant in the scene view.
- Choose an Edit scope. Use Entire scene to add objects or arrange the scene. To adjust one object, select it first and choose Selected object only.
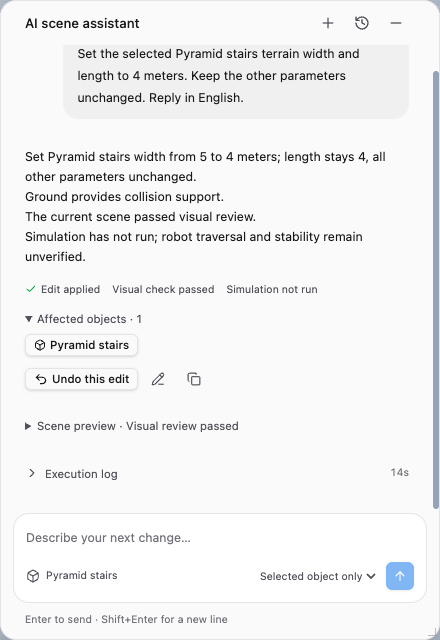
- Enter a specific request, such as “Set the selected Pyramid stairs terrain width and length to 4 meters. Keep the other parameters unchanged.” Click Send.
- Watch the progress and canvas. Changes appear directly in the current scene. You can minimize the assistant while observing the result. Wait for the request to finish before making another edit.
- Review the response, affected objects, scene preview, and execution log, then verify that the object parameters match your request.
Done when: the request finishes, Edit applied appears, and the parameters match the request. This actual result shows both Visual check passed and Simulation not run.
Understand Checks and Undo
- Visual check passed refers to the preview check for this request. Confirm dimensions, collision geometry, and task requirements yourself.
- Simulation not run means robot stability, contact behavior, and traversal have not been validated in simulation.
- If a request needs confirmation, fails, or reports an unavailable service, inspect the current canvas and execution log first. Completed changes may remain; failure does not imply an automatic rollback.
- Canvas Undo can reverse changes step by step. When available, whole-request undo can reverse that edit. It may become unavailable after later edits or reopening the project.
- Manually editing or undoing the scene while the assistant works may stop the task. Inspect the preserved state before sending a new request.
- New conversation clears the conversation context while retaining the scene and task records. It does not create an empty scene. History describes earlier operations and may differ from the current canvas.
Check Assets and Simulation Settings
An asset from the library or a local file may provide only visual geometry, or may also contain a native scene, collision geometry, mass, and joints. A visual preview does not establish physics readiness.
- Select the object and review Source information and any related notices. If only a visual model is available, obtain resources suitable for your target simulator.
- Under MuJoCo simulation → Whole-object motion, choose the source settings, a fixed whole object, or whole-object motion. This controls the object as a whole; it does not change internal joints or editor locking.
- Review Mass and inertia (advanced). Compare estimated values with reliable physical data. Re-estimating mass and inertia does not create missing collision geometry.
- Before export, check ground support, object relationships, initial intersections, and model dependencies.
Import native scenes with their complete folders or dependency packages, preserving directory structure. A preview without the native dependencies may remain usable for visual arrangement while portable project saving or target-format export fails. Follow the notices to supply the missing resources; changing a file extension does not fix them.
Save and Reopen a Scene Project
A .botscene file preserves the scene's editing state for later work. MuJoCo and OpenUSD dependency packages are for use in target tools.
- Choose File → Export project. Follow the browser prompt to select a local destination and wait for saving to finish.
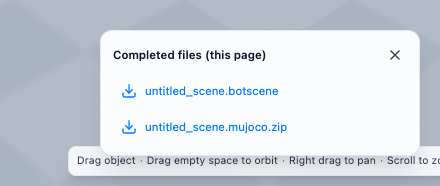
- For a separate backup, choose File → Download project copy. When Completed files (this page) appears, click the
.botscenefilename to download it. - Confirm that the file exists locally. A message that the copy is ready does not mean it has been saved to disk.
- To reopen it, choose File → Import file/archive and select the
.botscenefile. If there are unsaved edits, back them up before confirming Open and replace. - Check the scene name, object count, poses, and terrain parameters. This example should restore Pyramid stairs with width and length both set to 4 meters.
The Completed files screenshot below shows where prepared projects and packages can be downloaded. After clicking a filename, also confirm that the browser finished the download.
Project files do not grant extra asset permissions. Online operations may require renewed sign-in and resource authorization. Downloading a copy also does not clear the current scene's unsaved-change status.
Export a MuJoCo or OpenUSD Scene
- Save the
.botsceneproject first and check source resources, collision geometry, and simulation settings. - Choose File → Export, then select MuJoCo or OpenUSD in Export scene.
- Click Export. The app checks target-format compatibility before generating a dependency package when no issue requires action.
- If compatibility notices appear, review the affected objects, reasons, and suggested actions. Resolve blocking issues before exporting again. Read any notices that permit confirmation before continuing.
- Get the package from the browser's downloads or the Completed files panel. Preserve its directory structure when extracting it, open the main scene file in the target tool, and check for missing dependencies.
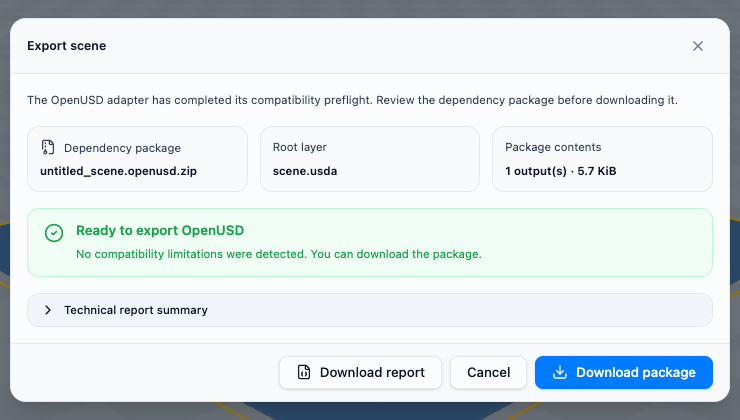
Done when: the package exists locally and loads after reimport or in the target tool. Both the MuJoCo and OpenUSD packages in this example were reimported for inspection. This is not a robot simulation test.
MuJoCo and OpenUSD use different physics and scene representations. Import support for one format does not guarantee lossless conversion into another. Follow the compatibility results for the current project. In MuJoCo, Isaac Sim, or another target tool, also verify materials, collisions, joints, and physical behavior.
To export one terrain, select it and use Export single MuJoCo terrain. This does not replace a full scene project backup. Direct terrain integration with BotLab remains planned; save the files and use them in your target tool for now.
Troubleshooting
| Symptom | What to check and do |
|---|---|
| Assistant or terrain parameters are missing | Check that the deployment includes this release and switch to Scene. Terrain parameters appear only when a parameterized terrain is selected. |
| The assistant cannot add objects | Check Edit scope. Adding objects requires Entire scene. |
| A request failed but the canvas changed | Inspect the execution log and current parameters. Keep or undo the changes before sending another request. |
| Visual checks pass but simulation is unstable | Check collision geometry, initial intersections, mass and inertia, ground, and whole-object motion. Retest in the target simulator. |
| An asset renders but saving or export fails | Review native dependency and permission notices. Supply original files, meshes, and textures, and sign in again if required. |
| Completed files appears but there is no local file | Click the filename and check the browser's download status. Complete downloads before leaving the page. |
| Compatibility checks block export | Resolve unsupported semantics or missing dependencies as directed. Ignoring the error or changing the extension will not fix it. |
Last updated: October 21, 2026.